
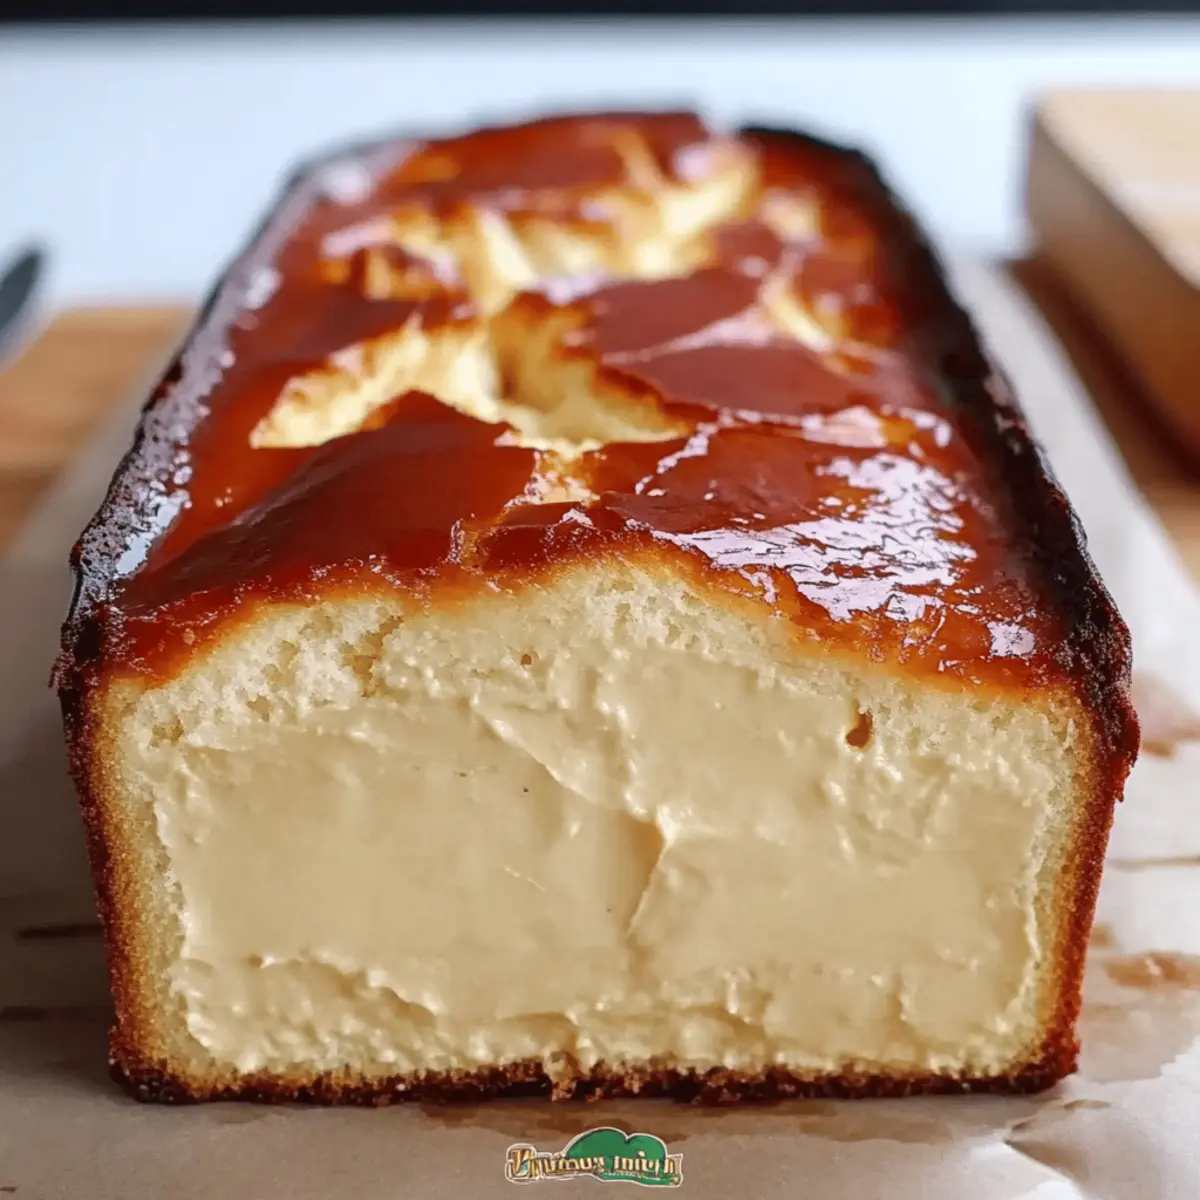
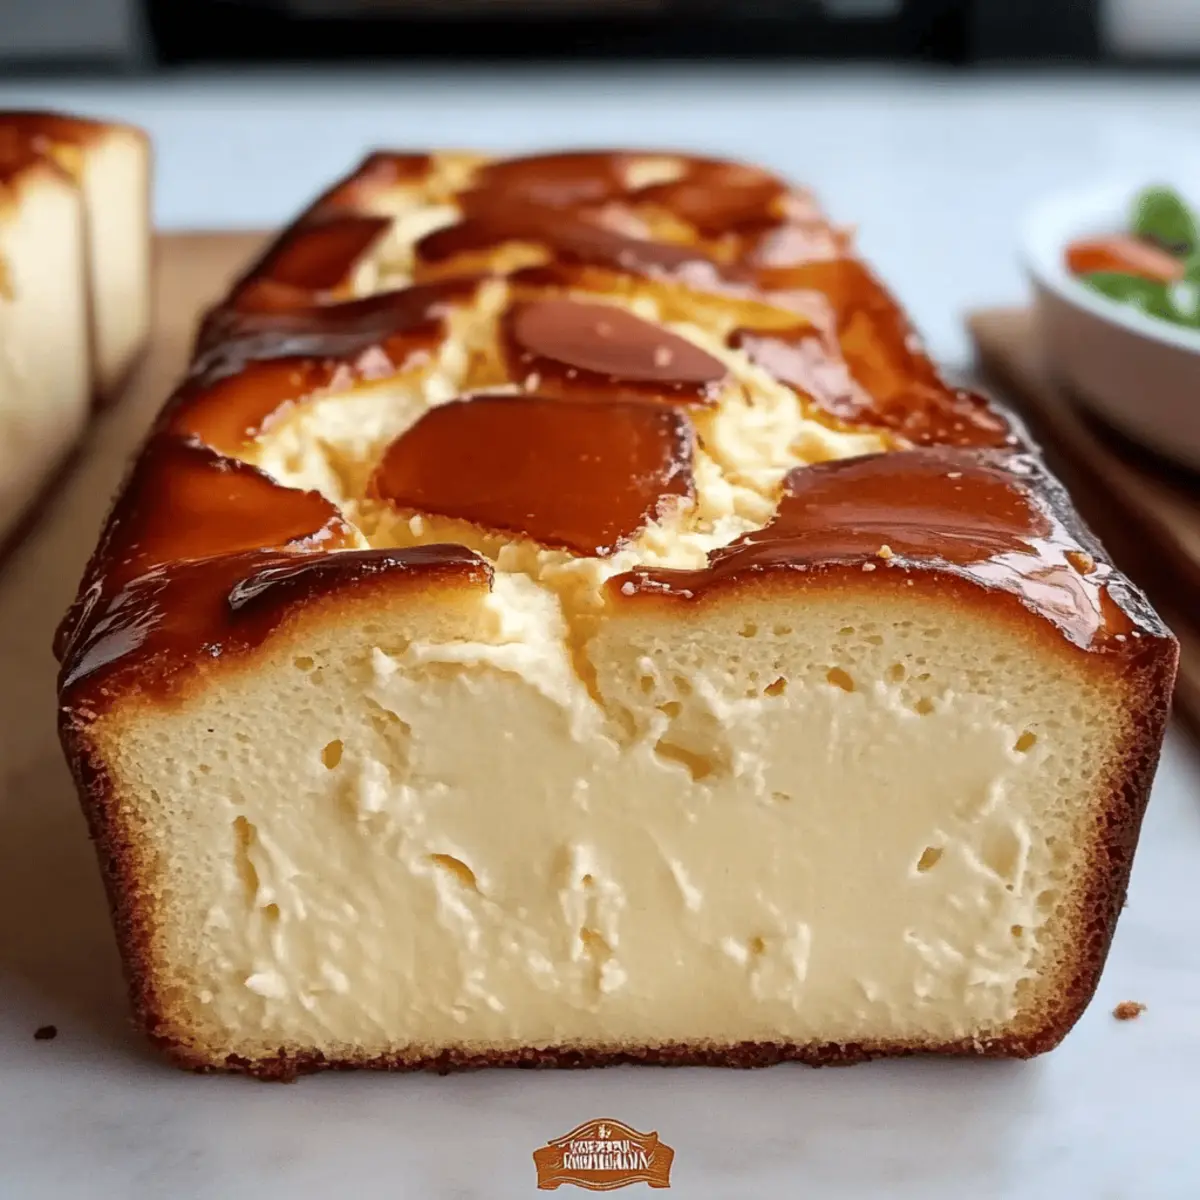
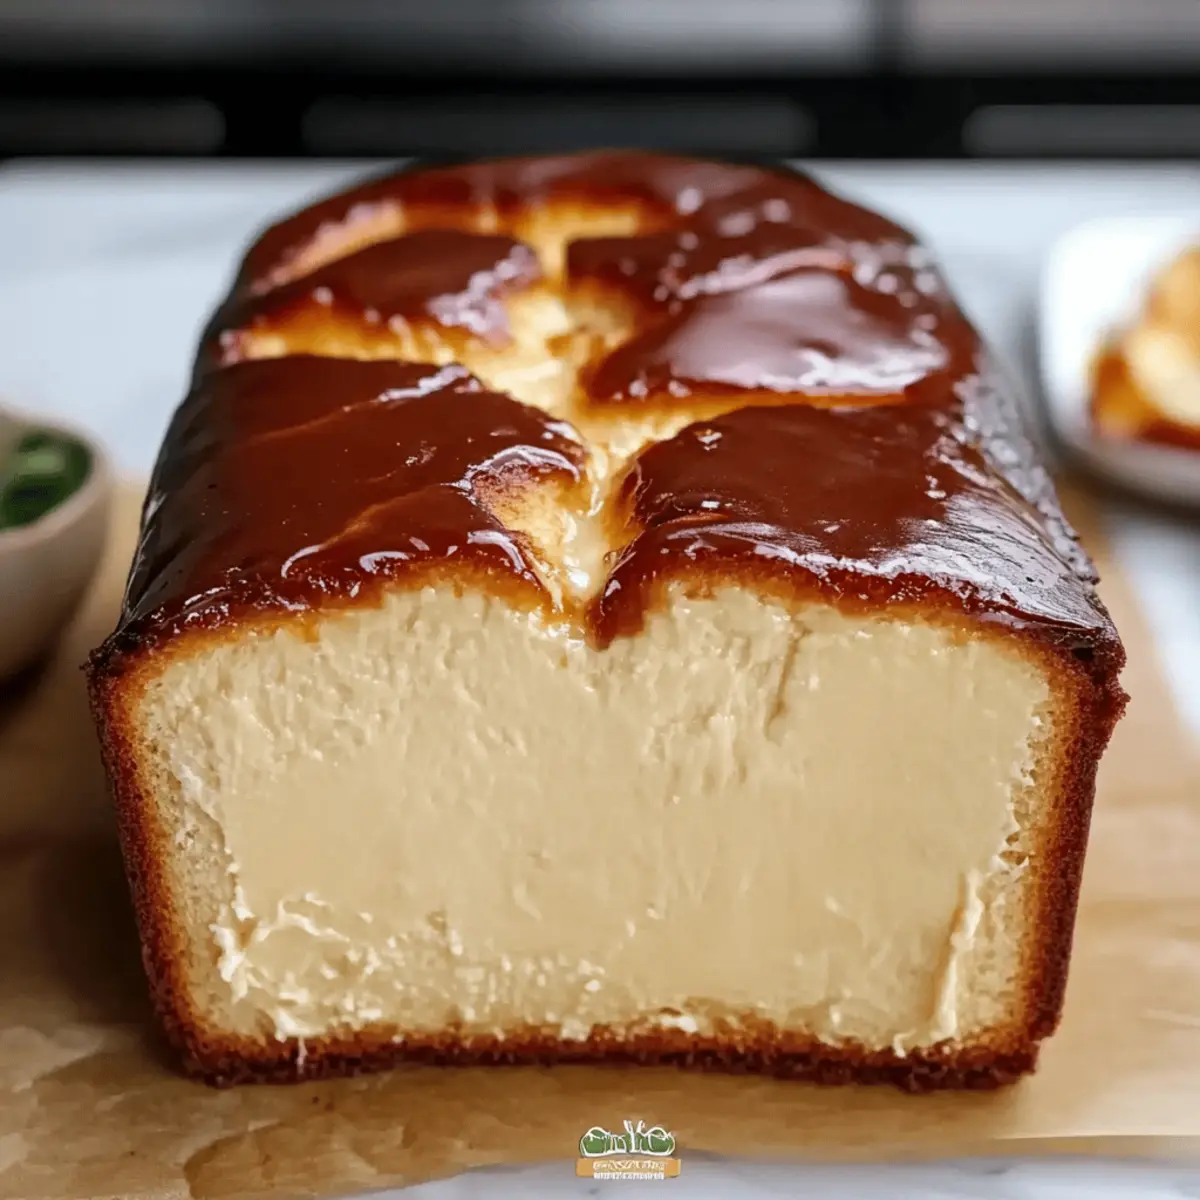
As I stirred the rich cream cheese mixture, a delightful aroma filled my kitchen, promising indulgence with every whisk. This Burnt Basque Cheesecake in a Loaf Pan has quickly become my go-to dessert when I want to impress friends or treat myself to something truly special. The beauty of this recipe lies not only in its stunning flavor but also in the effortless preparation—ready in just 55 minutes, plus chilling time. With its creamy center and delightfully charred top, it's a crowd-pleaser that also accommodates those busy evenings. Every bite is an invitation to enjoy a moment of sweet relaxation, whether you’re serving it after dinner or enjoying a slice with morning coffee. Curious to learn the simple steps behind this captivating dessert? Let's dive into the recipe!
Why is This Cheesecake So Special?
Unforgettable flavor: The combination of rich cream cheese and lightly burnt top creates a dreamy balance between sweet and savory.
Quick prep time: Simply 10 minutes of hands-on work means you can whip this treat up in no time.
Impressive appearance: The rustic, charred exterior makes for a stunning presentation at any gathering.
Chill out for later: Prepare ahead of time with a minimum of 4 hours chilling, allowing you to focus on your guests.
Versatile serving options: Enjoy it chilled or at room temperature, and consider topping with fresh berries or a drizzle of caramel for an added touch. For tips on enhancing your cheesecake experience, check out our serving suggestions.
Burnt Basque Cheesecake Ingredients
• Make sure you have these essentials for a memorable dessert!
For the Batter
- Full-fat cream cheese – ensures that your cheesecake is rich and creamy in texture.
- Granulated sugar – balances the flavors and adds a touch of sweetness to the burnt basque cheesecake.
- Large eggs – provide structure and richness; use room temperature for best mixing results.
- Heavy cream – adds smoothness and luxuriousness to the cheesecake, contributing to its irresistible flavor.
- All-purpose flour – helps to stabilize the batter just enough; don’t overmix!
- Vanilla extract – enhances the cheesecake’s flavor profile; a splash of pure extract is always best.
- Salt – brings out the natural sweetness and flavor of the other ingredients, elevating your dessert experience.
Indulge in this delectable Burnt Basque Cheesecake and embrace the joys of homemade desserts!
Step‑by‑Step Instructions for Burnt Basque Cheesecake
Step 1: Preheat Your Oven
Begin by preheating your oven to 400°F (200°C). This ensures that your Burnt Basque Cheesecake bakes evenly, achieving that signature charred top. While the oven heats, gather your ingredients and prepare your loaf pan for a seamless baking process.
Step 2: Prepare the Loaf Pan
Line a 9×5 inch loaf pan with parchment paper, allowing some overhang on the sides. This critical step makes it easy to lift your cheesecake out later, keeping its beautiful shape intact. Take care to smooth out the paper to avoid any wrinkles that could affect baking.
Step 3: Mix the Cream Cheese and Sugar
In a mixing bowl, combine 1 ½ cups of full-fat cream cheese with ¾ cup of granulated sugar. Beat the mixture using an electric mixer on medium speed until it reaches a silky smooth consistency, about 2-3 minutes. You'll know it's ready when there are no lumps and it feels creamy to the touch.
Step 4: Incorporate the Eggs
Add the two large eggs to the cream cheese mixture, one at a time. Mix on low speed, ensuring each egg is fully incorporated before adding the next. This step helps create a rich, cohesive batter, essential for the texture of your Burnt Basque Cheesecake.
Step 5: Add Cream and Flavorings
Pour in ½ cup of heavy cream, ½ teaspoon of vanilla extract, and ⅛ teaspoon of salt. Mix again until the batter is smooth and well-blended. The heavy cream will add a luxurious smoothness, and the salt will enhance the overall flavor profile.
Step 6: Fold in the Flour
Gently fold in 1 tablespoon of all-purpose flour to the batter using a spatula. Take care not to overmix; you want just enough to combine it without losing that deliciously airy texture. Ensuring minimal mixing keeps your Burnt Basque Cheesecake light and glorious.
Step 7: Pour the Batter
Carefully pour the cheesecake batter into your prepared loaf pan. Use a spatula to level the top for an even bake. Visual cues here matter; a smooth surface promotes even cooking and helps with that lovely caramelization on top.
Step 8: Bake to Perfection
Place the loaf pan in your preheated oven and bake for 45 minutes. As it bakes, the cheesecake will puff up and the top will develop a deeply golden brown crust. Remember, a slightly jiggly center is expected and will firm up after cooling.
Step 9: Cool in the Pan
Once baked, remove the cheesecake from the oven and let it cool in the pan for about 10 minutes. Carefully lift it out using the parchment paper edges. This step is crucial for the cheesecake's shape while it transitions to room temperature.
Step 10: Chill Before Serving
Allow your Burnt Basque Cheesecake to cool completely at room temperature, then refrigerate it for at least 4 hours or overnight before serving. Chilling helps the flavors meld beautifully and ensures a decadent, creamy texture that everyone's sure to enjoy.
What to Serve with Burnt Basque Cheesecake?
Creating a perfect meal is all about balancing flavors and textures, and this cheesecake is a delightful centerpiece.
-
Fresh Berries: The tartness of raspberries or strawberries adds a vibrant contrast, enhancing the rich flavor of the cheesecake and making each bite more refreshing.
-
Whipped Cream: A dollop of lightly sweetened whipped cream provides an airy texture, complimenting the dense creaminess of the cheesecake for a heavenly duo.
-
Espresso or Coffee: A robust cup of espresso brings out the cheesecake’s flavors while adding warmth and depth, making it a perfect way to round off your meal.
-
Chocolate Sauce: Drizzling warm chocolate sauce over each slice offers a luxurious richness that beautifully pairs with the cheesecake's burnt crust.
-
Caramel Drizzle: Smooth caramel adds a sweet, buttery finish to each bite, making for a delightful dessert that satisfies both chocolate and caramel lovers.
-
Nuts or Pralines: Chopped pistachios or hazelnuts introduce a satisfying crunch, enhancing the overall texture and infusing a toasted nut flavor that deepens the experience.
-
Mint Leaves: Fresh mint not only adds a splash of color but also a refreshing brightness that complements the richness of the dessert beautifully.
-
Vanilla Ice Cream: Pairing with a scoop of creamy vanilla ice cream adds an extra layer of indulgence, with its cool texture contrasting the warm, burnt top of the cheesecake.
-
Sparkling Wine: A glass of chilled Prosecco or Champagne brightens the meal and offers a celebratory feel, perfect for elevating your dessert experience.
Burnt Basque Cheesecake Variations
Feel free to experiment and make this delightful cheesecake your own with these mouthwatering twists!
- Gluten-Free: Replace all-purpose flour with a gluten-free blend to make this cheesecake suitable for gluten-sensitive friends.
- Chocolate Lover's Delight: Fold in ¼ cup of cocoa powder for a rich chocolate flavor that elevates this classic dessert to a new level of indulgence.
- Citrus Zing: Add the zest of one lemon or orange to the batter for a fresh, zesty kick that beautifully complements the creamy cheesecake.
- Nutty Crunch: Incorporate finely chopped nuts such as almonds or hazelnuts into the batter for added texture and a nutty flavor that brings a delightful crunch.
- Spiced Kicks: Add a pinch of nutmeg or cinnamon to the mixture for a cozy warmth that warms the soul and surprises the palate, perfect for fall gatherings.
- Caramel Infusion: Swirl in a few tablespoons of caramel sauce before baking for an extra layer of buttery sweetness that'll have everyone coming back for seconds.
- Fruit-Filled: Top the chilled cheesecake with your favorite fruits like fresh berries, or a vibrant fruit compote to enhance the flavors and add a pop of color.
- Dairy-Free: Substitute heavy cream with coconut cream and cream cheese with a dairy-free alternative to enjoy a luscious dessert without the dairy.
Explore these variations or create your own! For creative serving suggestions that can brighten each bite, explore our serving ideas and truly impress your guests!
Make Ahead Options
These Burnt Basque Cheesecakes are perfect for meal prep, allowing you to indulge in a homemade treat without the last-minute rush! You can prepare the batter up to 24 hours in advance; simply store it in an airtight container in the refrigerator after mixing. When you’re ready to bake, just pour the batter into the prepared loaf pan and pop it into the oven—no need to let it come to room temperature! If you want to make the cheesecake ahead of time, bake it and then refrigerate for up to 3 days. To maintain its creamy texture, chill it for at least 4 hours before serving. Just serve it chilled or at room temperature for a stress-free dessert that’s just as delicious!
How to Store and Freeze Burnt Basque Cheesecake
Fridge: Store the cheesecake in an airtight container for up to 5 days to keep its creamy texture and flavor fresh. Make sure to allow it to cool completely before sealing.
Freezer: For longer storage, wrap the chilled cheesecake tightly in plastic wrap and then in aluminum foil. It can be frozen for up to 2 months. Thaw it overnight in the fridge before serving.
Reheating: Enjoy your Burnt Basque Cheesecake chilled or let it sit at room temperature for 10–15 minutes before indulging for a soft, creamy texture.
Serving Reminder: If you’re adding toppings, such as whipped cream or berries, do so right before serving to maintain their freshness and charm!
Tips for the Best Burnt Basque Cheesecake
Room Temperature Eggs: Ensure your eggs are at room temperature before mixing. This helps create a smoother batter, which is key for your Burnt Basque Cheesecake's texture.
Don’t Overbake: Keep a close eye during the last few minutes of baking. The top should be deeply golden but not burnt, allowing for that signature creamy center.
Easy Removal: Use parchment paper with enough overhang to lift the cheesecake out easily after cooling. This prevents breakage and keeps your dessert intact.
Chill Well: Allow a minimum of 4 hours chilling before serving. This waiting time is essential for firming up the cheesecake and enhancing the flavors, ensuring a delightful experience.
Taste Test: Don’t shy away from tasting the batter before baking! Adjust sweetness with a pinch more sugar if needed, but remember to account for that extra richness once baked.
Serving Suggestions: When ready to serve, let the cheesecake rest at room temperature for 10–15 minutes for optimal flavor and texture. Add your favorite toppings for a personalized touch!
Burnt Basque Cheesecake Recipe FAQs
How do I select the right cream cheese for the Burnt Basque Cheesecake?
Absolutely! Choose full-fat cream cheese for the best results. It provides the rich and creamy texture that is characteristic of a good cheesecake. Check the expiration date and avoid any that look discolored or have formed dark spots.
How should I store the cheesecake and how long will it last?
You can store the cheesecake in an airtight container in the fridge for up to 5 days. Ensure it cools completely before sealing, as this keeps it moist and prevents it from absorbing any other odors. If you plan to keep it longer, consider freezing it.
Can I freeze Burnt Basque Cheesecake?
Very! To freeze your cheesecake, wrap it tightly in plastic wrap, then in aluminum foil to prevent freezer burn. It can stay frozen for up to 2 months. When you’re ready to enjoy it, simply transfer it to the fridge to thaw overnight. This helps to preserve its texture.
What should I do if my cheesecake cracks during baking?
No need to worry! Cracks can happen, especially with this style of cheesecake that embraces a rustic charm. If you see cracks forming during the last minutes of baking, it just means it's ready to cool. Once chilled, they usually become less noticeable, and topping it with whipped cream or berries helps cover them beautifully.
Are there any dietary considerations I should be aware of?
Absolutely! If serving it to guests with dietary restrictions, be mindful that this recipe contains dairy, eggs, and gluten from the all-purpose flour. Those with allergies should avoid serving or make substitutions, such as gluten-free flour and dairy-free cream cheese for a lactose-free version. Always double-check ingredient labels for hidden allergens!
Can I add flavor variations to my Burnt Basque Cheesecake?
Absolutely! You can enhance the flavor profile by adding a tablespoon of lemon zest or a splash of almond extract in place of some vanilla extract. Just remember to keep the base elements balanced. The more, the merrier when it comes to flavor experimentation!

Irresistibly Creamy Burnt Basque Cheesecake in a Loaf Pan
Ingredients
Equipment
Method
- Preheat your oven to 400°F (200°C).
- Line a 9×5 inch loaf pan with parchment paper.
- In a mixing bowl, combine 1 ½ cups of cream cheese with ¾ cup of granulated sugar and beat until smooth.
- Add the two large eggs one at a time, mixing well after each.
- Pour in the heavy cream, vanilla extract, and salt. Mix until smooth.
- Gently fold in 1 tablespoon of all-purpose flour.
- Pour the batter into the prepared loaf pan.
- Bake for 45 minutes, until the top is deeply golden brown.
- Let it cool in the pan for 10 minutes before lifting it out.
- Chill in the refrigerator for at least 4 hours before serving.
Leave a Reply