
As I rummaged through my pantry, it hit me—Halloween is just around the corner! What better way to celebrate the spooky season than with my Creepy Witch Finger Cookies? These delightfully eerie treats are not only a visual spectacle but also a unique way to bring a fun twist to your ordinary baking routine. With a quick prep time and an eye-catching appeal, they’re perfect for parties or cozy family gatherings. Made with simple ingredients like butter, sugar, and a hint of creativity, you’ll be amazed at how easily these cookies come together. Ready to conjure some magic in your kitchen? Let’s dive into this whimsical recipe that promises to impress even the toughest Halloween critics!
Why Are These Cookies So Fun?
Eerie Appeal: The unique, witchy shapes of these cookies make them a show-stopper at any gathering, sparking laughter and delight among guests.
Easy to Make: With just a few simple steps, you can whip up a batch of 48 cookies that look like they came straight from a bakery.
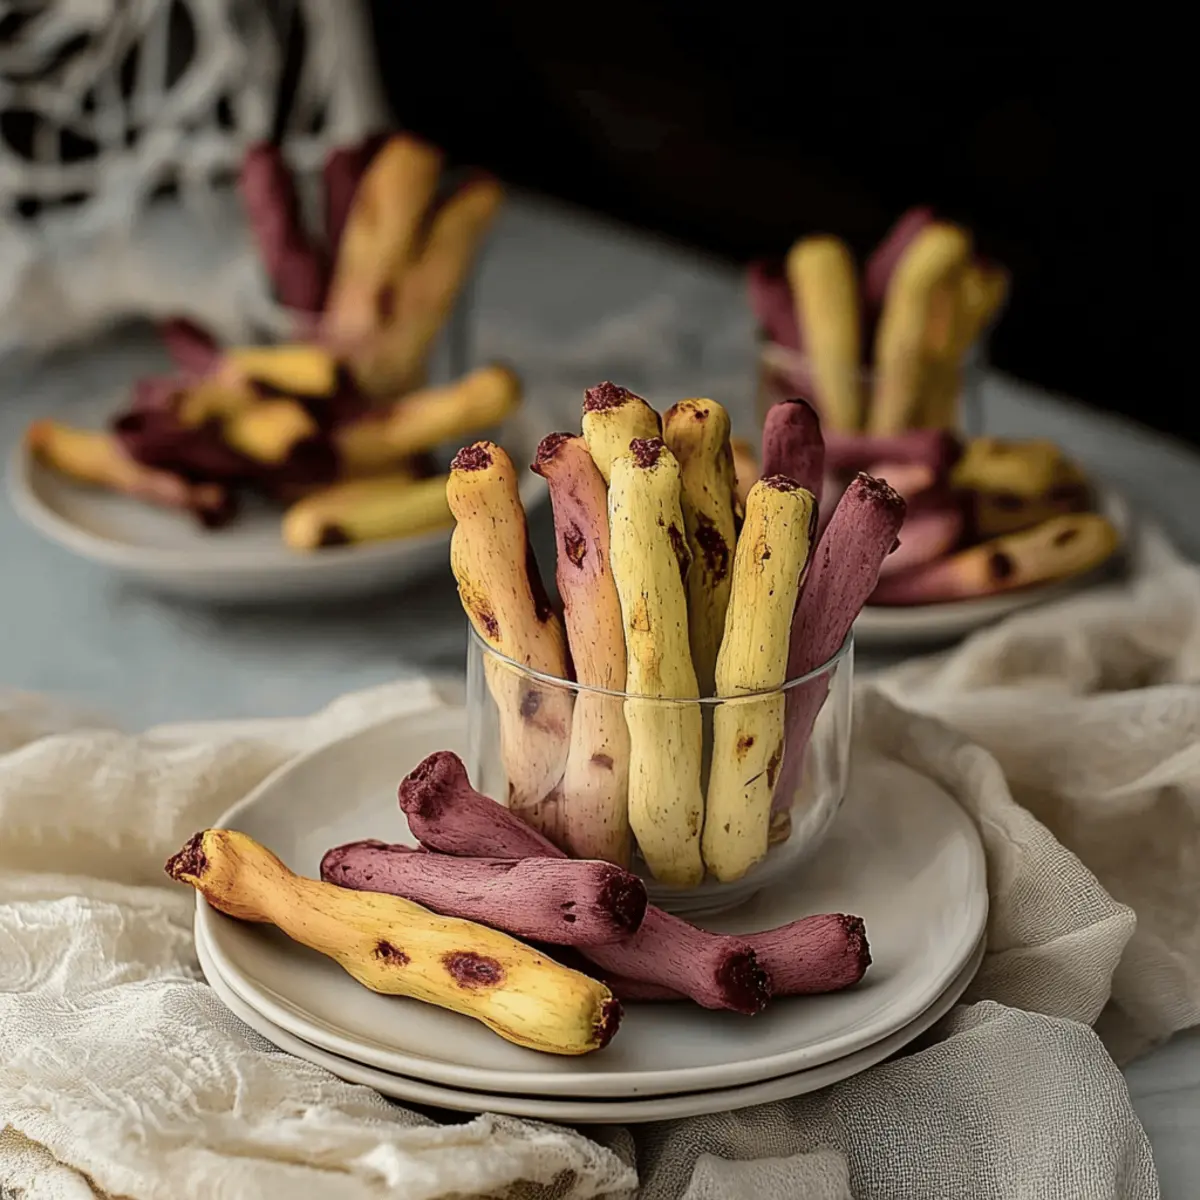
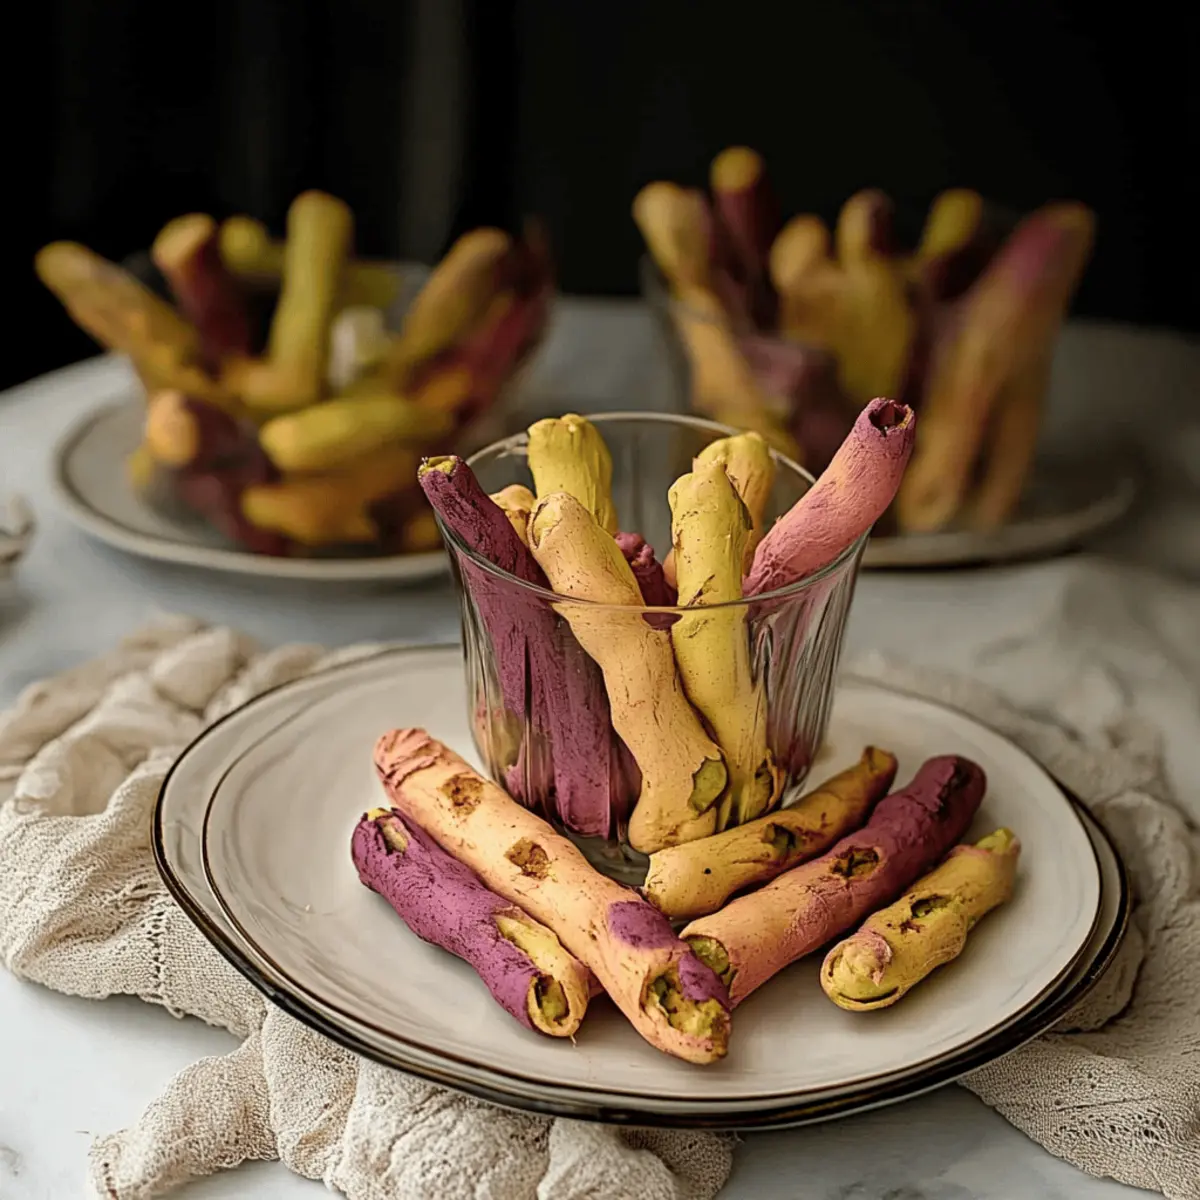
Colorful Creativity: Customize them with vibrant colors using matcha, sweet potato powder, or cocoa, making each cookie a piece of edible art—perfect for celebrating Halloween!
Crowd Pleaser: Everyone loves a spooky treat, and these cookies will have both kids and adults reaching for seconds. Plus, they pair wonderfully with a warm cup of cider or hot cocoa!
Makes Memories: Baking these cookies together can be a fun, family-oriented Halloween activity that everyone will cherish. Get started with assembling your ingredients, and you'll find yourself crafting perfect Creepy Witch Finger Cookies that create lasting holiday traditions.
Creepy Witch Finger Cookie Ingredients
Unlock the secrets to crafting these enchanting treats!
For the Dough
• Unsalted butter – 226 g, softened to ensure a light, creamy texture.
• Confectioner's sugar – 140 g, for that sweet, melt-in-your-mouth goodness.
• Sea salt – 1 tsp, to enhance the flavors of the cookies.
• Egg yolks – 4 from large eggs, at room temperature to create a rich dough.
• Vanilla extract – 5 mL, adding a warm depth of flavor.
• All-purpose flour – 454 g, the backbone of these delicious cookies.
• Baking powder – ¼ tsp, to give your cookies just the right rise.
For the Creepy Details
• Whole blanched almonds – 50, for creating spooky fingernails on your cookies.
• Matcha powder – 4 – 6 g, a fun way to give your cookies a ghastly green color.
• Purple sweet potato powder – 20 – 30 g, perfect for an eerie purple hue.
• Cocoa powder – 5 – 15 g, for those who prefer a touch of brown in their witchy treats.
• Cocoa powder (for dusting) – to add an extra layer of spooky charm.
For the Frightening Finish
• Strawberry jam – use this as a ghoulish filling instead of almonds.
• Red cake writing gel – for gory details or to create dripping blood effects.
• Melted white chocolate – or melted candy wafers, to add a delightful drizzle on top.
These delightful Creepy Witch Finger Cookies are not just adorable but also irresistibly fun to make, turning any Halloween gathering into a magical experience!
Step‑by‑Step Instructions for Creepy Witch Finger Cookies
Step 1: Cream the Butter and Sugar
Begin by placing the softened unsalted butter, confectioner's sugar, and sea salt into a mixing bowl. Using a hand mixer or stand mixer, cream the mixture on medium speed until it becomes light and fluffy, about 3-5 minutes. This step is crucial for creating a soft cookie texture that should appear pale and airy before adding the next ingredients.
Step 2: Add Wet Ingredients
Next, incorporate the egg yolks and vanilla extract into the creamed mixture, mixing until well blended. Don’t forget to scrape the bowl’s sides with a spatula to ensure everything is thoroughly combined. Once everything is smooth and creamy, this is the foundation of your dough for the Creepy Witch Finger Cookies.
Step 3: Combine Dry Ingredients
In a separate bowl, whisk together the all-purpose flour and baking powder. This process aerates the flour and ensures even distribution of the baking powder, critical for achieving that perfect cookie rise. Once combined, gradually fold the dry mixture into the wet ingredients, using a spatula, until it forms a cohesive soft dough.
Step 4: Color the Dough
If you're looking to add some creative flair to your Creepy Witch Finger Cookies, divide your dough into portions for coloring. Add matcha powder for green, purple sweet potato powder for a spooky hue, or cocoa powder for brown shades. Knead the food coloring into each portion until vibrant and evenly mixed, adding a whimsical touch to each cookie.
Step 5: Shape the Fingers
Take about 1 tablespoon of the dough and roll it into a finger shape, tapering the end to create a point. For added realism, create knuckles by gently pinching the dough at intervals. This step not only adds character to your cookies but also makes them more frightfully fun to present!
Step 6: Add the "Nails"
Press a whole blanched almond into the pointed tip of each shaped finger to simulate a creepy nail. Make sure to press firmly so that it stays in place during baking. This detail gives your Creepy Witch Finger Cookies an authentic monstrous look, which is perfect for your Halloween festivities.
Step 7: Freeze for Structure
Place the shaped cookies on a parchment-lined tray with some space between them and freeze for at least 1 hour. This freezing step helps the cookies hold their shape while baking and can prevent the fingers from spreading too much. This way, they will maintain their spooky form when they hit the oven!
Step 8: Preheat the Oven
While the cookies are in the freezer, preheat your oven to 325°F (163°C). This allows the oven to reach the perfect temperature for baking, ensuring a slightly crispy edge and a tender center. Once you’ve confirmed it’s ready, you can proceed to bake those eerie treats.
Step 9: Bake the Cookies
Carefully transfer the frozen cookies to the preheated oven and bake for 20-25 minutes. Keep an eye on them, and look for a slight golden brown color on the bottom, indicating they are perfectly baked. The cookies should be firm yet tender—it's the ideal time to bring those Creepy Witch Finger Cookies to life!
Step 10: Cool the Cookies
Once baked, remove the cookies from the oven and let them cool on the tray for about 5 minutes before transferring them to a wire rack. Cooling allows the cookies to set properly and also helps to enhance the flavors. Once set, you’re ready for the finishing touches!
Step 11: Decorate with Jam and Cocoa
For a delightful and spooky finish, replace the almond “nail” with a dollop of strawberry or raspberry jam. Dust the cookies with cocoa powder for an added layer of eerie charm. This step elevates the Creepy Witch Finger Cookies and emphasizes their ghostly allure, making them even more enticing.
Step 12: Add Final Touches
Lastly, using red cake writing gel, create gory details or dripping effects on the cookies. Alternatively, drizzle melted white chocolate or candy wafers on top for a sweet contrast. These finishing touches are what will captivate your guests and ensure your Creepy Witch Finger Cookies are an unforgettable treat this Halloween!
Creepy Witch Finger Cookies Variations
Feel free to let your imagination run wild and customize these delicious cookies with these fun tweaks and substitutions!
-
Gluten-Free: Substitute all-purpose flour with a gluten-free blend for an inclusive treat everyone can enjoy. Just make sure to check your baking powder too!
-
Nut-Free: Swap out the blanched almonds for pumpkin seeds or sunflower seeds to maintain that spooky nail effect without the nuts, making it safe for allergy sufferers.
-
Vegan: Replace the egg yolks with flaxseed meal mixed with water, and opt for plant-based butter in place of regular butter for a vegan-friendly twist.
-
Spicy Update: Add a pinch of cinnamon or cayenne pepper to the dough for a surprising heat that will tickle your taste buds. These cookies will definitely have an unexpected kick!
-
Add Zest: Incorporate finely grated lemon or orange zest into the dough for a refreshing citrus burst that complements the sweetness beautifully.
-
Chocolate Chip: Fold in mini chocolate chips into the dough. They will add a delightful texture and richness that makes these creepy treats even more irresistible.
-
Swirl Colors: Instead of just coloring the dough, create swirls by kneading together a few different colors in a unique pattern for visually stunning cookies.
-
Alcohol-Infused: For an adult twist, add a splash of your favorite liqueur like Amaretto or Kahlua to the dough to infuse flavor and a touch of fun for Halloween parties.
By experimenting with these variations, each batch of your Creepy Witch Finger Cookies can have a unique character all its own! You may also want to explore Baking With Kids to share this spooky baking adventure with family, or check out our delightful guide on How to Make Fun Halloween Treats for more ideas!
Tips for the Best Creepy Witch Finger Cookies
Chill the Dough: Make sure to freeze the shaped cookies for at least 1 hour. This helps maintain their shape during baking and prevents them from spreading too much.
Use Room Temperature Eggs: Having your egg yolks at room temperature ensures better incorporation into the dough, leading to a smoother consistency for your Creepy Witch Finger Cookies.
Don’t Overbake: Keep an eye on your cookies as they bake. They should be slightly golden at the bottom but still soft in the center for that perfect chewy texture.
Experiment with Colors: Feel free to mix different food colorings to create unique designs. Using matcha for green, purple sweet potato powder for a vibrant hue, or cocoa for a brown look can elevate your cookies.
Store Properly: If you have leftovers, store them in an airtight container at room temperature to keep them fresh. These cookies stay delightful for several days, making them great for sharing!
How to Store and Freeze Creepy Witch Finger Cookies
Room Temperature: Keep your cookies in an airtight container at room temperature for up to 3 days to maintain their delightful texture and spooky appeal.
Fridge: For longer freshness, you can refrigerate the cookies in an airtight container for up to 1 week. Just be aware that this may slightly alter their texture.
Freezer: Freeze the baked cookies in a single layer, separated by parchment paper, for up to 2 months. When ready to enjoy, thaw them at room temperature for a few hours.
Reheating: If you’d like to warm them up, place the cookies in a preheated oven at 300°F (150°C) for about 5 minutes. This will refresh the cookies, making them perfect for serving at your Halloween gathering!
Make Ahead Options
These Creepy Witch Finger Cookies are perfect for meal prep enthusiasts! You can prepare the dough up to 3 days in advance. Simply follow the first five steps of the recipe, then wrap the shaped, uncooked cookies tightly in plastic wrap and refrigerate. This helps maintain their vibrant colors and spooky shapes. When you're ready to bake, just remove them from the fridge, allow them to sit for a few minutes to come to room temperature, and then pop them into your preheated oven as instructed. They'll be just as delicious and eerie, making your Halloween gatherings a breeze with this time-saving trick!
What to Serve with Creepy Witch Finger Cookies?
These hauntingly delightful cookies pair wonderfully with a variety of treats, turning your Halloween gathering into a spooktacular feast.
- Warm Apple Cider: The sweet, spiced flavors of apple cider complement the creepy cookies perfectly, creating a cozy, festive atmosphere.
- Chocolate Bat Cupcakes: With rich chocolate flavors topped with bat decorations, these cupcakes enhance the spooky theme while being irresistibly indulgent.
- Caramel Popcorn: The crunchy and sweet caramel popcorn adds a delightful textural contrast and makes for great finger food alongside the witchy cookies.
- Pumpkin Soup: Served in small cups, this creamy and savory soup offers a warm, comforting contrast to the sweetness of the cookies.
- Ghostly Marshmallow Treats: These cute, ghost-shaped treats are a fun addition that children will adore, making every bite (and sight) even creepier!
- Ghoulish Green Smoothies: Made with spinach and fruit, this vibrant drink is a healthy choice that brings a burst of color while balancing out sweeter indulgences.
- Vanilla Ice Cream: The cool creaminess of vanilla ice cream pairs wonderfully when placed next to our witch finger cookies, perfect for dipping!
- Dark Chocolate Fondue: A luxurious fondue is a fun interactive dessert. Dip your cookies for a rich, sweet experience that takes your Halloween treats to another level.
Let your imagination run wild as you pair these delightful options with your Creepy Witch Finger Cookies for a memorable Halloween celebration!

Creepy Witch Finger Cookies Recipe FAQs
How do I select the right butter for my Creepy Witch Finger Cookies?
Absolutely! It's important to use unsalted butter, softened to room temperature, for the best results. This allows for easy creaming with sugar and creates a tender texture. Avoid butter labeled as "light" or "spreadable," as they contain additional water or oils that can alter the cookie's consistency.
What is the best way to store my Creepy Witch Finger Cookies?
For optimal freshness, store your cookies in an airtight container at room temperature for up to 3 days. If you want to extend their shelf life, refrigerate them in the container for up to 1 week. Just remember, refrigeration can slightly change their texture, making them a bit softer.
Can I freeze my Creepy Witch Finger Cookies?
Yes, you can! To freeze, arrange the unbaked cookies on a parchment-lined tray and freeze until solid, about 1-2 hours. Then, transfer them to a freezer bag or container, separating layers with parchment paper. They’ll keep well for up to 2 months. When you're ready to bake, no need to thaw—just pop them straight into the oven preheated at 325°F (163°C) and bake for the same time!
What are some troubleshooting tips if my cookies don't hold their shape?
If your Creepy Witch Finger Cookies spread too much during baking, consider a couple of adjustments. First, ensure that the shaped cookies are thoroughly frozen for at least 1 hour before baking; this helps them maintain their shape. Additionally, check the flour measurement—too little flour can lead to excess spreading. It’s also crucial to avoid overmixing the dough, as this can activate the gluten in the flour, causing the cookies to spread.
Are these cookies safe for pets and those with nut allergies?
Very! For an allergy-friendly version, you can either create "nail" substitutes from non-nut alternatives, like sunflower seeds or chocolate chips, for a similar effect. However, always double-check with guests about their allergies. For pet safety, it's best to keep these cookies away from dogs, as chocolate is toxic to them. Enjoy your Halloween treats safely!

Creepy Witch Finger Cookies That Wow Your Halloween Guests
Ingredients
Equipment
Method
- Cream the softened unsalted butter, confectioner's sugar, and sea salt until light and fluffy, about 3-5 minutes.
- Add the egg yolks and vanilla extract, mixing until well blended and smooth.
- Whisk together the all-purpose flour and baking powder, then fold into the wet mixture.
- Divide the dough and color portions with matcha, purple sweet potato, or cocoa powder.
- Shape about 1 tablespoon of dough into a finger shape and create knuckles.
- Press a whole blanched almond into the tip of each finger.
- Freeze the shaped cookies on a parchment-lined tray for at least 1 hour.
- Preheat the oven to 325°F (163°C).
- Bake the frozen cookies for 20-25 minutes until slightly golden on the bottom.
- Cool the cookies on the tray for 5 minutes before transferring to a wire rack.
- Decorate with strawberry or raspberry jam and dust with cocoa powder.
- Using red cake writing gel, add gory details and drizzle melted white chocolate on top.


Leave a Reply