
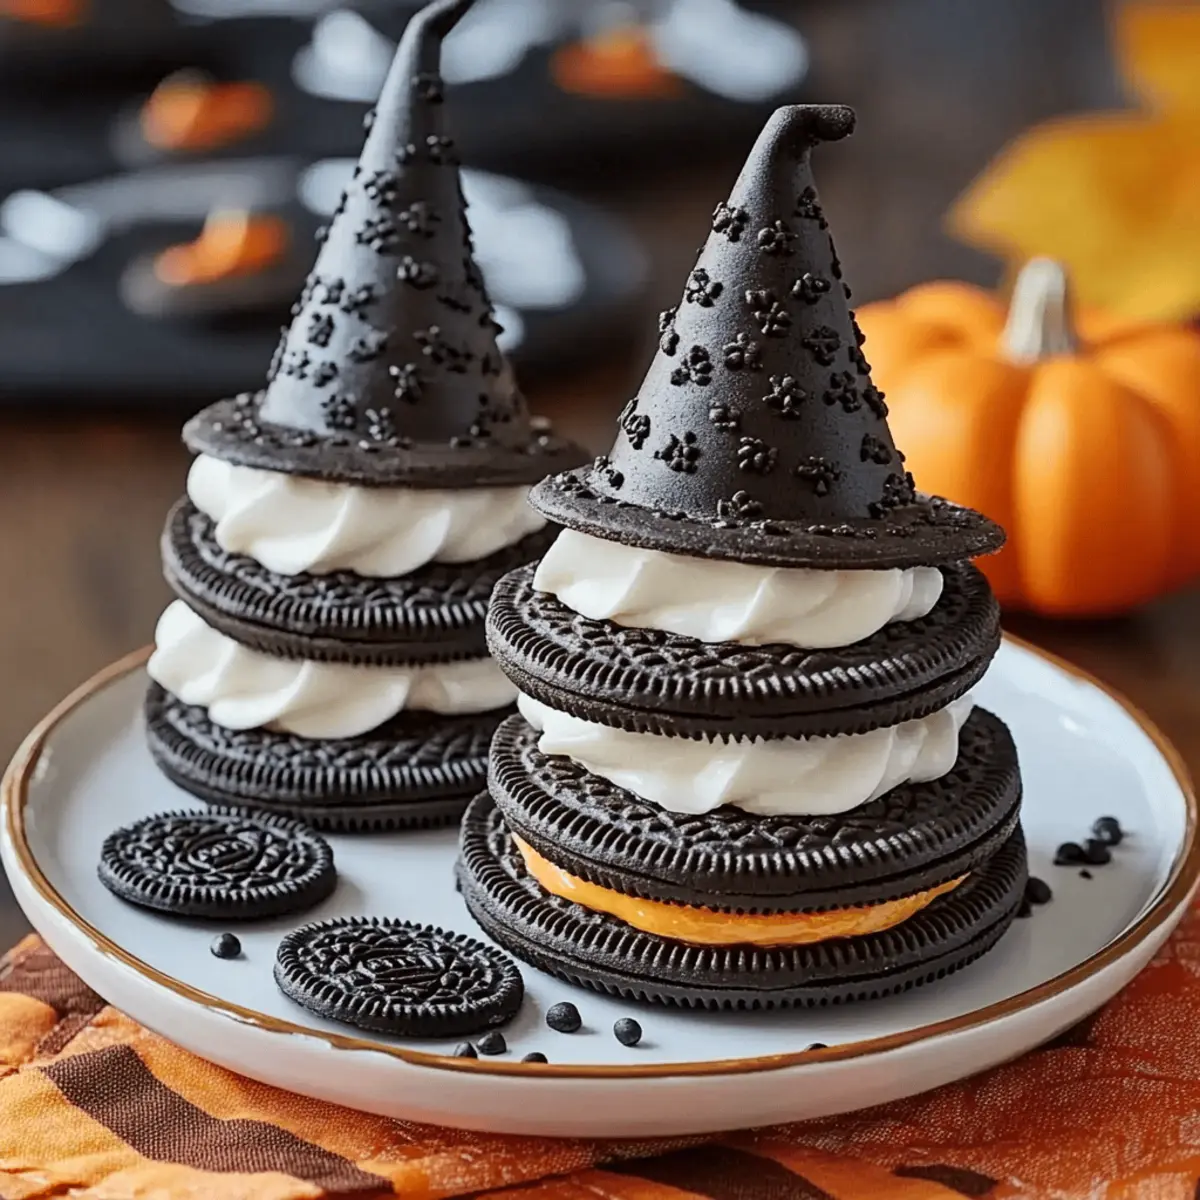
As the air turns crisp and the leaves begin to dance in hues of orange and gold, I can’t help but get giddy thinking about the fun treats Halloween brings. That's when I whip up these delightful Oreo Witch Hat Cookies, a whimsical twist perfect for gatherings or just a little festive snacking. This no-bake marvel is not only quick to prepare in just 20 minutes, but it also satisfies that sweet tooth craving with a charming presentation that’s sure to impress. Plus, they’re simple enough for anyone to make—no fancy skills or equipment required! So, are you ready to create some tasty magic in your kitchen? Let's dive into this spooktacular recipe!

Why Are Oreo Witch Hat Cookies So Fun?
Delightful and Adorable: These cookies aren't just delicious; their whimsical shape adds a splash of fun to any gathering.
Quick and Easy: With a prep time of just 20 minutes, you can whip up a batch of these treats without spending hours in the kitchen.
Kid-Friendly: Perfect for a fun family activity, these Oreo Witch Hat Cookies are easy enough for kids to help assemble, making them a wonderful way to create magical memories together.
Versatile Treat: Great for Halloween but delightful year-round, they make for an excellent addition to cookie platters at parties or potlucks.
Elevate your cookie game by combining these treats with other festive recipes like Mini Oreo Stuffed or Hot Cocoa Cookies. Give them a try; your friends and family will love you for it!
Oreo Witch Hat Cookies Ingredients
For the Cookies
• Oreo cookies – 1 package (15.6 oz); these serve as the base and structure for your witch hats.
• Chocolate kisses – 12 oz; their shape and taste mimic the hats while adding a rich chocolate flavor.
For the Frosting
• Butter – ½ cup (softened); this creates a creamy texture that binds the cookies and enhances flavor.
• Powdered sugar – 1 cup; a sweet, fine sugar that helps achieve the right consistency for spreading.
For the Decoration
• White chocolate chips – ½ cup; melted and drizzled over cookies for that added touch of sweetness and flair.
• Colorful sprinkles – ¼ cup; sprinkle on while the white chocolate is still wet for a fun, festive flair.
These ingredients come together to create charming Oreo Witch Hat Cookies that not only satisfy your sweet tooth but also bring some whimsical magic to your gatherings!
Step‑by‑Step Instructions for Oreo Witch Hat Cookies
Step 1: Preheat Your Oven
Begin by preheating your oven to 350°F (175°C). While the oven heats up, gather your ingredients and set up your workspace. Place a baking sheet lined with parchment paper nearby to make the assembly process smoother. Having everything ready will help keep the magic flowing in the kitchen as you prepare your delightful Oreo Witch Hat Cookies.
Step 2: Prepare the Oreos
Carefully separate the Oreo cookies, using only one half from each cookie. Set aside the cream-filled sides, as you'll only need the plain halves for this witchy creation. This step ensures that your cookies will have a strong and sturdy base for stacking later on. Make sure to keep them organized to streamline your assembly process.
Step 3: Make the Creamy Filling
In a medium bowl, mix the softened butter and powdered sugar together until light and fluffy. Use an electric mixer if you have one, as this will take about 3-5 minutes to achieve the desired consistency. The creamy filling will help sandwich the Oreos together, giving your Oreo Witch Hat Cookies their delicious structure and sweetness.
Step 4: Assemble the Sandwiches
Spread the fluffy mixture generously on the cream-less side of one Oreo half. Next, take another Oreo half and press it on top to create a sandwich. Repeat this process with the remaining cookies until you've formed all your sandwiches. The white filling will add delightful sweetness and fun texture to each of your spooky creations.
Step 5: Melt the Chocolate Kisses
Place the chocolate kisses in a microwave-safe bowl and melt them in the microwave for about 30 seconds, stirring until smooth. Monitor closely to prevent overheating. Once melted, use a fork to dip one side of each Oreo sandwich into the chocolate, allowing any excess to drip off. This will form the “hat” of your Oreo Witch Hat Cookies.
Step 6: Drizzle with White Chocolate
Melt the white chocolate chips in a separate microwave-safe bowl, again in 30-second increments, stirring until smooth. With a spoon, drizzle the melted white chocolate over each cookie, creating a delightful design. The glossy finish will add a beautiful shine to your creations, making your Oreo Witch Hat Cookies visually appetizing.
Step 7: Add Festive Sprinkles
While the white chocolate is still warm, sprinkle colorful decorations onto the cookies. This will help the sprinkles adhere, adding a fun and whimsical touch to your Oreo Witch Hat Cookies. Be playful and generous with the sprinkles—this is the magic dust that makes your treats even more memorable.
Step 8: Cool and Serve
Let your decorated Oreo Witch Hat Cookies cool on wire racks for about 10 minutes. This cooling time allows the chocolate and white chocolate to set properly. Once completely cooled and firm, your delightful cookies are ready to be served. They’re perfect for Halloween gatherings or a sweet treat any day of the year!

What to Serve with Oreo Witch Hat Cookies
Imagine a cozy gathering filled with laughter and joy, where sweet treats steal the spotlight and warm flavors mingle in the air.
-
Chilled Milk: A classic pairing, chilled milk perfectly complements the rich chocolate and creamy textures of the cookies, making every bite feel indulgent.
-
Pumpkin Spice Latte: The warm spices in this fall favorite enhance the sweetness of the cookies, creating an autumn-inspired delight that warms the heart.
-
Caramel Popcorn: The crunchy sweetness of caramel popcorn adds a fun texture contrast that perfectly balances the soft, creamy cookies. It’s an irresistible combination that will have everyone reaching for more.
-
Apple Cider: A tangy apple cider brings out the flavors of Halloween, making it the perfect drink to enjoy alongside these whimsical cookies.
-
Chocolate Fudge Brownies: For the ultimate indulgence, serve a slice of fudgy brownies that harmonize with the Oreo Witch Hat Cookies, creating a dessert lover's dream.
-
Vanilla Ice Cream: The creaminess of vanilla ice cream pairs beautifully with the cookies, offering a delightful temperature contrast that is both satisfying and delicious.
-
Spiced Cupcakes: Complement your cookies with light and fluffy spiced cupcakes topped with cream cheese frosting for a festive dessert experience.
-
Hot Chocolate: Rich and velvety hot chocolate adds warmth to the gathering. The chocolatey flavor mirrors the cutting-edge treat while inviting cozy conversations.
-
Fruit Salad: Fresh fruit salad adds a refreshing burst of flavor, providing a lighter balance to the rich sweetness of the cookies. The colors also bring a vibrant touch to your dessert table.
Expert Tips for Oreo Witch Hat Cookies
• Use Fresh Ingredients: Ensure your Oreos and chocolate kisses are fresh for the best flavor and texture in your Oreo Witch Hat Cookies.
• Melt Carefully: Melt chocolate kisses and white chocolate in short intervals to prevent burning. Stir well until fully smooth for a beautiful finish.
• Spread Evenly: When adding the creamy filling, be generous but avoid overfilling to keep sandwiches together during assembly.
• Chill for Stability: If your cookies seem unstable, place them in the refrigerator for a few minutes to help set the chocolate layers.
• Mix and Match Sprinkles: Get creative with your toppings! Combine different colored sprinkles for a festive look that stands out at gatherings.
These simple tips will help you create delightful Oreo Witch Hat Cookies that everyone will love!
How to Store and Freeze Oreo Witch Hat Cookies
Room Temperature: Store cookies in an airtight container at room temperature for up to 3 days to keep them fresh and delightful.
Fridge: If you prefer a cooler treat, keep your Oreo Witch Hat Cookies in the fridge, where they’ll stay fresh for up to a week. Just ensure they’re in a sealed container to prevent drying.
Freezer: For longer storage, freeze individual cookies in a single layer, then transfer to an airtight container for up to 2 months. Thaw at room temperature before enjoying.
Reheating: No need to reheat these cookies, but if you like them warm, pop them in the microwave for 5-10 seconds. Enjoy these delightful Oreo Witch Hat Cookies anytime!
Oreo Witch Hat Cookies Variations
Feel free to sprinkle your own magic into these Oreo Witch Hat Cookies with these fun and friendly variations!
-
Nut-Free: Substitute the chocolate kisses with carob chips for a nut-free alternative that still packs a sweet punch.
-
Gluten-Free: Use gluten-free Oreo cookies to make this treat suitable for those with gluten sensitivities, ensuring everyone can enjoy a piece of the fun!
-
Add Spice: Enhance the flavor by mixing in a dash of cinnamon or nutmeg into the creamy filling. It adds a lovely warmth and festive flair.
-
Flavor Twist: Swap the white chocolate with dark chocolate for a deliciously rich variation. Dark chocolate brings depth that perfectly complements the sweetness of the Oreo cookies.
-
Candy Coated: Add a surprise by placing small candy corns or Halloween-themed gummies on top of the melted chocolate for a pop of color and fun texture.
-
Less Sweet: Reduce the powdered sugar in the filling by half for a less sweet version that’s still delightful but won’t overpower your taste buds.
-
Boozy Version: For an adult twist, drizzle a splash of coffee liqueur mixed with the white chocolate for a rich, indulgent flavor that’s perfect for Halloween parties.
-
Try Mini: Use mini Oreo cookies and chocolate kisses to create bite-sized versions of these delightful treats. They make for cute party favors and perfect for kids!
Don’t forget to explore more tasty treats like Cinnamon Cream Cheese Cookies or Cake Batter Cookies alongside these magical cookies. Your friends and family will be in for a treat!
Make Ahead Options
These Oreo Witch Hat Cookies are perfect for meal prep enthusiasts! You can prepare the creamy filling (butter and powdered sugar) up to 24 hours in advance; just store it in an airtight container in the refrigerator to keep it fresh and fluffy. Additionally, you can separate the Oreo cookies and keep the plain halves ready to go, ensuring assembly is quick when you're ready to serve. When it's time to enjoy, simply spread the filling, dip the sandwiches in melted chocolate, drizzle with white chocolate, and add colorful sprinkles. This way, you'll create delightful treats with minimal effort, saving you time without sacrificing taste!
Oreo Witch Hat Cookies Recipe FAQs
How do I choose the right Oreos for my recipe?
Absolutely! Look for Oreos that have no visible signs of damage or age. The cookies should be firm and intact, without any dark spots or cracks. Fresh Oreos create a sturdier base for your Oreo Witch Hat Cookies, ensuring they hold up during assembly.
What is the best way to store leftover Oreo Witch Hat Cookies?
To keep your cookies fresh, store them in an airtight container at room temperature for up to 3 days. If you want them to last longer, you can keep them in the fridge for up to a week—but make sure they're sealed properly to avoid drying out.
Can I freeze Oreo Witch Hat Cookies, and if so, how?
Yes, freezing these cookies is a great option! Here's how: First, place individual cookies in a single layer on a baking sheet and freeze for about 1-2 hours or until fully firm. Once set, transfer them to an airtight container or a freezer bag, ensuring they are spaced apart to prevent sticking. They can be stored in the freezer for up to 2 months. When you want to enjoy them, simply thaw at room temperature for about 30 minutes before serving.
What should I do if the chocolate doesn’t melt smoothly?
If you find that your chocolate kisses aren’t melting smoothly, try reheating them in 10-second intervals instead of 30, stirring thoroughly between each interval. This prevents overheating, which can cause the chocolate to seize. If it does seize, you can add a small amount of vegetable oil to help smooth it out.
Can I use alternative ingredients in this recipe?
Very! If you're concerned about allergies or dietary restrictions, you can use gluten-free Oreos or non-dairy chocolate kisses to make a batch suitable for those with gluten intolerance or dairy allergies. Just read the labels carefully to ensure they meet your dietary needs, and feel free to substitute white chocolate chips with a dairy-free version if needed.
These FAQs aim to ensure your Oreo Witch Hat Cookies turn out perfectly, making your spooky celebrations even sweeter!

Delicious Oreo Witch Hat Cookies You’ll Love Making
Ingredients
Equipment
Method
- Preheat your oven to 350°F (175°C) and prepare your workspace.
- Carefully separate the Oreo cookies, using only one half from each cookie.
- In a medium bowl, mix the softened butter and powdered sugar together until light and fluffy.
- Spread the fluffy mixture on the cream-less side of one Oreo half and top with another half.
- Melt the chocolate kisses in a microwave-safe bowl for about 30 seconds, stirring until smooth.
- Dip one side of each Oreo sandwich into the melted chocolate, allowing excess to drip off.
- Melt the white chocolate chips and drizzle over each cookie.
- While the white chocolate is still warm, sprinkle colorful decorations onto the cookies.
- Let your decorated cookies cool on wire racks for about 10 minutes before serving.


Leave a Reply