
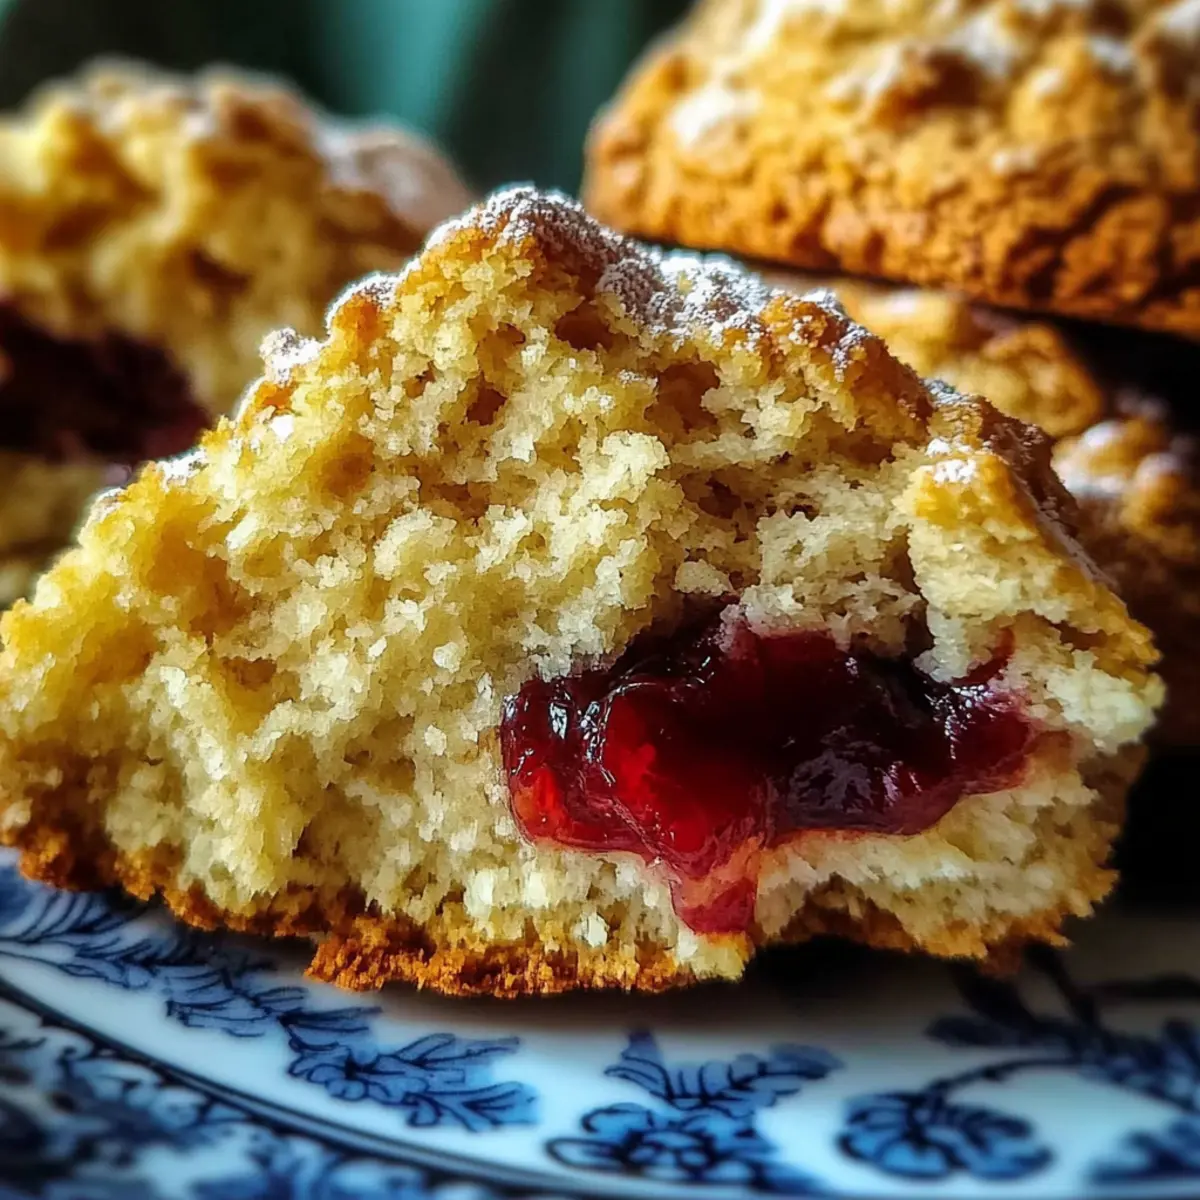
There’s something truly magical about the aroma of freshly baked scones filling the kitchen, isn’t there? When I first discovered how to make Gluten-Free Almond Flour Scones, I felt an exhilarating sense of achievement. These delightful bites are not only easy to whip up—taking just about 30 minutes from start to finish—but they also cater to gluten-sensitive friends and family without sacrificing flavor or texture. With the nutty goodness of almond flour and a hint of sweetness, they’re perfect for breakfast or an afternoon pick-me-up. Not to mention, they can be customized with your favorite mix-ins, whether that’s dried fruit or rich chocolate chips. So, ready to embrace the warm, buttery goodness and create a batch that will make everyone swoon?

Why are these scones a must-try?
Deliciously Unique: These Gluten-Free Almond Flour Scones deliver a delightful twist on traditional scones, offering a rich, nutty flavor that will impress even the pickiest eaters.
Quick and Easy: With just 30 minutes from prep to plate, this recipe is perfect for busy mornings or last-minute brunch gatherings.
Customizable Options: Feel free to add your favorite mix-ins, like chocolate chips or dried fruit, transforming each batch into a unique creation that suits your taste.
Health Conscious: Made with nutritious almond and coconut flour, these scones provide a gluten-free option packed with wholesome ingredients.
Crowd-Pleaser: With their irresistible aroma and fluffy texture, these scones will surely impress your family and friends. While you’re at it, try pairing them with homemade jam or whipped cream for an extra special touch!
Gluten-Free Almond Flour Scones Ingredients
• These ingredients are key to your baking success!
For the Scone Dough
- Almond flour – A gluten-free staple that adds a wonderful nutty flavor and texture.
- Coconut flour – This light flour helps absorb moisture, contributing to the fluffy texture of the scones.
- Granulated sugar or coconut sugar – Either sweetener will enhance the scones, just pick based on your flavor preference.
- Baking powder – Essential for making your scones rise and become delightfully fluffy.
- Salt – Balances the sweetness and enhances the overall flavor profile of the scones.
- Unsalted butter – Cold and cubed, it creates those flaky layers that are a hallmark of a good scone.
- Large eggs – Provide moisture and richness, helping to bind the ingredients together.
- Unsweetened almond milk (or any milk of choice) – A dairy-free option that keeps the dough moist.
- Vanilla extract – Adds a lovely aromatic flavor, enhancing the overall sweetness of the scones.
Optional Add-ins
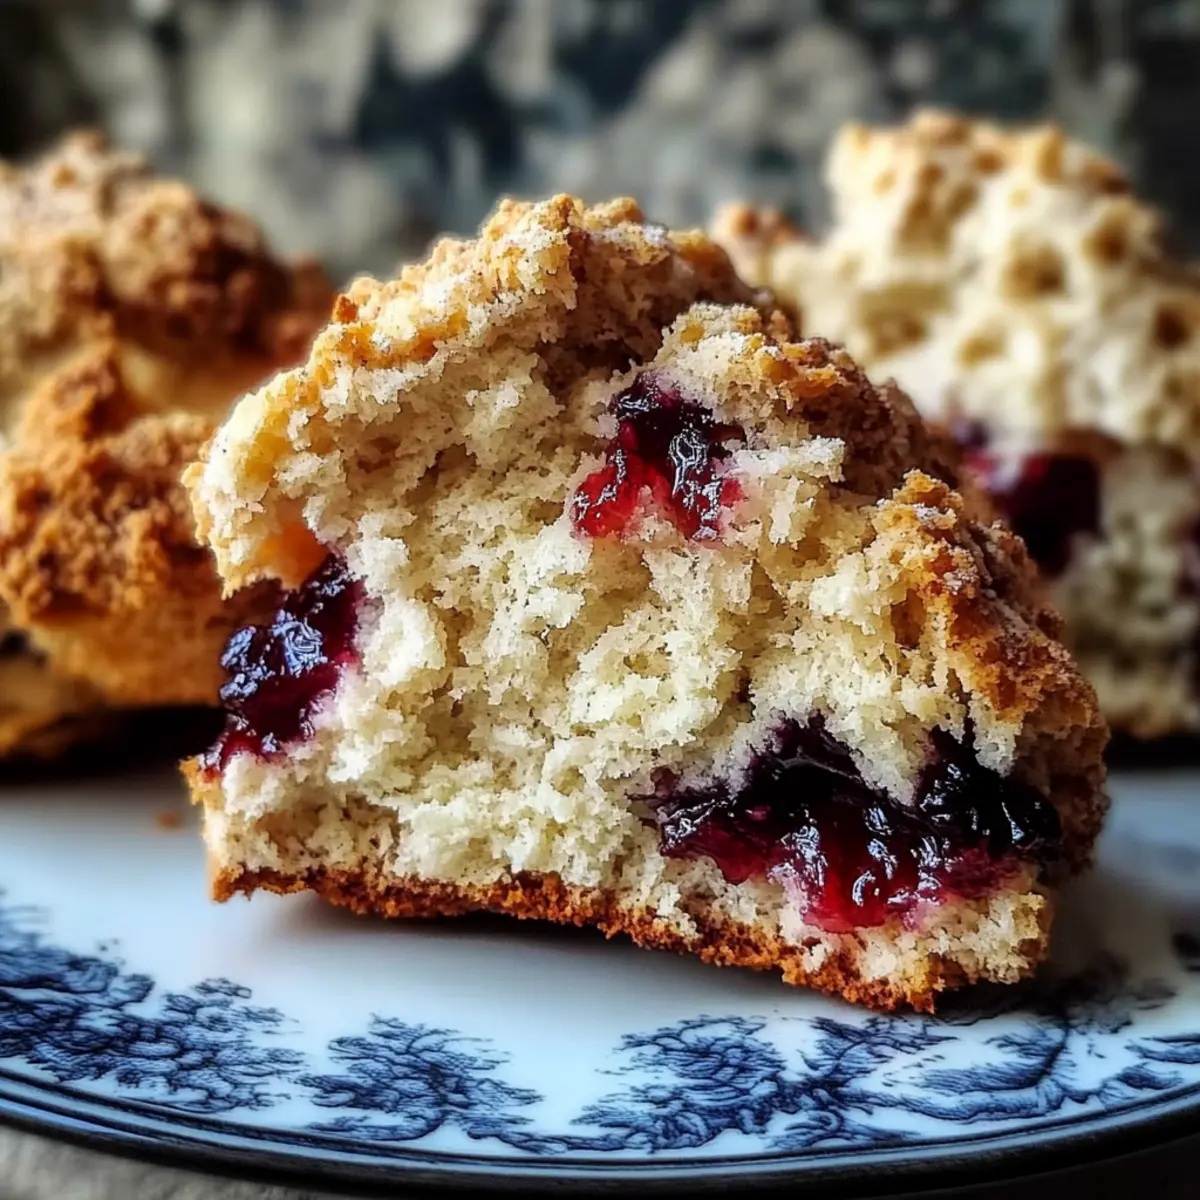
- Dried fruit (such as cranberries or blueberries) – Adds natural sweetness and a chewy texture that contrasts beautifully with the fluffy scones.
- Chocolate chips – For those who crave something richer and sweeter, these make a tasty addition!
Step‑by‑Step Instructions for Gluten-Free Almond Flour Scones
Step 1: Preheat the Oven
Begin by preheating your oven to 350°F (175°C). While the oven warms up, grab a baking sheet and line it with parchment paper to prevent sticking. This step ensures your Gluten-Free Almond Flour Scones will bake evenly and come out perfectly golden brown.
Step 2: Prepare the Dry Ingredients
In a large mixing bowl, combine 2 cups of almond flour, ¼ cup of coconut flour, ¼ cup of granulated sugar, 1 tablespoon of baking powder, and ½ teaspoon of salt. Whisk the dry ingredients together until they are thoroughly mixed and there are no lumps. This blend of flours forms the base of your scone dough, setting the stage for a delicious treat.
Step 3: Incorporate the Butter
Add ¼ cup of cold, cubed unsalted butter into the bowl with the dry mixture. Using a pastry cutter or your fingertips, work the butter into the dry ingredients until the mixture resembles coarse crumbs. This step is crucial for creating the flaky texture that makes Gluten-Free Almond Flour Scones so irresistible.
Step 4: Mix the Wet Ingredients
In a separate bowl, whisk together 2 large eggs, ¼ cup of unsweetened almond milk, and 1 teaspoon of vanilla extract. Whisk them together until well combined, ensuring the eggs and almond milk incorporate fully, adding moisture and richness to your scone batter.
Step 5: Combine Wet and Dry Mixtures
Pour the wet mixture into the bowl with the dry ingredients. Gently stir the mixture with a spatula until just combined; do not overmix. If you’re adding any optional ingredients like ½ cup of dried fruit or chocolate chips, fold them into the dough during this step for an extra burst of flavor in your scones.
Step 6: Shape the Dough
Turn the dough out onto a lightly floured surface, using either almond or coconut flour. Shape it into a disc, roughly 1-inch thick, ensuring an even thickness for consistent baking. This compact shape not only makes handling easier but also helps in achieving that perfect scone texture.
Step 7: Cut the Scones
Using a sharp knife, cut the disc into 8 equal wedges. Carefully place these wedges onto the prepared baking sheet, ensuring there's space between each scone to allow for rising. This spacing is important for achieving that ideal golden color and fluffy texture during baking.
Step 8: Bake the Scones
Slide the baking sheet into the preheated oven and bake for 15-20 minutes. Keep an eye on them—the scones should turn golden brown, and a toothpick inserted into the center should come out clean. This is the key moment where the warm, inviting aroma fills your kitchen.
Step 9: Cool the Scones
Once baked, remove the scones from the oven and let them cool on the baking sheet for about 5 minutes. This cooling period allows them to set and makes it easier to transfer to a wire rack. After that, move them to the rack to cool completely—if you can resist the tempting aroma wafting around!
What to Serve with Gluten-Free Almond Flour Scones
Imagine enjoying a warm scone fresh from the oven, surrounded by delightful accompaniments that elevate every bite.
- Fresh Berries: Plump blueberries or raspberries add a burst of refreshment, perfectly complementing the nutty flavor of the scones. Their tartness balances the sweetness beautifully.
- Homemade Jam: A dollop of your favorite fruit jam, whether strawberry or apricot, enhances each scone with a sweet, fruity flourish. It’s like a taste of summer in every bite!
- Whipped Cream: Light and airy whipped cream offers a luxurious topping to these scones, adding creaminess that contrasts with the crumbly texture.
- Herbal Tea: A warm cup of chamomile or Earl Grey tea provides a soothing companion, bringing out the delicate flavors of your scones. Aromatic and calming, it’s perfect for afternoon tea.
- Cheese Platter: A selection of soft cheeses complements the scones’ sweetness, providing a savory counterpoint that makes for a delightful brunch spread.
- Chocolates: For chocolate lovers, dark chocolate truffles create a rich and indulgent pairing with the scones, elevating them to a heavenly dessert experience.
- Sparkling Water: A refreshing glass of sparkling water or flavored seltzer cuts through the richness, cleansing the palate and making each scone taste even better.
- Ice Cream: Serve with a scoop of vanilla or almond ice cream for a decadent dessert twist that will leave everyone craving more.
- Fruit Smoothie: A berry smoothie blends fruity flavors with creamy textures, making for a delightful and nutritious pairing that brightens the meal.
- Coffee: A hot cup of coffee adds a rich, bold contrast that enhances the scones’ flavors, creating a comforting breakfast or snack moment.
Make Ahead Options
These Gluten-Free Almond Flour Scones are perfect for meal prep, allowing you to enjoy fresh-baked goodness with minimal effort on busy mornings! You can prepare the dough up to 24 hours in advance, storing it tightly covered in the refrigerator. Simply shape the dough into a disc and cut it into wedges before refrigerating to prevent the scones from browning. When you're ready to bake, place the scones directly on a lined baking sheet and pop them in the preheated oven—no need to thaw! This way, you’ll enjoy fresh, fluffy scones just as delicious as if you made them that day, saving you precious time without compromising on flavor.
Gluten-Free Almond Flour Scones Variations
Feel free to sprinkle your own twist on these delicious scones for an unforgettable treat that excites your senses.
-
Nutty Flavor: Add ½ cup of chopped nuts like walnuts or pecans to the dough for a delightful crunch and a boost of healthy fats. Incorporating nuts provides a wonderful texture and complements the almond flour beautifully.
-
Citrus Zest: Stir in the zest of one lemon or orange for a refreshing citrus flavor. This brightens up the scones and adds a lovely aroma that dances in the kitchen while they bake.
-
Spiced Up: Mix in 1 teaspoon of cinnamon or pumpkin spice for a cozy warmth. The spices add a comforting depth that’s perfect for chilly mornings or holiday gatherings.
-
Savory Spin: Substitute the sugar with grated cheese and add herbs like rosemary or thyme for a savory version. Picture these delightful scones pairing perfectly with your favorite soup or salad!
-
Coconut Delight: Replace half the almond flour with additional coconut flour for an even more tropical flavor. The coconut will enhance the sweetness while also adding a lovely hint of the tropics to each bite.
-
Chocolate Lovers: For a rich and indulgent treat, add ½ cup of dark chocolate chunks. These melty bits create a luxurious experience and will make each scone feel like a special dessert.
-
Fruit Medley: Combine ½ cup of assorted dried fruits such as apricots, raisins, or figs for a sweet and chewy texture throughout the scones. This fruity mix adds a burst of flavor that complements the nutty scone base perfectly.
-
Extra Moisture: Swap out almond milk for buttermilk or yogurt for a touch of tanginess and additional moisture. This simple swap may just elevate your scones to the next level, making them irresistibly tender.
If you're looking for more insights, don’t forget to explore how to prepare the toppings for your scones, like checking out some amazing homemade jam recipes to elevate your breakfast!
Expert Tips for Gluten-Free Almond Flour Scones
Perfect Butter Temperature: Use cold butter: It’s crucial to keep the butter cold to ensure flaky layers in your scones. Room temperature butter won't give you the same texture.
Don’t Overmix: Gently stir: When combining wet and dry ingredients, mix just until combined. Overmixing can lead to dense scones, which you want to avoid for these Gluten-Free Almond Flour Scones.
Watch the Baking Time: Keep an eye on them: Baking times can vary slightly with different ovens—check for a golden brown color and a clean toothpick.
Customize Wisely: Add-ins matter: Feel free to incorporate dried fruit or chocolate chips, but make sure they’re evenly distributed without overmixing.
Cool Down Properly: Let them set: Allow the scones to cool on the baking sheet for a few minutes before moving them to a wire rack to maintain their fluffiness.
How to Store and Freeze Gluten-Free Almond Flour Scones
Fridge: Store the scones in an airtight container for up to 3 days. This keeps them fresh and maintains their delightful texture for your enjoyment.
Freezer: For longer storage, freeze the scones individually wrapped in plastic wrap or placed in a freezer bag for up to 2 months. This way, you can enjoy a homemade treat anytime!
Reheating: When you're ready to enjoy, simply reheat the frozen scones in a preheated oven at 350°F (175°C) for about 10-15 minutes. The scones will regain their warmth and fluffiness, making them just as irresistible as when they were freshly baked.

Gluten-Free Almond Flour Scones Recipe FAQs
How do I choose the right almond flour for this recipe?
Absolutely! When selecting almond flour, opt for a finely ground option to achieve the best texture for your Gluten-Free Almond Flour Scones. If you find blanched almond flour, it’s even better since it removes the skins, allowing for a finer crumb and lighter scone.
What’s the best way to store leftover scones?
The more the merrier! Store your scones in an airtight container at room temperature for up to 3 days. If you want to keep them longer, I recommend refrigerating them for optimal freshness. Just be sure they are fully cooled before sealing.
Can I freeze these scones?
Absolutely! To freeze your Gluten-Free Almond Flour Scones, wrap each scone individually in plastic wrap or place them in a freezer bag before sealing. They can last up to 3 months in the freezer. When you're ready to eat, reheat them in a preheated oven at 350°F (175°C) for about 10-15 minutes until warm and fluffy.
What should I do if my dough is too crumbly?
If you find your dough a bit too crumbly, don’t worry! You can add a touch more almond milk—start with a tablespoon and mix gently. This should help bind the ingredients without overmixing, ensuring your scones remain light and fluffy. The key is to keep the dough moist but not sticky!
Are there any dietary considerations for this recipe?
Very! This recipe is naturally gluten-free, making it perfect for those with sensitivities. However, if you’re concerned about allergies, make sure your almond flour and other ingredients are certified gluten-free. Also, if you're sharing with pets, be cautious as almonds can be harmful to dogs, so it’s best to keep these treats for the humans!
Irresistible Gluten-Free Almond Flour Scones You’ll Love
Ingredients
Equipment
Method
- Preheat your oven to 350°F (175°C) and line a baking sheet with parchment paper.
- In a large mixing bowl, combine almond flour, coconut flour, granulated sugar, baking powder, and salt.
- Add cold, cubed unsalted butter and work it into the dry ingredients until it resembles coarse crumbs.
- In a separate bowl, whisk together eggs, almond milk, and vanilla extract until well combined.
- Pour the wet mixture into the dry ingredients and stir gently, adding in any optional ingredients if desired.
- Turn the dough out onto a lightly floured surface and shape it into a disc about 1-inch thick.
- Cut the disc into 8 wedges and place them on the prepared baking sheet.
- Bake for 15-20 minutes until golden brown and a toothpick comes out clean.
- Let cool on the baking sheet for 5 minutes before transferring to a wire rack.


Leave a Reply