
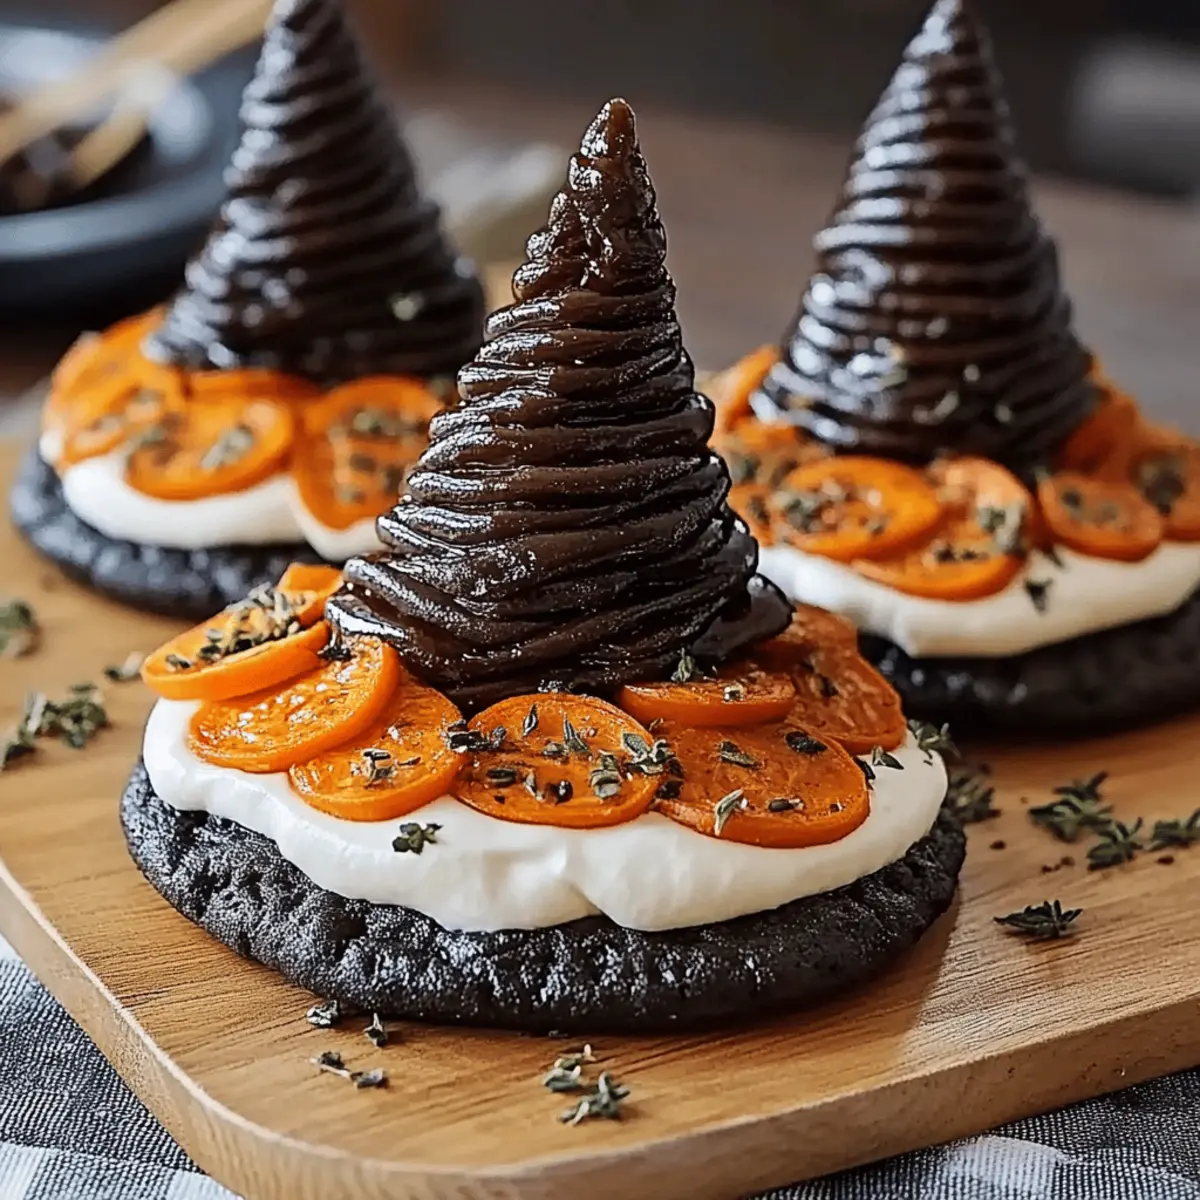
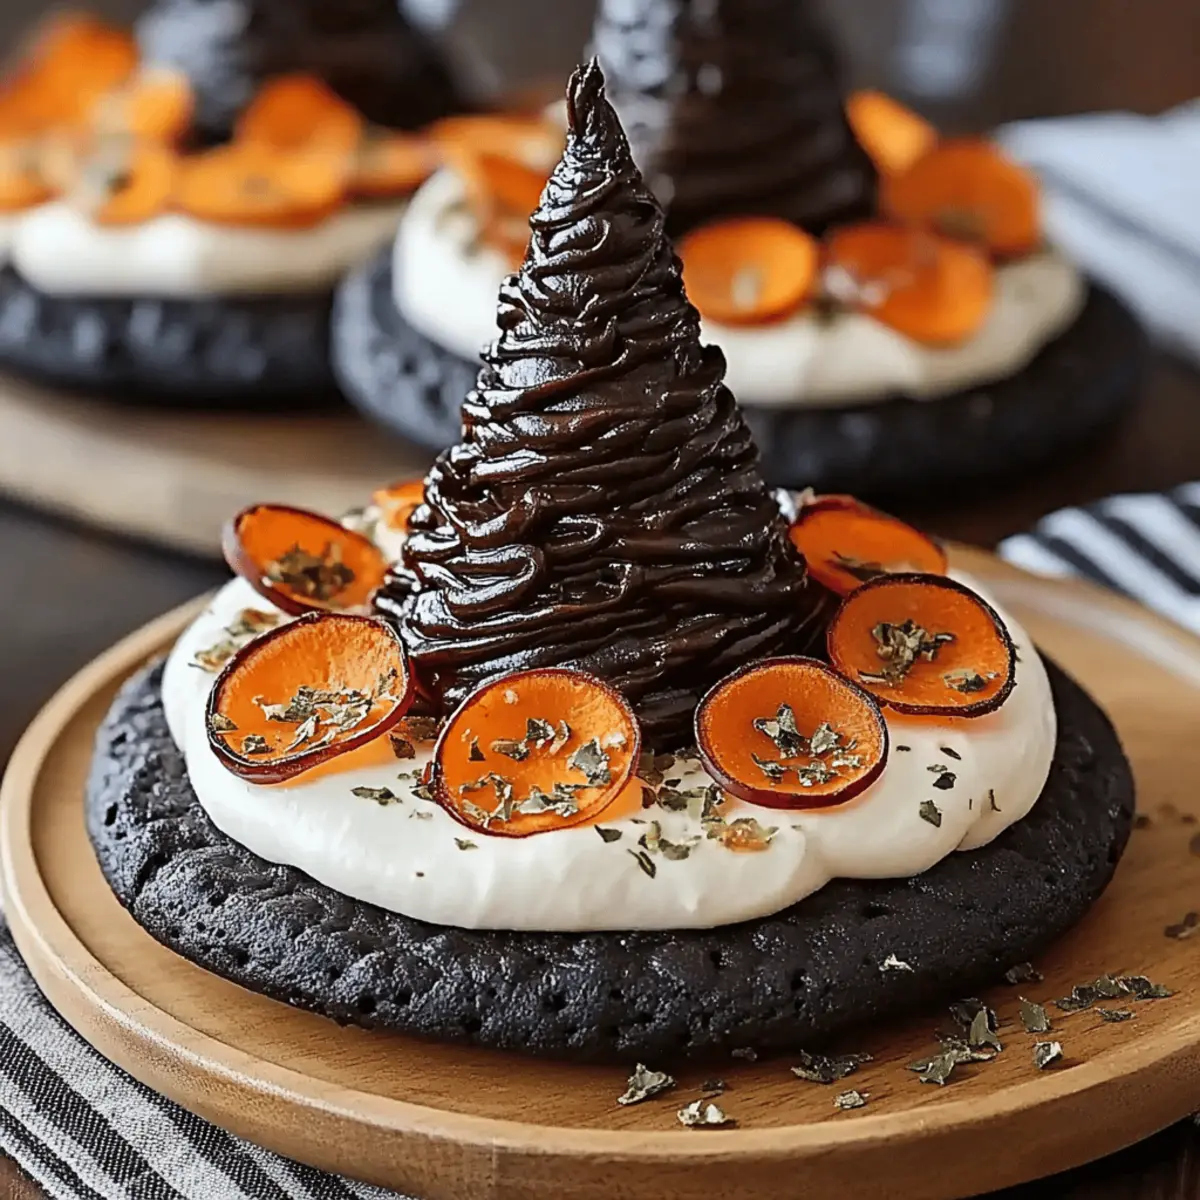
As I unwrapped a package of Oreo cookies on a chilly autumn afternoon, the delightful scent of chocolate filled my kitchen, instantly sparking nostalgic memories of childhood treats. Today, I'm transforming these beloved cookies into fun and festive Oreo Witch Hat Cookies. This recipe is not just a quick 20-minute conjuration, but also a perfect way to bring some Halloween cheer to your home. With minimal effort, you'll create impressive bites that are sure to captivate both kids and adults alike, making them the star of any gathering. Plus, they’re easily customizable to suit your own festive flair! Curious to see how this magical treat comes together? Let’s dive in!
Why Are These Oreo Witch Hat Cookies Amazing?
Quick and Easy: With just 20 minutes of prep, you’ll delight in the effortless magic of this recipe.
Festively Fun: Perfectly shaped like witch hats, these treats are a hit during Halloween and beyond.
Kid-Friendly: Kids love helping assemble these treats, making it a great family activity!
Deliciously Sweet: The blend of creamy filling, chocolate kisses, and sprinkles creates a decadent flavor explosion.
Customizable: Whether you add festive sprinkles or chocolate drizzle, you can tailor them to your personal taste—just like in my Hot Cocoa Cookies or Cake Batter Cookies recipes!
Crowd-Pleaser: These cookies are sure to impress at parties, leaving everyone wanting more!
Oreo Witch Hat Cookies Ingredients
For the Cookies
- Oreo cookies – One package provides a delightful chocolate base for our witch hats.
- Chocolate kisses – These melt perfectly to create the iconic hat tip!
For the Filling
- Butter (softened) – This adds a creamy texture that binds everything together.
- Powdered sugar – Gives the filling a delightful sweetness and smooth consistency.
For the Drizzle and Decoration
- White chocolate chips – Melted and drizzled on top, they create a beautiful contrast against the Oreos.
- Colorful sprinkles – Add a fun and festive touch to make your cookies pop!
Whether you’re preparing these Oreo Witch Hat Cookies for a spooky gathering or simply for a sweet treat, each ingredient plays a crucial role in preserving that whimsical charm!
Step‑by‑Step Instructions for Oreo Witch Hat Cookies
Step 1: Preheat Your Oven
Begin by preheating your oven to 350°F (175°C). This will ensure it's warmed up and ready for any baking needs, although these Oreo Witch Hat Cookies don't require baking. While the oven is heating, gather all your ingredients and equipment, so you're prepared for the exciting assembly process ahead.
Step 2: Prepare the Oreos
Carefully separate all the Oreo cookies, using only one half with the cream for each cookie. Place the cream-less halves aside, as we will not use them in this recipe. The vibrant chocolate cookies will form the base of your whimsical witch hats, so make sure to keep them intact for a sturdy design.
Step 3: Make the Filling
In a medium bowl, mix the softened butter and powdered sugar together until you achieve a fluffy, creamy consistency. This may take about 2-3 minutes of vigorous mixing. The filling will add a delightful sweetness and smooth texture to your Oreo Witch Hat Cookies, so ensure it is thoroughly combined.
Step 4: Assemble the Cookies
Spread a generous amount of the creamy filling onto the cream-less side of an Oreo half. Then, gently press another Oreo half on top to create a delightful sandwich. Arrange the assembled cookies on a baking tray lined with parchment paper, ensuring they are well spaced to allow for easy decorating later on.
Step 5: Melt the Chocolate Kisses
Melt the chocolate kisses in a microwave-safe bowl for about 30 seconds, then stir. Continue heating in 10-second intervals until they are soft and smoothly melted. Once melted, carefully place a chocolate kiss on top of each Oreo sandwich, serving as the tip of your witch hats.
Step 6: Drizzle the White Chocolate
Next, melt the white chocolate chips in the microwave for about 30 seconds and stir until smooth. Using a fork or a piping bag, drizzle the melted white chocolate over the cookies while they’re still warm. This will create a beautiful contrast and adhere any sprinkles you wish to add.
Step 7: Add Colorful Sprinkles
While the white chocolate drizzle is still wet, generously sprinkle the colorful sprinkles over each Oreo Witch Hat cookie. This whimsical touch will not only enhance the visual appeal but also add a delightful crunch. Allow your creations to rest for a few moments as the chocolate cools.
Step 8: Cool and Serve
Carefully transfer the finished cookies to a wire rack and allow them to cool completely before serving. This will help the chocolate set perfectly. After about 10-15 minutes, your Oreo Witch Hat Cookies will be ready to enchant friends and family at any gathering!

What to Serve with Tasty Oreo Witch Hat Cookies
These enchanting treats create a whimsical dessert table, perfect for your next gathering or Halloween party.
-
Chilled Milk: The classic pairing, cold milk enhances the rich chocolate flavor and adds a nostalgic touch.
-
Pumpkin Spice Latte: This seasonal beverage complements the sweetness of the cookies with warm spices, making every bite feel festive.
-
Fruit Platter: A selection of fresh fruits adds a refreshing contrast to the cookies' sweetness, balancing your dessert spread beautifully.
-
Caramel Sauce: Drizzling some warm caramel over the cookies elevates the treat, adding a gooey sweetness that’s irresistible.
-
Vanilla Ice Cream: Serving these cookies alongside a scoop of creamy vanilla ice cream creates a dreamy texture contrast and enhances indulgence.
-
Chocolate Milkshake: Blend this up for a decadent drink that perfectly pairs with the cookies’ flavors, making it a fun, creamy complement for all ages.
Gather your favorites, and create a delightful spread that’ll have everyone savoring the bites long after the last cookie is gone!
How to Store and Freeze Oreo Witch Hat Cookies
Room Temperature: Keep your Oreo Witch Hat Cookies in an airtight container at room temperature for up to 3 days. This way, they stay fresh and ready for a sweet treat anytime!
Fridge: If you want to extend their freshness, store the cookies in the fridge. They will remain good for up to 1 week, but make sure to bring them back to room temperature before serving for the best taste.
Freezer: To freeze, place the assembled cookies in a single layer in a freezer-safe container for up to 2 months. Thaw at room temperature before enjoying or pop them back in the microwave for a few seconds to soften.
Reheating: If you want to revitalize the flavor, reheat in the microwave for about 5-10 seconds only; this will warm them up without melting the chocolate tops excessively!
Expert Tips for Oreo Witch Hat Cookies
-
Hands-On Help: Involve your kids in the assembly process; it’s a fun activity that allows for creativity and bonding while making these Oreo Witch Hat Cookies.
-
Avoid Overheating: When melting chocolate kisses or white chocolate chips, heat in short intervals. Overheating can cause them to seize up and become unusable.
-
Sprinkle Wisely: To ensure that the sprinkles stick, apply them immediately after drizzling the white chocolate; clean-up and presentation will reward you with gorgeous cookies.
-
Cookie Stability: For sturdier witch hats, allow the assembled cookies to set in the refrigerator for a few minutes before decorating. This helps maintain their shape during the decorating process.
-
Oreo Selection: Make sure to use full-sized Oreos for optimal height; mini Oreos may not hold the toppings or achieve the same festive look.
-
Easily Customizable: Feel free to experiment with colorful sprinkles or even chocolate drizzle designs to make your Oreo Witch Hat Cookies uniquely yours!
Make Ahead Options
These Oreo Witch Hat Cookies are perfect for those busy days when you need a quick, delightful treat! You can prepare the cookie sandwiches (the Oreo halves with filling) up to 24 hours in advance and refrigerate them in an airtight container to maintain freshness. The colorful sprinkles can be added at the time of serving to keep them vibrant and crunchy. When you're ready to impress your guests, simply melt the chocolate kisses and drizzle the white chocolate on top of the assembled cookies, finishing with sprinkles while the chocolate is still warm. This makes for a stress-free, spooktacular dessert that’s just as delicious as if you made them the same day!
Oreo Witch Hat Cookies Variations
Feel free to get creative with these delightful cookies and make them your own!
-
Gluten-Free: Use gluten-free Oreos for a tasty twist that everyone can enjoy without worry.
-
Nutty Addition: Add a spoonful of creamy peanut butter to the filling for a deliciously rich and nutty flavor.
-
Minty Magic: Swap out regular Oreos for mint-flavored Oreos to add a refreshing hint of mint to each bite.
-
Chocolaty Delight: Use dark chocolate kisses instead of regular chocolate for a deeper, more intense chocolate flavor.
-
Spooky Colors: Incorporate different colored melting chocolates for a variety of drizzle options that match your Halloween theme!
-
Vegan Swap: Replace butter with a plant-based alternative and use vegan chocolate kisses for a dairy-free version. This way, everyone can join the fun!
-
Extra Crunch: Mix in chopped nuts or crushed pretzels into the creamy filling for added texture and flavor that complements the sweetness beautifully.
Customizing your Oreo Witch Hat Cookies opens up a world of delicious possibilities. Each variation provides a unique experience, making them perfect for special occasions or simply spicing up your dessert table! You might even enjoy crafting a delightful batch of Mini Oreo Stuffed cookies to accompany your spooky treats.
Oreo Witch Hat Cookies Recipe FAQs
Can I use different types of Oreo cookies?
Absolutely! Feel free to experiment with different Oreo flavors like mint or peanut butter to create unique twists on your Oreo Witch Hat Cookies. Just keep in mind that these variations will slightly alter the flavor profile, making it an exciting adventure for your taste buds.
How should I store leftover Oreo Witch Hat Cookies?
To maintain freshness, store your Oreo Witch Hat Cookies in an airtight container at room temperature for up to 3 days. If you'd like to extend their shelf life, don’t hesitate to pop them into the fridge, where they’ll remain delicious for up to 1 week!
Can I freeze these cookies for later?
Yes, you can freeze these delightful treats! Simply place the assembled cookies in a single layer within a freezer-safe container, ensuring there's parchment paper between layers to avoid sticking. They can be frozen for up to 2 months. To enjoy, just thaw them at room temperature or microwave for about 5-10 seconds until slightly softened.
What should I do if my white chocolate drizzle isn’t smooth?
If your white chocolate malfunctions and seizes up, don’t worry! Simply add a teaspoon of vegetable oil or shortening to the bowl and melt it again in the microwave in 10-second increments. This will help restore its smooth, drizzle-ready consistency.
Can I make these cookies nut-free?
Of course! These Oreo Witch Hat Cookies are already nut-free as long as you ensure that the ingredients you choose (like the chocolate kisses and sprinkles) are confirmed to be nut-free. Always check labels to avoid any allergens, especially if you're serving these cookies to guests with specific dietary needs.
Are Oreo Witch Hat Cookies suitable for pets?
Sadly, our furry friends can’t enjoy these treats. Chocolate is toxic to dogs and cats, so please keep these delicious creations out of their reach. It's always best to reserve human snacks for humans only!
Oreo Witch Hat Cookies That Are Spooktacularly Delicious
Ingredients
Equipment
Method
- Preheat your oven to 350°F (175°C).
- Carefully separate all the Oreo cookies and keep the cream-filled halves.
- Mix softened butter and powdered sugar until fluffy and creamy.
- Spread creamy filling on one Oreo half and top with another.
- Melt chocolate kisses and place one on top of each sandwich.
- Melt white chocolate chips and drizzle over cookies.
- Sprinkle colorful sprinkles over the melted white chocolate.
- Transfer to a wire rack and cool completely before serving.


Leave a Reply