
With a warm aroma wafting through your kitchen, you’ll soon discover a delightful twist on the classic pairing of sweet and savory. These Blue Cheese Stuffed Pears are a gourmet treat that you can whip up in just 30 minutes—perfect for impressing dinner guests or indulging in a cozy night at home. Not only do they make for an elegant appetizer, but they also present a wonderful opportunity to elevate simple ingredients into something extraordinary. The creamy blue cheese melds beautifully with the sweetness of the pear, while the walnuts provide a satisfying crunch. Who knew that such a refined dish could be so easy to prepare? Ready to impress your taste buds and create a memorable meal? Let’s dive into this delightful recipe!
Why are Blue Cheese Stuffed Pears irresistible?
Quick and Easy: In just 30 minutes, you can create an impressive dish that elevates any meal. Perfect for beginners or seasoned chefs, this recipe simplifies gourmet cooking.
Sweet and Savory Harmony: The creamy blue cheese beautifully balances the natural sweetness of the pear, complemented by crunchy walnuts for that perfect textural contrast.
Versatile Serving Options: Enjoy them as an elegant appetizer, a stunning side dish, or a unique addition to a salad. They pair wonderfully with wines or even as part of a cheese board!
Crowd-Pleasing Delight: Your guests will be raving about this unique combination. These Blue Cheese Stuffed Pears are bound to impress anyone, transforming simple ingredients into a sophisticated dish.
Check out more delightful appetizers like these stuffed mushrooms or bruschetta to complete your menu!
Blue Cheese Stuffed Pears Ingredients
For the Pears
• Medium ripe pears – Choose pairs that are slightly firm but yield to gentle pressure for the best texture.
For the Filling
• Crumpled blue cheese – Adds a tangy, creamy essence that pairs magically with the sweetness of the pears.
• Chopped walnuts – They provide a delightful crunch; feel free to use pecans or almonds as a tasty alternative.
• Fresh lemon juice – A touch of acidity that prevents the pears from browning while enhancing their flavor.
• Salt – Enhances the flavors; use sea salt for a gourmet twist.
• Pepper – A dash of fresh ground pepper adds a subtle heat that complements the richness of the cheese.
For Drizzling
• Honey – Drizzle warm honey over the stuffed pears for an exquisite finish; maple syrup also works beautifully for a unique twist!
These Blue Cheese Stuffed Pears are not just a dish; they are a delightful journey for your taste buds!
Step‑by‑Step Instructions for Blue Cheese Stuffed Pears
Step 1: Preheat the Oven
Begin by preheating your oven to 375°F (190°C). This step is crucial as it ensures the perfect baking environment for your Blue Cheese Stuffed Pears. While the oven warms, gather your ingredients and equipment, including a baking sheet lined with parchment paper to catch any drips from the delicious stuffing.
Step 2: Prepare the Pears
Slice the medium ripe pears in half lengthwise, and scoop out the core with a spoon, creating a nice cavity in each pear half. Set the pear halves cut side up on the prepared baking sheet. Ensure they are evenly spaced to allow for even cooking and to prevent sticking as they bake.
Step 3: Make the Filling
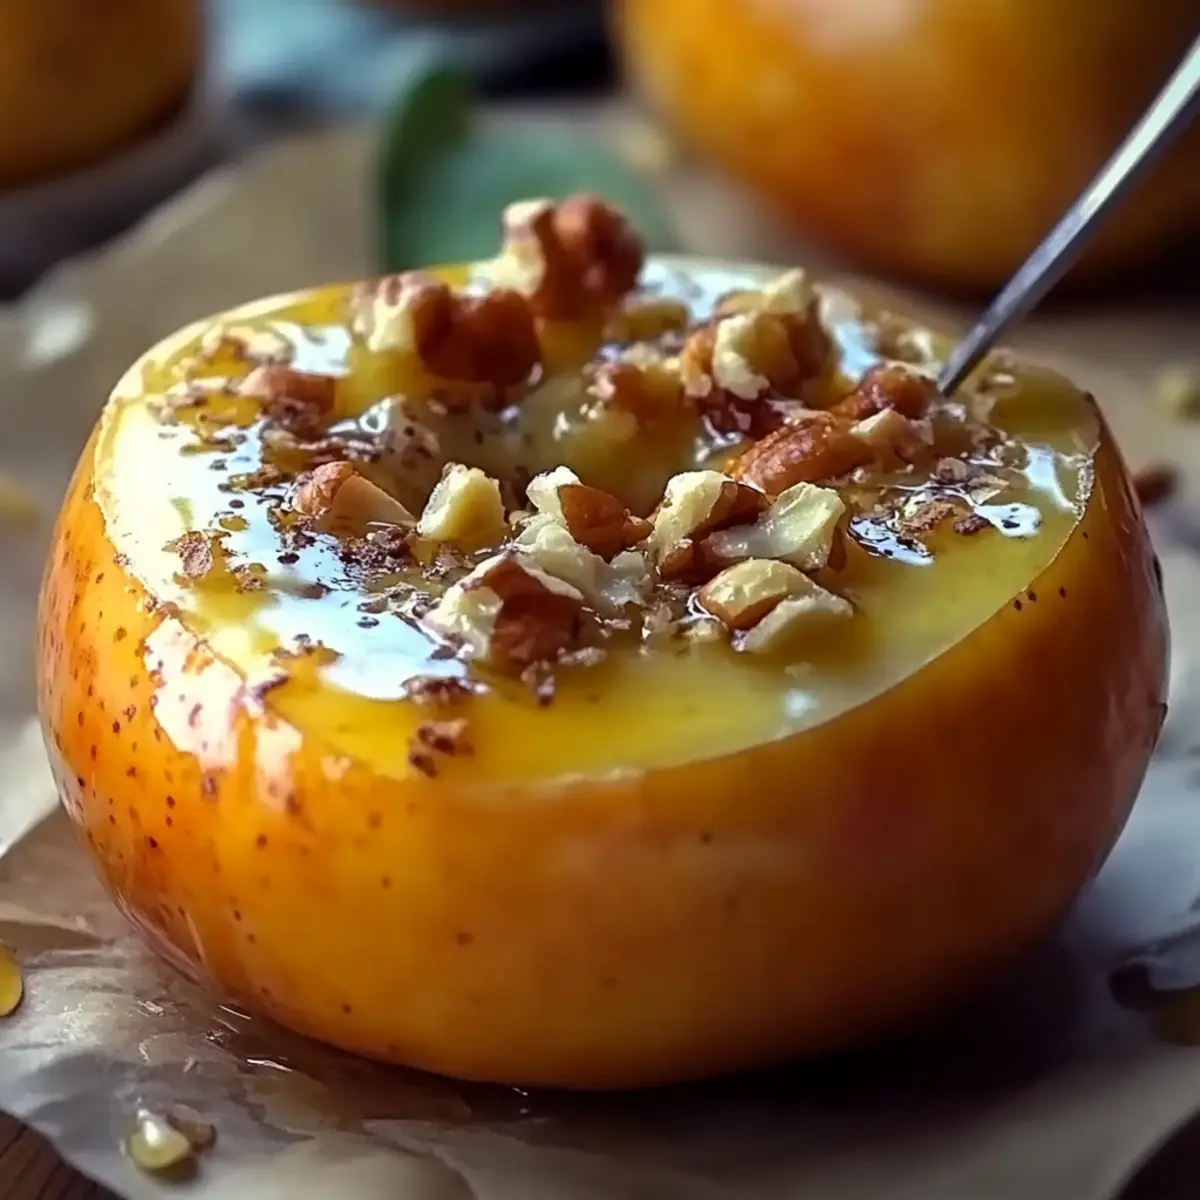
In a small mixing bowl, combine the crumbled blue cheese, chopped walnuts, fresh lemon juice, salt, and pepper. Mix well until everything is thoroughly blended. The creamy blue cheese should combine with the crunchy walnuts into a rich, inviting filling ready to transform your pears into a gourmet delight.
Step 4: Stuff the Pears
Generously spoon the blue cheese mixture into the cavity of each pear half. Don’t be shy—fill them well, as this will create a delightful flavor bomb. Ensure the filling looks inviting and plump, as this will enhance the visual appeal of your Blue Cheese Stuffed Pears once baked.
Step 5: Drizzle with Honey
After stuffing the pears, drizzle a bit of honey over the top of each filled half. This sweet touch will caramelize slightly during baking, enhancing the overall flavor. If you prefer, you can also use maple syrup for a unique twist. Visualize the golden honey glistening against the blue cheese—beautiful!
Step 6: Bake the Pears
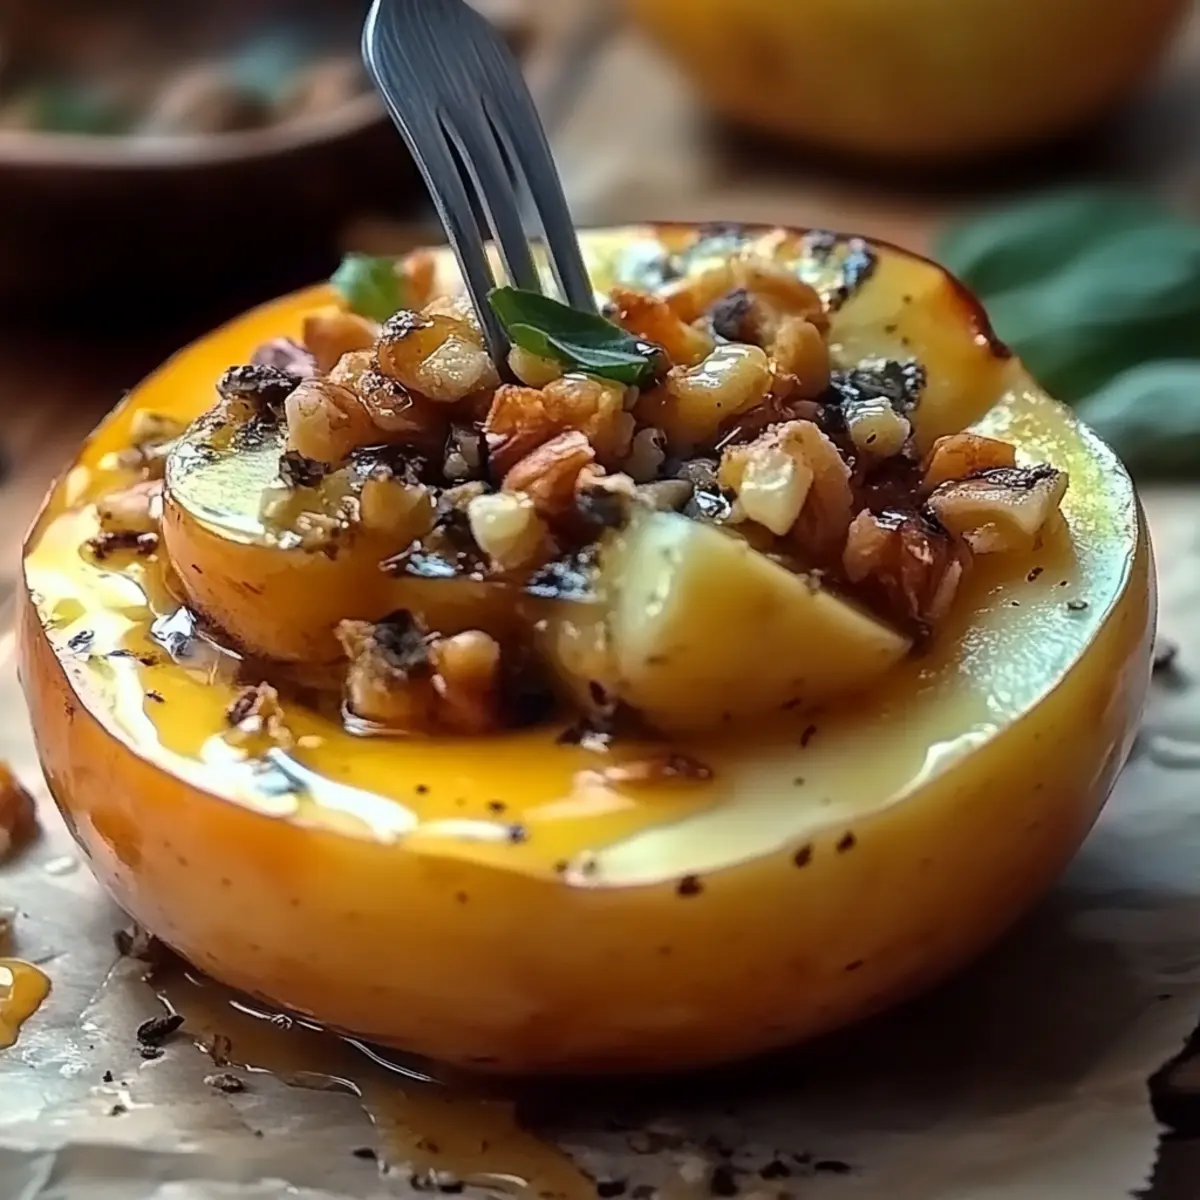
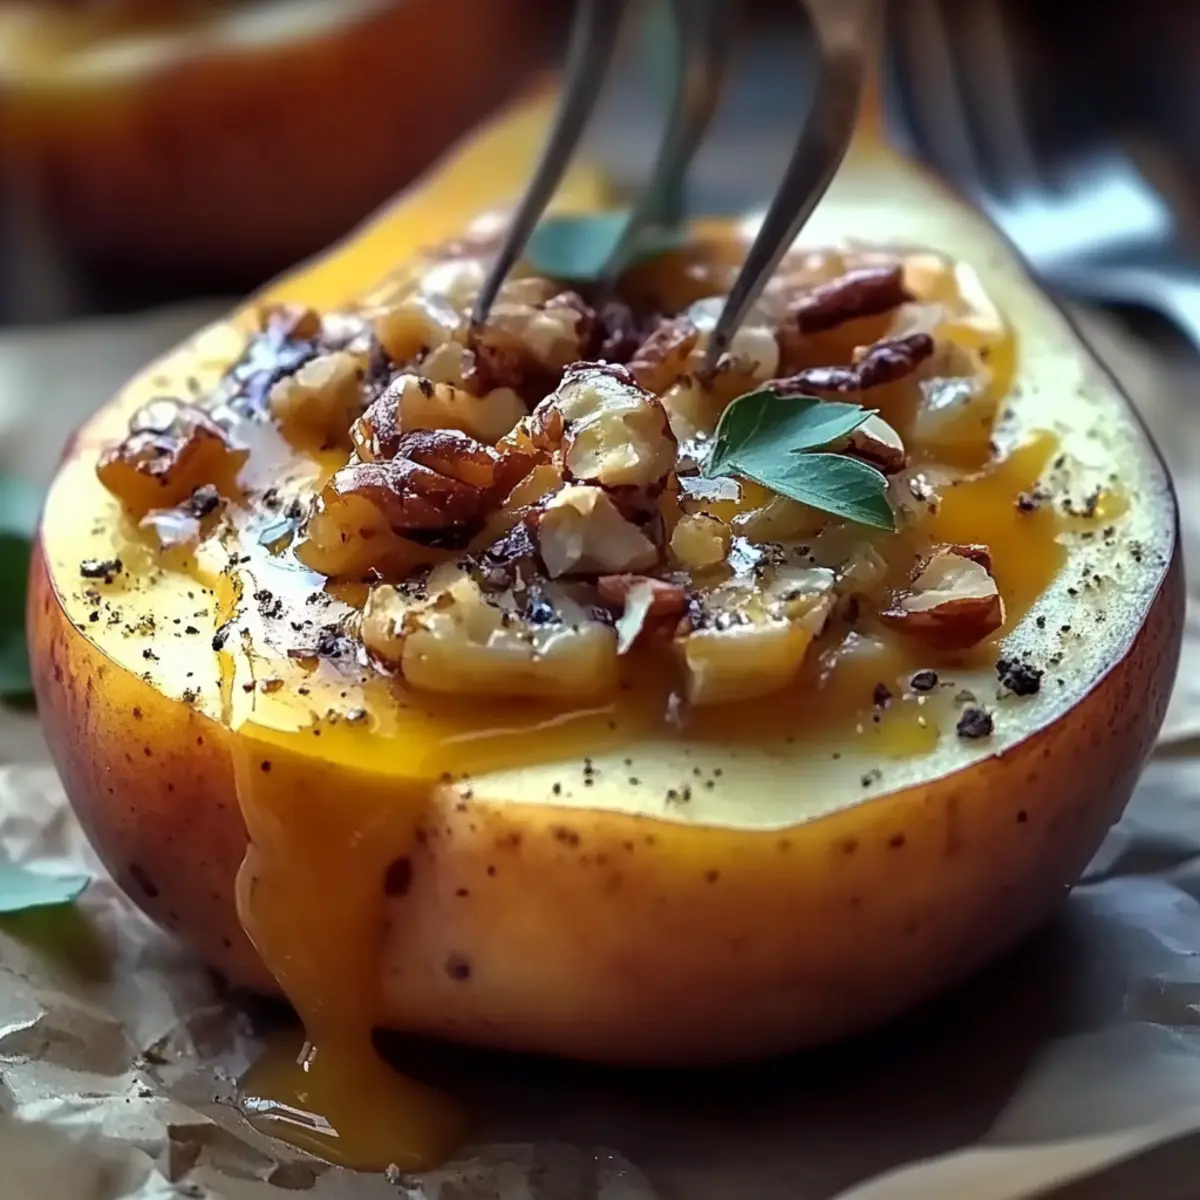
Place your stuffed pears in the preheated oven and bake for 15-20 minutes. Keep an eye on them as they cook—you're looking for a tender pear that still holds its shape and a filling that turns a lovely golden brown. The sweet aroma wafting through your kitchen will be a delightful preview of what's to come.
Step 7: Cool and Serve
Once baked, remove the Blue Cheese Stuffed Pears from the oven and let them cool for a few minutes on the baking sheet. This resting time allows the flavors to settle. If desired, drizzle with additional honey before serving them over a bed of fresh arugula or mixed greens to add an elegant touch to your plate.
Blue Cheese Stuffed Pears Variations
Feel free to get creative with these Blue Cheese Stuffed Pears to suit your taste preferences and dietary needs!
-
Vegan Option: Substitute blue cheese with cashew cheese or a crumbly vegan feta for a plant-based delight.
-
Nut-Free: Omit the walnuts and use sunflower seeds instead for that crunchy texture without the nuts.
-
Spicy Kick: Add a pinch of red pepper flakes or a few slices of jalapeño in the filling for a delightful heat that contrasts beautifully with the sweetness of pears.
-
Herbed Delight: Mix in fresh herbs like thyme or rosemary into the cheese filling for a fragrant, savory boost.
-
Fruit Fusion: Try adding crumbled dried cranberries or figs to the filling for an extra layer of sweetness and a pop of color.
-
Cheese Variety: Instead of blue cheese, use goat cheese or feta for a different but equally delicious flavor profile.
-
Balsamic Drizzle: Swap the honey for a balsamic reduction for a tangy twist that adds depth and contrast.
-
Stuffed with Sausage: For a heartier variation, mix cooked sausage with the cheese and walnuts for a satisfying savory touch.
Explore these variations and make the recipe truly your own, ensuring each bite is bursting with flavor! Check out other unique appetizers like these stuffed mushrooms or bruschetta to complement your culinary creations!
Expert Tips for Blue Cheese Stuffed Pears
-
Choose Ripe Pears: Opt for pears that are slightly firm yet yield to gentle pressure, ensuring they maintain shape while baking.
-
Mix Well: Blend the blue cheese, walnuts, lemon juice, salt, and pepper thoroughly to create a cohesive filling for your Blue Cheese Stuffed Pears.
-
Don’t Overstuff: While it's tempting to pack in the filling, avoid overstuffing to prevent spillover during baking. Leave a bit of room for expansion.
-
Honey Alternative: If you're out of honey, try maple syrup for a unique flavor twist that still complements the dish beautifully!
-
Watch the Bake Time: Keep an eye on your pears in the oven; bake until tender and the filling is golden brown, avoiding mushy texture.
-
Garnish Elegantly: Serve on a bed of arugula or mixed greens for a beautiful presentation that enhances the dish’s visual appeal.
How to Store and Freeze Blue Cheese Stuffed Pears
Fridge: Keep any leftover Blue Cheese Stuffed Pears in an airtight container for up to 3 days. They make a fantastic snack or quick addition to your meals!
Freezer: To freeze, wrap the stuffed pears individually in plastic wrap and then place them in a freezer-safe bag. They can last up to 2 months; simply thaw in the fridge before reheating.
Reheating: Reheat in the oven at 350°F (175°C) for about 10-15 minutes until warmed through. This retains the lovely texture and flavor of the blue cheese and pear combination.
Serving Tip: For a fresh taste, consider adding a drizzle of honey just before serving after reheating!
Make Ahead Options
These Blue Cheese Stuffed Pears are perfect for meal prep, allowing you to savor this delicious dish with minimal effort! You can prepare the filling—a delightful blend of crumbled blue cheese, chopped walnuts, lemon juice, salt, and pepper—up to 24 hours in advance. Simply refrigerate it in an airtight container to maintain freshness. You can also slice the pears and coat them lightly with lemon juice to prevent browning; store them in the fridge for up to 3 days. When it’s time to enjoy, simply stuff the pears with the prepped filling, drizzle with honey, and bake as instructed. You'll have a gourmet treat ready in no time!
What to Serve with Blue Cheese Stuffed Pears?
Elevate your dining experience by pairing these delightful bites with complementary flavors and textures, creating a memorable meal.
-
Creamy Mashed Potatoes: The velvety texture of mashed potatoes offers a comforting contrast to the sweet and savory stuffed pears.
-
Arugula Salad: Tossed with lemon vinaigrette, the peppery arugula brightens the rich flavors of the blue cheese, balancing every bite beautifully.
-
Balsamic Glaze: A drizzle of balsamic reduction adds tangy sweetness, enhancing the pairing with its sharp yet smooth flavor profile.
-
Crusty Bread: Serve with a warm, crusty baguette to soak up the sweet honey and savory cheese, making every mouthful a delight.
-
Fig Jam: The earthy sweetness of fig jam perfectly complements the salty blue cheese, a heavenly pairing to elevate your appetizer experience.
-
Sauvignon Blanc: This crisp wine's zesty notes and acidity help cut through the richness of the cheese, refreshing your palate between bites.
-
Candied Nuts: Offer a small bowl of sweet, crunchy nuts on the side for an added element of texture that contrasts beautifully with the softness of the pears.
-
Chocolate Fondue: For dessert, rich chocolate fondue provides a sweet end to the meal, echoing the sweet notes of honey in the stuffed pears.
Let your culinary adventure begin with these pairings, enhancing the delightful experience of your Blue Cheese Stuffed Pears!

Blue Cheese Stuffed Pears Recipe FAQs
What type of pears should I use for this recipe?
Absolutely! For the best results, choose medium ripe pears that are slightly firm, such as Anjou or Bosc. They should yield to gentle pressure without feeling mushy, ensuring they maintain their shape while baking.
How should I store leftover Blue Cheese Stuffed Pears?
Store any leftover Blue Cheese Stuffed Pears in an airtight container in the refrigerator for up to 3 days. They'll make a delicious snack or an easy addition to your meals.
Can I freeze Blue Cheese Stuffed Pears?
Yes, you can! To freeze, wrap the stuffed pears individually in plastic wrap and place them in a freezer-safe bag or container. They will keep well for up to 2 months. When you’re ready to enjoy them, simply thaw them in the refrigerator overnight and reheat in a 350°F (175°C) oven for about 10-15 minutes until warmed through.
What should I do if my filling is too crumbly?
If you find that your blue cheese mixture is too crumbly, it might be helpful to either add a touch more lemon juice or consider mixing in a small amount of cream cheese or sour cream. This will help bind the filling together, making it easier to stuff your pears without falling apart.
Are Blue Cheese Stuffed Pears suitable for my gluten-sensitive guests?
Yes! This recipe is naturally gluten-free. However, always double-check the labels on your blue cheese and any additional ingredients to ensure that they are gluten-free, as brands can vary.
How can I add more flavor to the pears?
To elevate the flavor, consider incorporating herbs into the filling, such as fresh thyme or rosemary. You might also sprinkle a pinch of cayenne pepper or nutmeg for warmth. Just mix these in when you prepare your filling; it’ll add a delightful surprise to every bite!
Blue Cheese Stuffed Pears: A Sweet, Savory Delight You’ll Love
Ingredients
Equipment
Method
- Preheat your oven to 375°F (190°C).

- Slice the medium ripe pears in half lengthwise, and scoop out the core with a spoon.
- In a small mixing bowl, combine the crumbled blue cheese, chopped walnuts, fresh lemon juice, salt, and pepper. Mix well.
- Generously spoon the blue cheese mixture into the cavity of each pear half.
- Drizzle a bit of honey over the top of each stuffed half.
- Place your stuffed pears in the preheated oven and bake for 15-20 minutes.
- Once baked, let the pears cool for a few minutes before serving.


Leave a Reply