
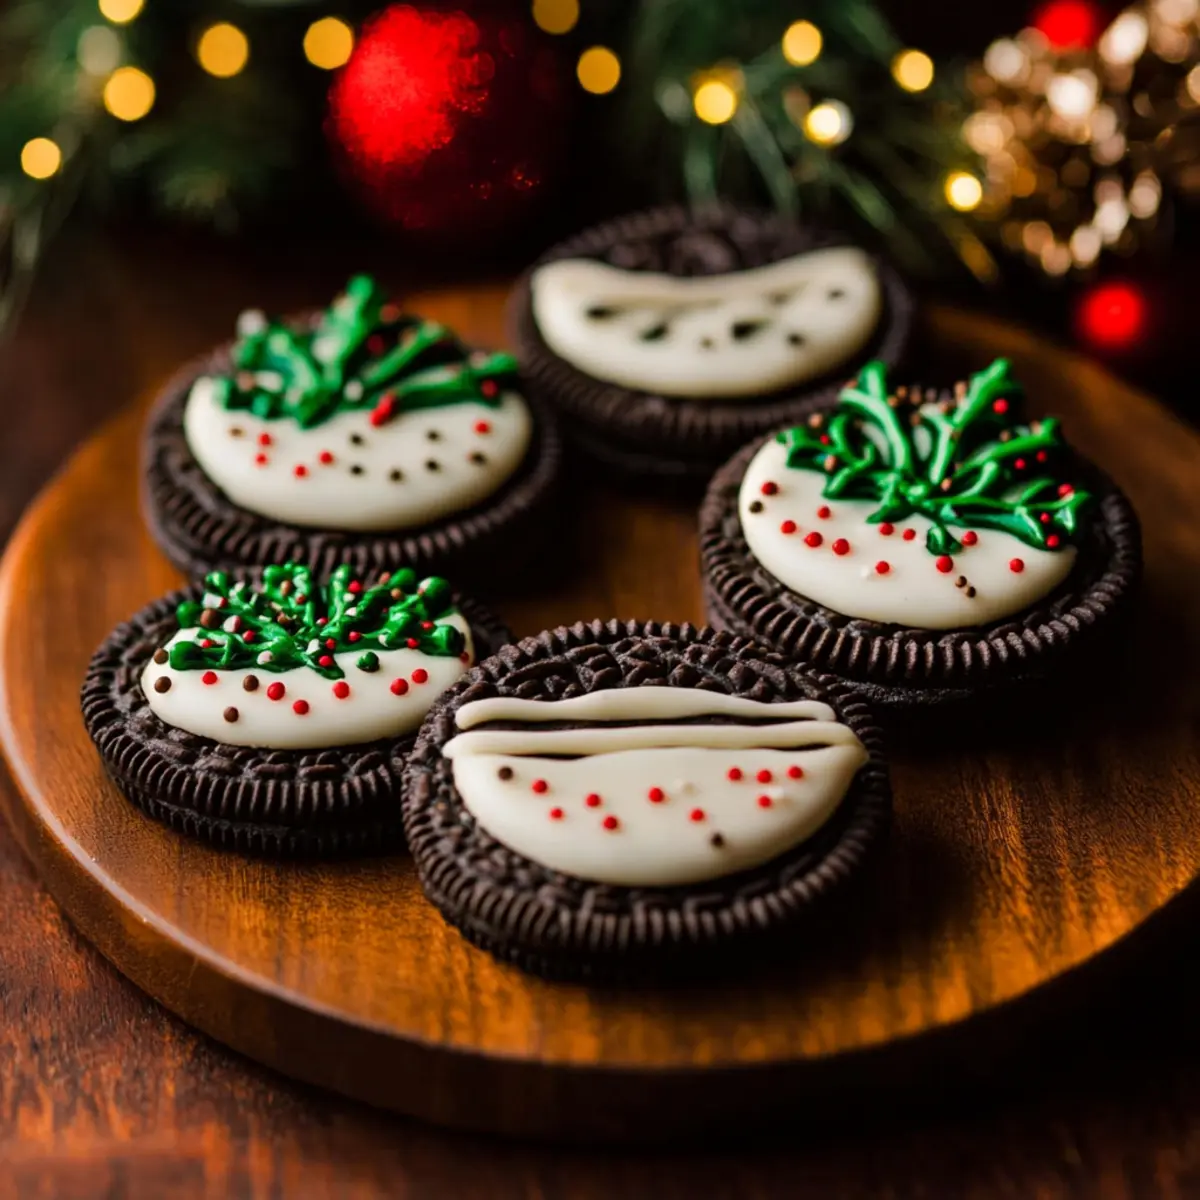
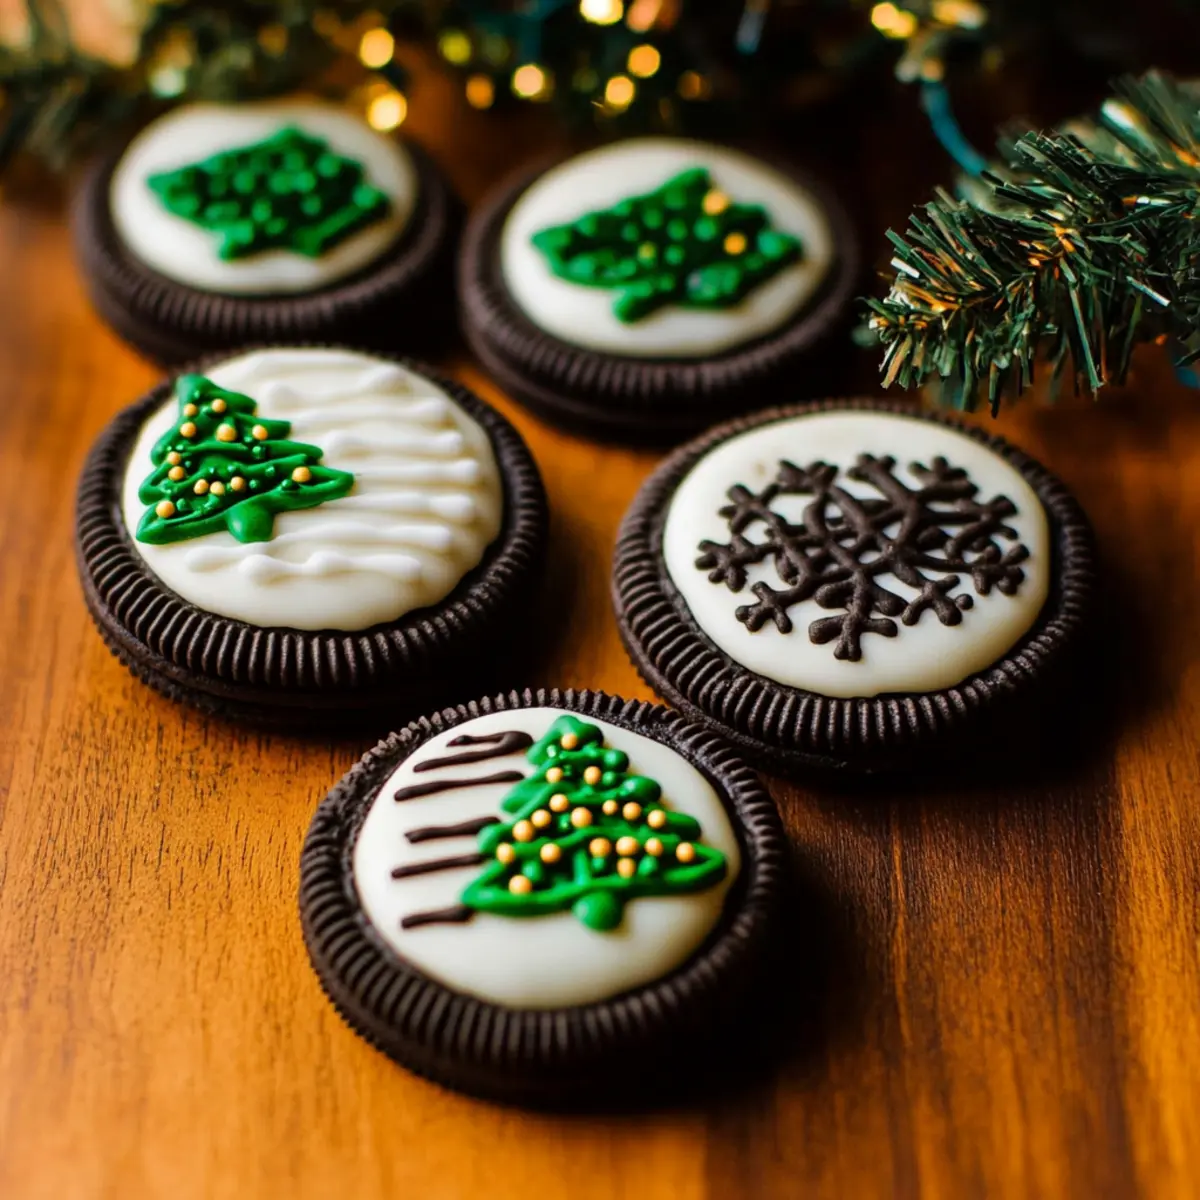
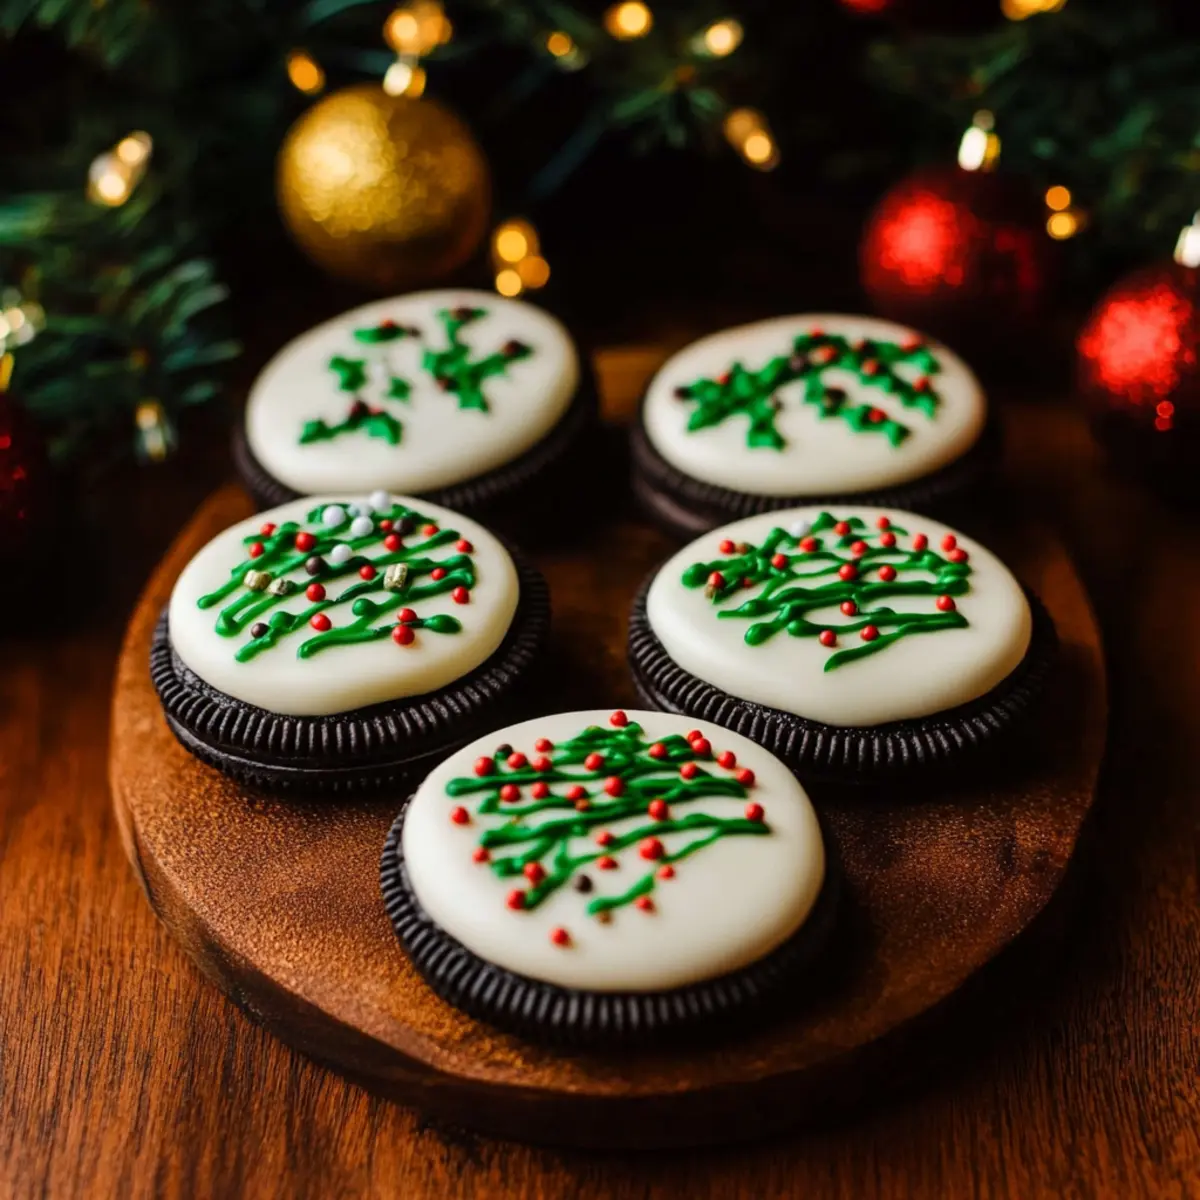
Picture this: a festive gathering, laughter filling the air, and the sweet scent of holiday treats wafting through your home. Amidst this cozy backdrop, there’s one delight that never fails to turn heads—Christmas Oreos! These little gems are the perfect no-bake indulgence that combines the classic appeal of Oreos with a cheerful holiday twist. By dipping store-bought Oreos into smooth, melted white chocolate and adorning them with whimsical Christmas tree designs made of colorful candy melts and sprinkles, you're not just making cookies; you're crafting edible joy.
What I love most about these Christmas Oreos is how effortlessly they come together, making them an excellent choice for both seasoned bakers and those just dipping their toes into the world of holiday goodies. Plus, they’re a surefire crowd-pleaser that can be customized with various Oreo flavors to suit any palate—imagine mint or peppermint Oreos dressed up for the season!
Ready to turn your holiday gathering into a sweet celebration? Let’s dive into making these festive treats that will have everyone asking for seconds!
Why Choose Christmas Oreos for Your Holidays?
Easy preparation: These Christmas Oreos require no baking, making holiday baking stress-free.
Endless variations: Switch up flavors with classic, DoubleStuf, or peppermint Oreos to suit everyone's taste.
Festive design: Create charming Christmas tree decorations that are visually appealing and delightful to eat.
Perfect for gifting: Package them in festive treat bags for a thoughtful homemade gift that friends and family will love.
Crowd-pleaser: These treats are guaranteed to be a hit at any holiday gathering—who can resist chocolate-covered Oreos?
Christmas Oreos Ingredients
• Here’s what you need for your festive cookies:
For the Coating
• White Chocolate or White Candy Melts – Ideal for coating the Oreos; white candy melts are easier to manage.
For the Oreos
• Oreos (12) – The delicious foundation of this treat; feel free to use any flavor, including classic, holiday, or peppermint.
For Decorating
• Green Candy Melts (2 ounces) – Used for creating a fun Christmas tree design; alternatively, tint melted white chocolate with gel color.
• Rainbow Nonpareils – These sprinkles add a colorful touch to your decorated Oreos; any mix of colors can be used based on your creativity.
• Yellow or Gold Beads or Stars (optional) – These can serve as decorative elements for your tree tops.
• Chocolate Jimmies (optional) – Consider these for a whimsical representation of tree trunks.
Step-by-Step Instructions for Christmas Oreos
Step 1
Begin by lining a large baking sheet with parchment paper, ensuring it’s flat to create an easy surface for your cookies. This step is crucial to prevent the Christmas Oreos from sticking as they set. Next, place your Oreo cookies nearby for quick access. This setup will make the dipping process smoother and more enjoyable.
Step 2
In a microwave-safe bowl, melt the white chocolate or candy melts in 30-second intervals, stirring frequently, until the mixture is smooth. You should see a glossy finish without any lumps after about 1-2 minutes on medium power. Be cautious to avoid burning the chocolate, as it can seize easily. A good visual cue is when the chocolate reaches a velvety consistency.
Step 3
Carefully dip the bottom half of each Oreo into the melted chocolate, using a fork to help coat them evenly. Allow any excess chocolate to drip off before placing the cookies on your prepared baking sheet. Let them set at room temperature for about 15 minutes, or until the chocolate has firmed up and is no longer sticky.
Step 4
Once the first coating is set, it's time to melt the green candy melts using the same microwave method as before. Melt in 30-second increments, stirring in between, until you achieve a smooth and pourable consistency. This vibrant green icing will be used to create the charming Christmas tree decorations on your coated Oreos.
Step 5
Transfer the melted green candy into a piping bag or a zip-top bag with a corner snipped off. With a steady hand, pipe a zig-zag line down the center of each dipped Oreo to resemble a decorative Christmas tree. This adds a fun and festive touch! You’ll notice the bright contrast against the white chocolate, making each cookie pop with holiday cheer.
Step 6
Immediately sprinkle rainbow nonpareils over the piped green icing to add color and texture. If you’re feeling extra festive, add optional decorative beads or chocolate jimmies as cute tree tops and trunks. The sprinkles will stick best if applied right after piping, so work quickly to make each cookie as charming as possible.
Step 7
Let the decorated Christmas Oreos stand at room temperature until completely hardened. This may take about 30 minutes, but they can also be refrigerated for a faster setting time. Once hardened, your delightful holiday treats are ready to be stored in an airtight container or beautifully packaged for gifting. Enjoy your festive creations with friends and family!
Christmas Oreos Variations & Substitutions
Feel free to let your creativity shine while customizing your Christmas Oreos with these fun variations!
- Flavor Swaps: Try using mint or peanut butter Oreos for a twist on the classic flavor.
- Colorful Coating: Instead of white chocolate, use dark chocolate or milk chocolate for a rich contrast.
- Vibrant Decoration: Swap green candy melts for red or blue to match your holiday theme or personal preference.
- Nutty Addition: Add a sprinkle of chopped nuts for an extra crunch and earthy flavor alongside the sweet chocolate.
- Spicy Kick: Incorporate a pinch of cinnamon or pumpkin spice into the melted chocolate for a seasonal flair.
- Crunchy Texture: Replace nonpareils with crushed peppermint candy or toffee bits for a festive crunch!
- Layered Delight: Create a Double-Stuf Oreo effect by stacking two Oreos together before dipping to amplify the filling.
- Sweet Alternatives: For a healthier option, consider using dark chocolate or coconut oil-infused candy melts for a unique flavor profile.
With these variations, you can make your Christmas Oreos perfect for any gathering or personal taste!
How to Store and Freeze Christmas Oreos
Room Temperature: Store your Christmas Oreos in an airtight container at room temperature for up to 2 weeks, ensuring they stay fresh and tasty.
Fridge: For a firmer texture, you can keep the cookies in the fridge for up to 3 weeks. Just be sure to seal them tightly to prevent any moisture.
Freezer: If you want to extend their shelf life, freeze the Christmas Oreos for up to 2 months. Place them in a single layer on a baking sheet until frozen solid, then transfer to a freezer-safe container for storage.
Reheating: When ready to enjoy, simply thaw your frozen Christmas Oreos at room temperature for about an hour before serving.
What to Serve with Christmas Oreos?
Create a delightful spread that perfectly complements the sweetness and festive spirit of these cheerful cookies!
- Hot Cocoa Bar: A rich, creamy hot chocolate pairs wonderfully with Christmas Oreos, adding warmth and comfort to your holiday gathering. Enhance it with marshmallows and whipped cream for an extra special touch.
- Gingerbread Cookies: The spiced flavor of gingerbread brings a traditional holiday taste that contrasts beautifully with the sweet, smooth chocolate of the Oreos. It’s a classic combination that evokes warm memories.
- Eggnog: This creamy, spiced drink rounds out your dessert table, offering a pleasant contrast to the crunchy texture of the cookies. Serve it chilled or warm for an extra festive element.
- Fruit Platter: Fresh fruit like sliced strawberries or tangy tangerines adds a bright, refreshing note to your dessert spread. It not only looks appealing but also provides a zesty counterbalance to the rich cookies.
- Cheesecake Bites: Mini cheesecake bites provide a creamy, rich treat that pairs exceptionally with the chocolatey sweetness of the Christmas Oreos, creating an indulgent dessert experience.
- Holiday Punched Apple Cider: A warm apple cider infused with spices complements the sweetness of the Oreos splendidly and brings a cozy atmosphere to your celebrations.
- Nutty Biscotti: For a crunchy texture to savor along with your cookies, serve nutty biscotti that offers a delightful contrast and is perfect for dipping into hot beverages.
- Chocolate Fondue: A whimsical chocolate fondue station invites guests to indulge further. Chocolate-dipped fruits or pretzels enhance the decadence while echoing the festive spirit of the Christmas Oreos.
Make Ahead Options
These Christmas Oreos are ideal for busy cooks looking to streamline their holiday preparations! You can dip the Oreos in white chocolate and let them set up to 24 hours in advance, ensuring they are ready to go when you need them. Simply store the dipped cookies in an airtight container at room temperature to maintain their delicious creaminess. If you'd like, you can also prepare the green candy melts and keep them in a piping bag in the refrigerator for up to 3 days; just warm them gently before decorating. When it’s time to serve, finish by piping the candy melts onto the Oreos and sprinkling the nonpareils, and you'll have festive treats that taste just as delightful as if made fresh!
Expert Tips for Christmas Oreos
- Melt Carefully: Slow melting is key to avoid burning your white chocolate; use medium power and stir frequently for best results.
- Shallow Dipping: Utilize a shallow bowl for melting to make dipping easier and to minimize mess—no one wants a chocolate-covered countertop!
- Piping Speed: Work quickly when decorating; the melted green candy can set fast, so sprinkle immediately after piping for better adherence.
- Layering Flavors: For a fun twist, experiment with different Oreo flavors like mint or double-stuf; each brings a festive surprise!
- Storage Know-How: Store your Christmas Oreos in an airtight container at room temperature for up to 2 weeks; freezing may affect their crunchiness.

Christmas Oreos Recipe FAQs
How do I select the right Oreos for this recipe?
Absolutely! You can use any Oreo flavor you prefer. Classic, DoubleStuf, and holiday-themed options all work beautifully. If you're feeling adventurous, try peppermint Oreos for a refreshing twist that complements the white chocolate perfectly!
What’s the best way to store leftover Christmas Oreos?
For optimum freshness, store your Christmas Oreos in an airtight container at room temperature for up to 2 weeks. If you want them to last longer, refrigerate them for up to 3 weeks, ensuring they’re sealed tightly to avoid moisture. The choice is yours depending on how quickly you plan to indulge!
Can I freeze these Christmas Oreos?
Definitely! To freeze your Christmas Oreos, first place them in a single layer on a baking sheet and freeze until solid—about 1-2 hours. Then, transfer them to a freezer-safe container for long-term storage. They can be kept frozen for up to 2 months. When you're ready to serve, simply thaw them at room temperature for about an hour. They’ll taste almost as fresh as day one, though you may notice a slight difference in crunchiness.
What can I do if the melted chocolate seized during melting?
Oh no! If your chocolate seizes, don’t worry! You can often bring it back by adding a teaspoon of vegetable oil or shortening and stirring well over low heat until smooth. Alternatively, if melting chocolate seems difficult, use chocolate chips or candy melts, which are less temperamental and typically a breeze to work with.
Are there any dietary considerations for these Christmas Oreos?
Absolutely! If you're catering to dietary restrictions, keep in mind that Oreos are generally vegan and dairy-free, but check for any gluten allergies first, as they contain wheat. If you have friends with specific allergies, consider using dairy-free chocolate coatings or alternatives like dark chocolate. For pets, remember that chocolate can be toxic, so keep these festive treats out of their reach.
Do Christmas Oreos taste different from regular Oreos?
Great question! In fact, the flavor of Christmas Oreos largely depends on the Oreo flavor you choose. The addition of white chocolate and festive decorations creates a delightful blend that enhances the cookie experience, making them taste extra special during the holiday season. Plus, any unique Oreo flavor you use will impart its deliciousness, creating flavors just for the holidays!
Irresistibly Easy Christmas Oreos You’ll Want to Share!
Ingredients
Method
- Line a large baking sheet with parchment paper and place Oreo cookies nearby.
- Melt the white chocolate or candy melts in a microwave-safe bowl in 30-second intervals until smooth.
- Dip the bottom half of each Oreo into the melted chocolate and place on the prepared baking sheet. Let set at room temperature for about 15 minutes.
- Melt the green candy melts using the same method and transfer to a piping bag.
- Pipe a zig-zag line down the center of each dipped Oreo to resemble a Christmas tree.
- Immediately sprinkle rainbow nonpareils over the piped icing and add optional decorative elements if desired.
- Let the decorated Christmas Oreos sit until hardened, about 30 minutes, or refrigerate for faster setting.
Nutrition
Notes
- Melt Carefully: Slow melting is key to avoid burning white chocolate.
- Shallow Dipping: Use a shallow bowl for easier dipping.
- Piping Speed: Work quickly when decorating; sprinkle immediately after piping.
- Layering Flavors: Experiment with different Oreo flavors.
- Storage Know-How: Store in an airtight container for up to 2 weeks.
Leave a Reply