
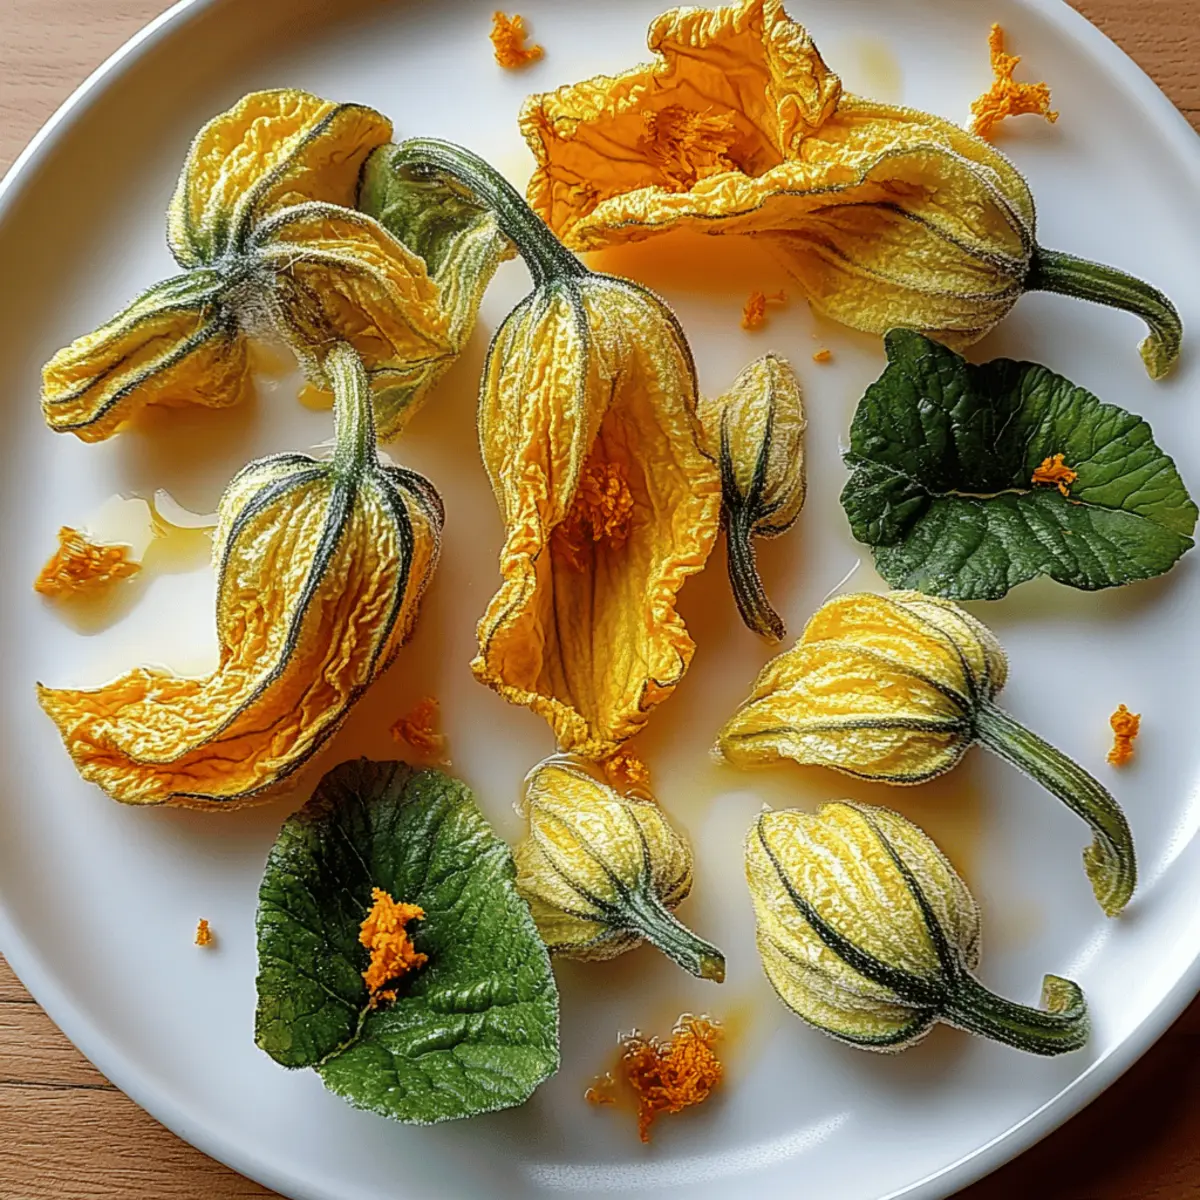
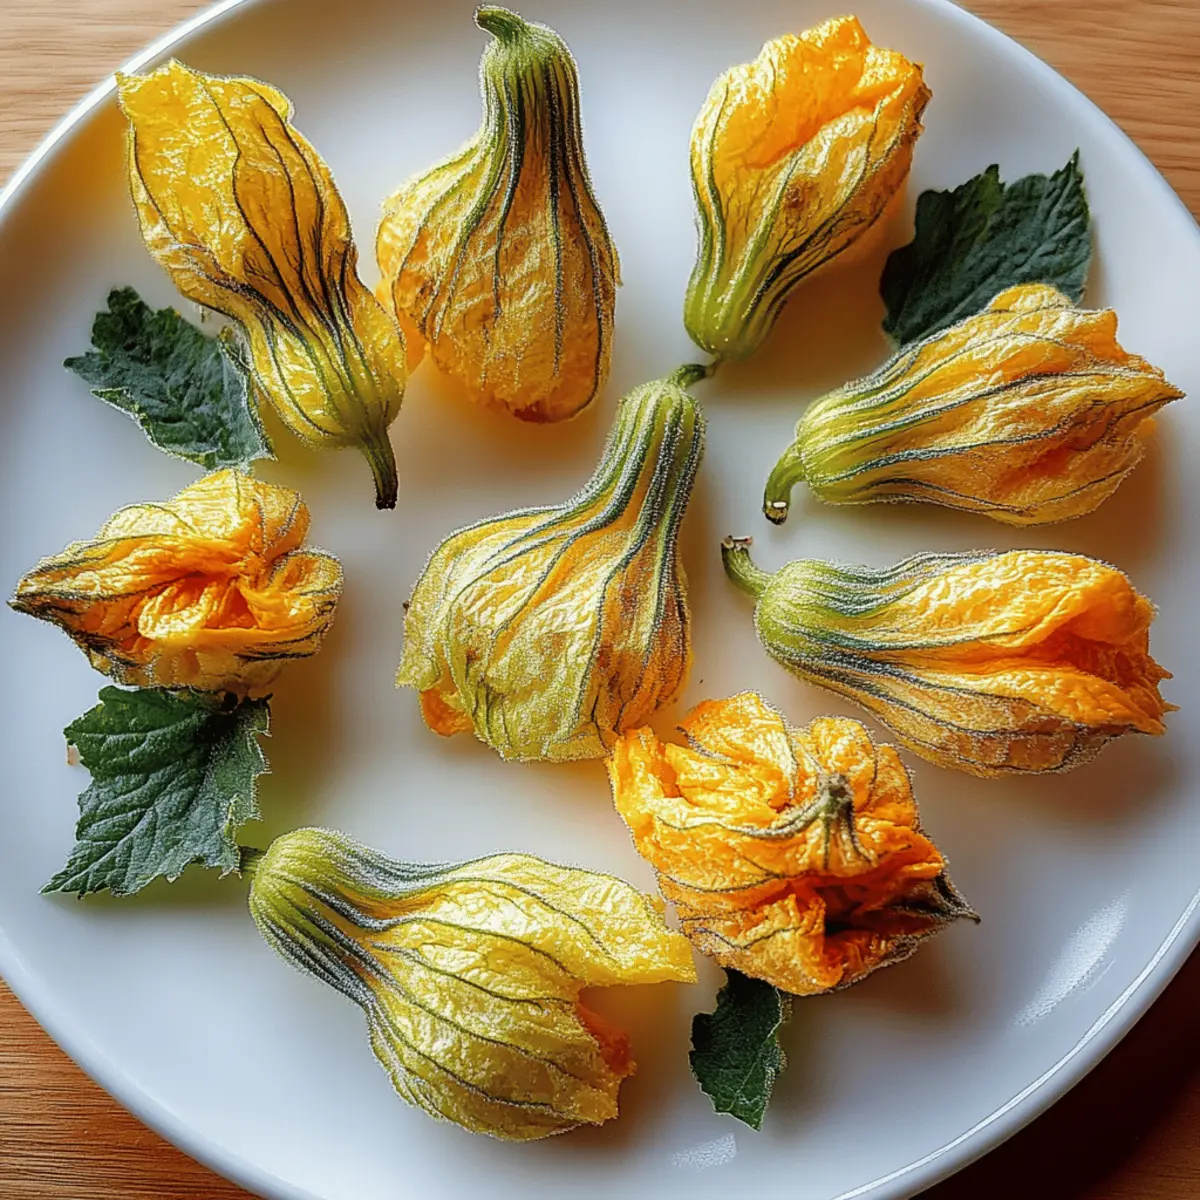
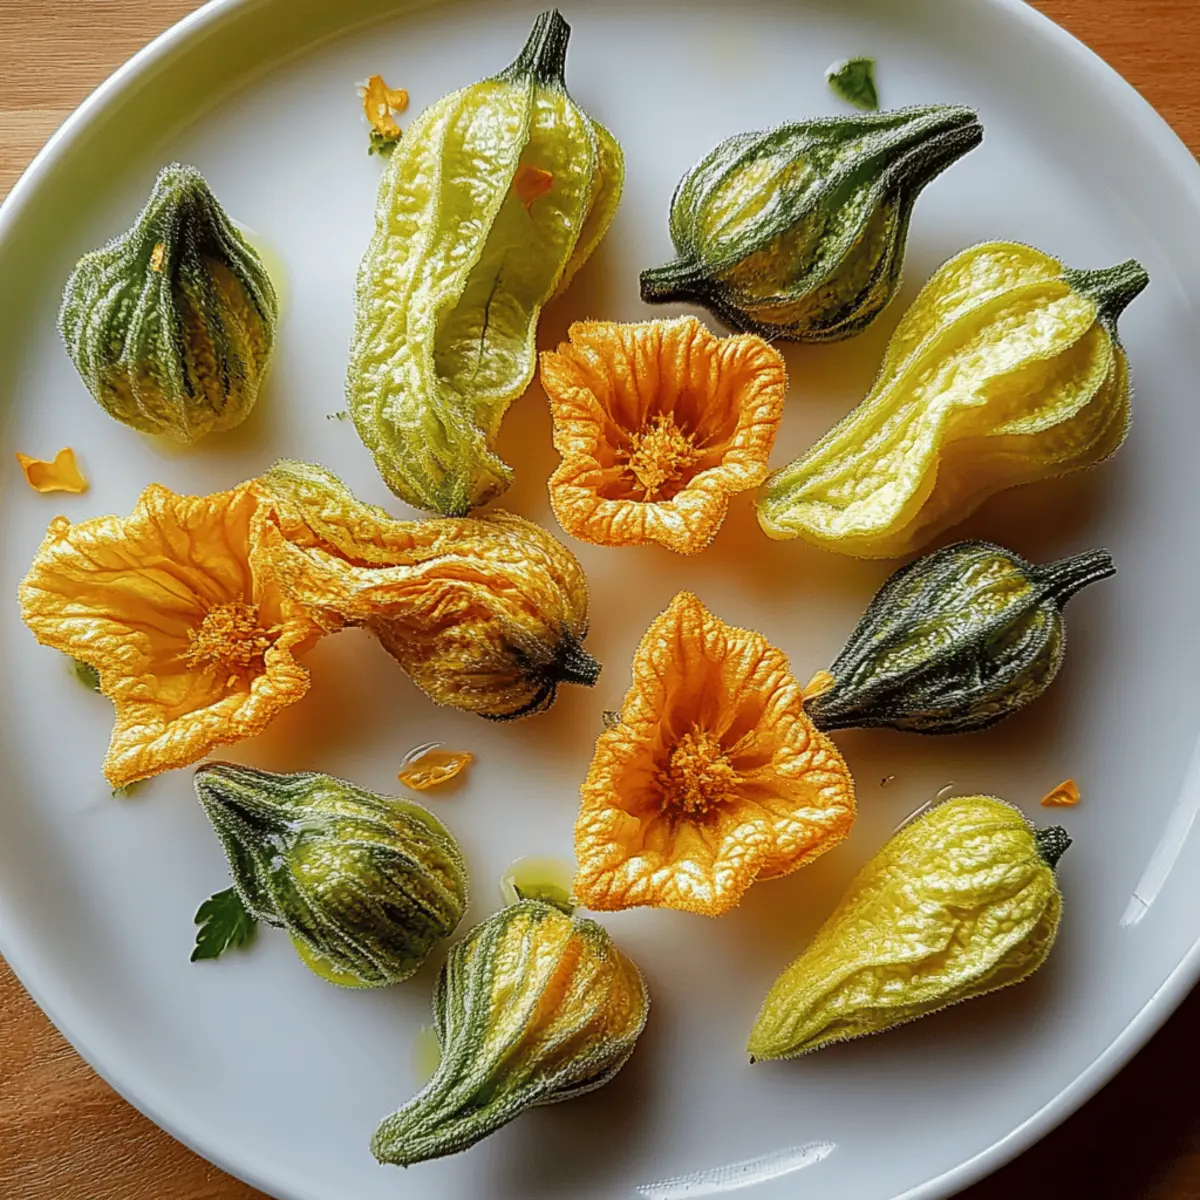
As I strolled through the local farmer's market, something unique caught my eye: vibrant, delicate pumpkin blossoms, their golden hue beckoning me to experiment in the kitchen. Today, they're the star of my recipe for Healthy Pumpkin Blossoms, a dish that's not only incredibly simple to whip up but also effortlessly sophisticated. Perfect for impressing guests or enjoying a cozy night in, these blossoms are a delightful way to break free from the monotony of fast food. Made with chickpea flour, they offer a protein-packed twist that’s naturally gluten-free and veggie-friendly! With just 35 minutes from prep to plate, you'll savor the satisfaction of crafting something special without spending hours in the kitchen. Are you ready to transform these lovely blooms into a crispy, tasty treat? Let’s dive in!
Why are Healthy Pumpkin Blossoms a Must-Try?
Bright, Vibrant Dish: The colorful pumpkin blossoms make for an eye-catching and impressive appetizer that will wow your family and friends.
Protein-Packed Twist: Made with chickpea flour, these blossoms are not only gluten-free but also offer a healthy dose of protein, ensuring you won't miss the fast food crunch.
Quick Prep & Cook Time: With just 15 minutes of prep and another 15 minutes of cooking, you’ll have a delicious snack ready in no time.
Versatile Serving Options: Pair these delicious blossoms with a refreshing cashew-based dip or a zesty salsa for an added flavor boost.
Crispy Perfection: Each blossom is golden brown and crispy, providing that satisfying crunch you crave while keeping it guilt-free.
Satisfaction Guaranteed: Enjoy these healthy delights warm, with lemon wedges on the side for an uplifting finish that brightens every bite!
Healthy Pumpkin Blossoms Ingredients
For the Blossom Coating
• Pumpkin blossoms – These delicate flowers are the star ingredient, bringing a unique flavor and visual appeal to your dish.
• Chickpea flour – Adds a protein-packed, gluten-free batter that crisps up beautifully when cooked.
• Water – Adjusts the batter consistency for the perfect coating texture.
• Olive oil – Provides richness and enhances the flavor of the batter.
• Garlic powder – Sprinkles in savory depth and aroma.
• Onion powder – Adds a hint of sweetness and complexity to the mix.
• Salt – Essential for balancing flavors and enhancing the overall taste.
• Black pepper – Offers a mild kick and enhances the other ingredients.
• Chili flakes (optional) – For those who love a bit of heat, this adds a nice touch of spice.
For Cooking & Serving
• Olive oil spray or additional olive oil – Lightly greasing the skillet ensures the blossoms don’t stick, allowing for that crispy bite.
• Lemon wedges – Brighten up the dish with a squeeze of fresh citrus, which complements the flavors beautifully!
Dive into this delightful recipe for Healthy Pumpkin Blossoms, and let your taste buds experience joy like never before!
Step‑by‑Step Instructions for Healthy Pumpkin Blossoms
Step 1: Prepare the Blossoms
Gently wash the 12 fresh pumpkin blossoms under cold water, then pat them dry with a kitchen towel to retain their delicate texture. Carefully remove any stamens or pistils inside the blossoms, creating space for the flavorful chickpea batter. This step helps ensure the blossoms are ready for a delicious filling and proper cooking.
Step 2: Make the Batter
In a mixing bowl, combine 1 cup chickpea flour, 1 cup water, 1 tablespoon olive oil, 1 teaspoon garlic powder, 1 teaspoon onion powder, 1 teaspoon salt, ½ teaspoon black pepper, and ¼ teaspoon chili flakes if desired. Whisk everything together until a smooth, lump-free batter forms, achieving the perfect consistency needed for coating your Healthy Pumpkin Blossoms.
Step 3: Heat the Skillet
Preheat a non-stick skillet or frying pan over medium heat, ensuring it reaches a steady temperature for cooking. Lightly grease the skillet with olive oil spray or a small amount of olive oil, allowing the blossoms to crisp up nicely. This step is crucial to achieving that golden brown exterior while preventing the blossoms from sticking.
Step 4: Coat the Blossoms
Holding each blossom by the stem, dip it into the prepared chickpea batter, ensuring the entire blossom is thoroughly coated. This should create a lovely layer that will crisp up beautifully during frying. Make sure to let any excess batter drip off before placing the blossoms in the skillet for the best frying experience.
Step 5: Cook the Blossoms
Once the skillet is preheated, carefully place the coated pumpkin blossoms onto the surface. Cook for about 3-4 minutes on each side, or until they turn golden brown and crispy. Use a spatula to gently flip them, ensuring that they maintain their shape and texture throughout the cooking process.
Step 6: Drain and Cool
After cooking, remove the blossoms from the skillet and transfer them to a plate lined with paper towels. This will help absorb any excess oil, leaving you with perfectly crisp Healthy Pumpkin Blossoms. Allow them to cool slightly before serving, enhancing their delightful crunch.
Step 7: Serve with Lemon
Enjoy the warm pumpkin blossoms immediately, accompanied by fresh lemon wedges on the side. A refreshing squeeze of citrus elevates the flavors and contrasts beautifully with the crispy coating. These Healthy Pumpkin Blossoms make a perfect snack or appetizer for any occasion!
Healthy Pumpkin Blossoms Variations
Feel free to get creative and tailor these delightful blossoms to suit your taste buds and dietary needs!
-
Spicy Addition: Increase the chili flakes for a fiery kick or add diced jalapeños to the batter for spice lovers. It's a fun way to elevate the flavor!
-
Herbed Delight: Mix in fresh herbs such as cilantro or parsley into the batter for an aromatic twist that brightens up the dish. This adds a fresh taste and an inviting aroma.
-
Cheesy Version: Stir in a tablespoon of nutritional yeast or your favorite dairy cheese for a cheesy coating that adds richness. Melting flavors can create a delectable experience!
-
Zesty Lemon Zing: Incorporate lemon zest into the batter for a zesty touch that compliments the fresh lemon served alongside the blossoms. It adds brightness and vibrancy!
-
Nutty Flavor: Add finely chopped nuts like pistachios or almonds to the batter for a delightful crunch and nutty taste. This introduces an exciting texture that keeps every bite interesting.
-
Gluten-Free Option: Use a blend of gluten-free all-purpose flour instead of chickpea flour for those avoiding gluten, maintaining the beloved crispy coating while meeting dietary needs.
-
Creamy Dip Pairing: Serve with a creamy avocado or tahini dip instead of the traditional yogurt, creating a wholesome and velvety contrast to the crispy blossoms. It's a luscious addition you won't want to miss!
-
Savory Spice Mix: Experiment with spices like smoked paprika or cumin in the batter for an extra layer of flavor that adds warmth and personality to each bite. This gives depth and character—a little goes a long way!
Embrace the joy of cooking by experimenting with these variations, and don’t forget to pair your blossoms with a refreshing salsa or a luscious cashew-based dip for an unforgettable appetizer!
How to Store and Freeze Healthy Pumpkin Blossoms
Fridge: Store leftover Healthy Pumpkin Blossoms in an airtight container and refrigerate for up to 2 days. This helps maintain their flavor and texture.
Freezer: For longer storage, freeze cooked pumpkin blossoms in a single layer on a baking sheet before transferring them to a freezer-safe bag. They can be stored for up to 2 months.
Reheating: To restore crispness, reheat refrigerated blossoms in a preheated oven at 350°F (175°C) for 10-15 minutes before serving.
Room Temperature: If you have any leftovers, you can keep them at room temperature for about 1 hour before they should be refrigerated to ensure food safety.
What to Serve with Healthy Pumpkin Blossoms?
Indulging in crispy pumpkin blossoms opens up a world of delightful pairing possibilities that will elevate your meal.
-
Creamy Cashew Dip: A smooth, nutty dip that balances the crispy texture, enhancing every bite with a rich flavor.
-
Zesty Salsa: The bright, fresh notes of salsa provide a perfect contrast, refreshing your palate and adding a pop of acidity.
-
Herbed Quinoa Salad: Light and fluffy, this salad full of herbs brings together textures and flavors that perfectly accompany your blossoms.
-
Lemon-Tahini Dressing: Drizzle this creamy dressing over a bed of greens to create a vibrant and zingy contrast to the warm, crispy blossoms.
-
Grilled Flatbread: Serve alongside warm, fluffy flatbread that allows you to pick up the blossoms, making every bite that much more enjoyable.
-
Sparkling Mineral Water: Refreshing and light, this drink cleanses the palate beautifully, making it a perfect pairing for your crispy snack.
-
Herbal Tea: A warm cup of chamomile or mint tea complements the flavors of the blossoms, creating a soothing dining experience.
Enjoy this delightful exploration of flavors while your Healthy Pumpkin Blossoms shine at the center of your meal!
Make Ahead Options
These Healthy Pumpkin Blossoms are perfect for meal prep enthusiasts! You can prepare the chickpea batter up to 24 hours in advance and store it in an airtight container in the refrigerator. However, it's best to coat the pumpkin blossoms just before cooking to maintain their crispy texture. Gently wash and dry the blossoms, and if you wish, you can also remove the stamens up to 3 days ahead and keep them in a damp paper towel within a plastic bag to prevent wilting. When you're ready to serve, simply dip the prepped blossoms into the batter, cook for about 3-4 minutes per side until golden brown, and enjoy this delightful treat with minimal effort!
Expert Tips for Healthy Pumpkin Blossoms
-
Choose Fresh Blossoms: Select bright, vibrant pumpkin blossoms to ensure maximum flavor and tenderness. Wilted or damaged flowers will affect the dish's overall quality.
-
Batter Consistency: Aim for a smooth, lump-free batter that is neither too thin nor too thick. This allows the coating to adhere properly and create that desired crispy texture for your Healthy Pumpkin Blossoms.
-
Temperature Matters: Preheating the skillet is crucial! A hot pan promotes even cooking and prevents sogginess, helping you achieve a beautiful golden brown.
-
Avoid Overcrowding: Fry the blossoms in batches to maintain the skillet temperature and achieve optimal crispiness. Overcrowding can lead to steaming instead of frying, resulting in less than perfect texture.
-
Garnish for Flavor: Don’t skimp on lemon wedges when serving! A fresh squeeze brightens the dish, enhancing the vibrant flavors of your Healthy Pumpkin Blossoms and making each bite even more delightful.
Healthy Pumpkin Blossoms Recipe FAQs
How do I select the best pumpkin blossoms?
Choosing fresh pumpkin blossoms is key for optimal taste and texture. Look for vibrant, bright petals without any browning or wilting. The blossoms should feel firm yet delicate—if they have dark spots all over or appear limp, it's best to pass.
How can I store leftover cooked pumpkin blossoms?
To store any leftover Healthy Pumpkin Blossoms, place them in an airtight container and refrigerate for up to 2 days. This will help maintain their flavor and texture. When ready to enjoy them again, simply reheat in a preheated oven at 350°F (175°C) for about 10-15 minutes to bring back their crispiness.
Can I freeze pumpkin blossoms?
Absolutely! To freeze cooked pumpkin blossoms, lay them out in a single layer on a baking sheet and place them in the freezer until solid. After that, transfer them to a freezer-safe bag, removing as much air as possible. They can be stored in the freezer for up to 2 months. When you’re ready to eat, just reheat them in the oven at 350°F (175°C) until warmed through.
What should I do if my batter is too thick or too thin?
If you find your batter is too thick, simply add a little more water, a tablespoon at a time, until you reach the desired consistency. Conversely, if it's too thin, whisk in a small amount of chickpea flour to thicken it up. You're aiming for a smooth, lump-free batter that coats the blossoms nicely!
Are there any dietary concerns for serving pumpkin blossoms?
While Healthy Pumpkin Blossoms are naturally gluten-free, it's essential to check for potential allergies, especially if serving to guests. If anyone has a chickpea allergy, consider experimenting with alternative flours like rice flour. As always, serve these delightful treats alongside lemon wedges to cater to different tastes!
How long can I leave cooked pumpkin blossoms at room temperature?
It's safe to leave your cooked Healthy Pumpkin Blossoms at room temperature for about an hour. Beyond that, they should be refrigerated to ensure food safety. I recommend enjoying them fresh for the best experience!

Crispy Healthy Pumpkin Blossoms for Guilt-Free Snacking
Ingredients
Equipment
Method
- Gently wash the fresh pumpkin blossoms under cold water, then pat them dry. Remove any stamens or pistils inside.
- Combine chickpea flour, water, olive oil, garlic powder, onion powder, salt, black pepper, and chili flakes in a bowl. Whisk until smooth.
- Preheat a skillet over medium heat and lightly grease with olive oil spray.
- Dip each blossom into the batter, ensuring it’s thoroughly coated. Let excess batter drip off.
- Place the coated blossoms onto the skillet. Cook for 3-4 minutes on each side until golden brown.
- Transfer cooked blossoms to a plate lined with paper towels to absorb excess oil. Allow to cool slightly.
- Serve warm with lemon wedges on the side for freshness.
Leave a Reply