
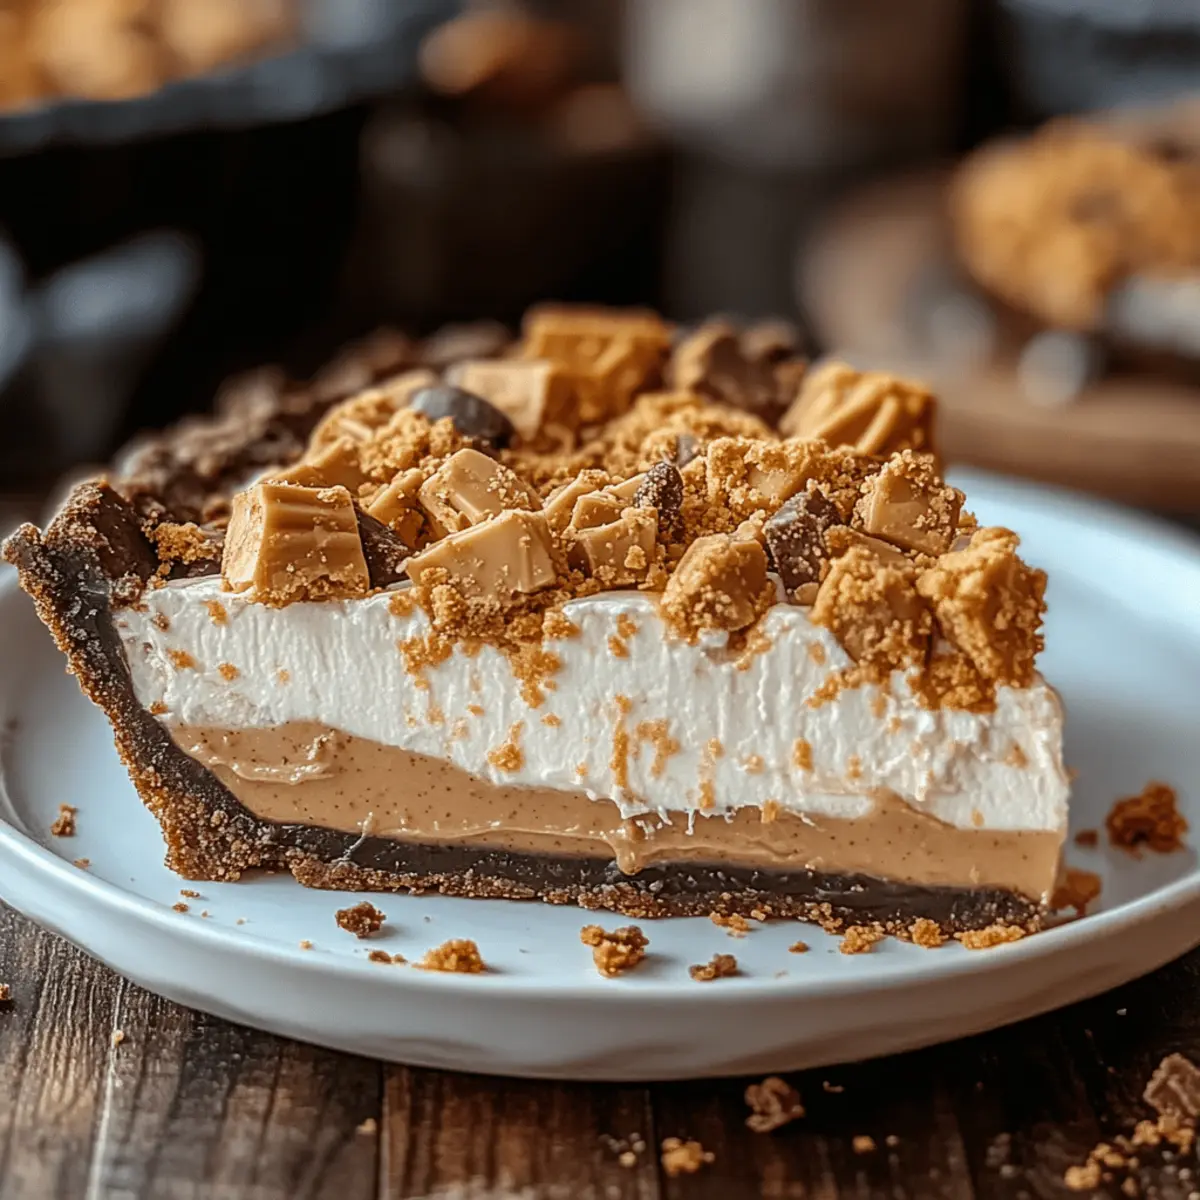
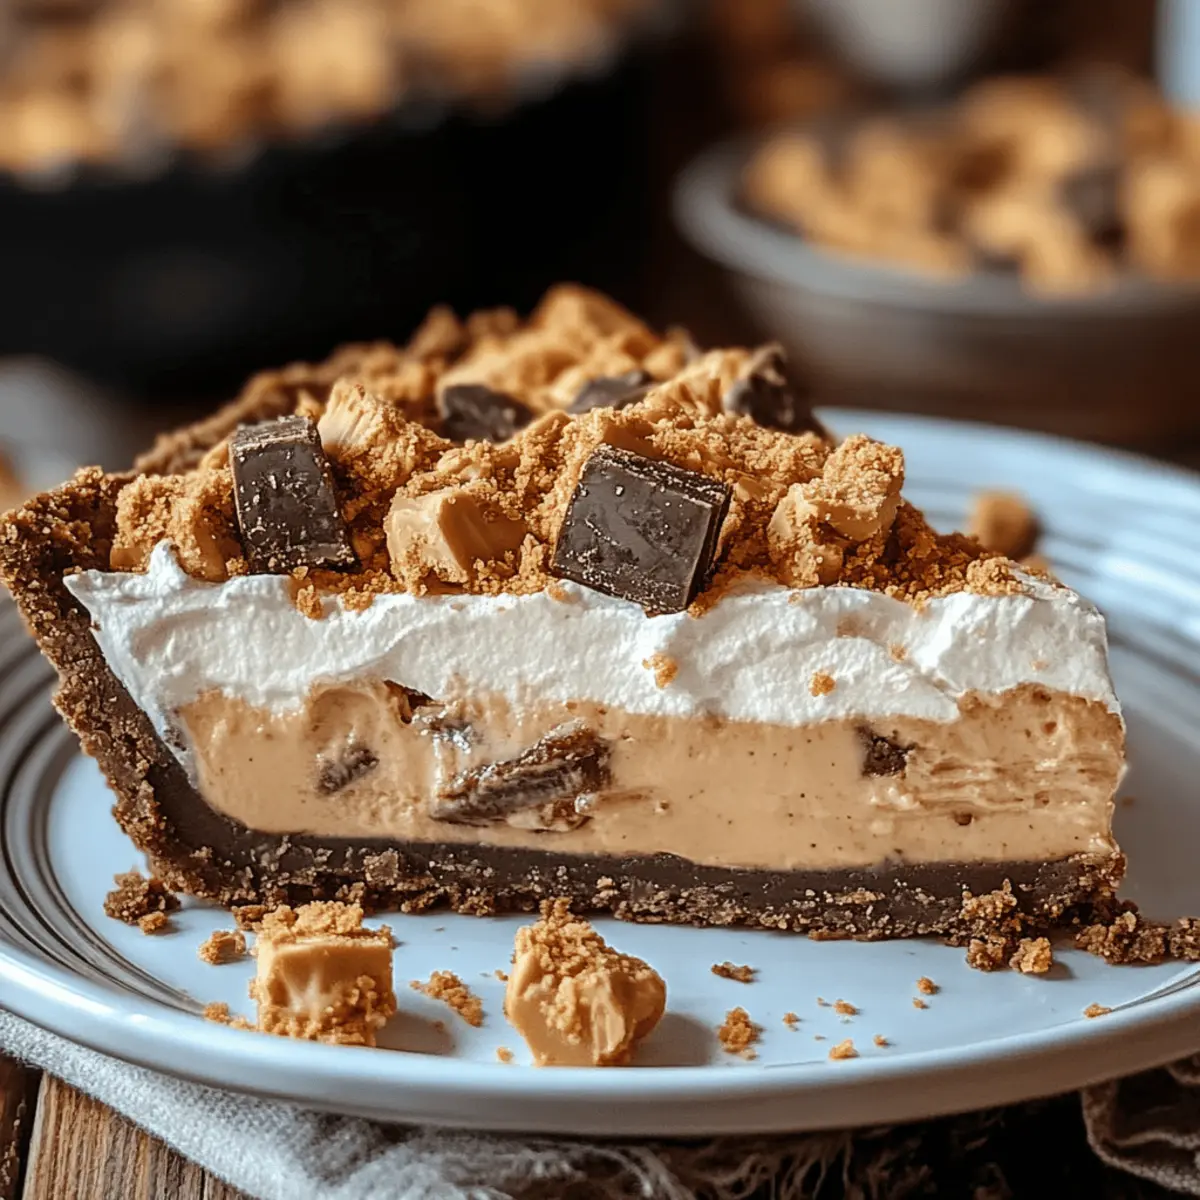
As I stood in my kitchen, the tantalizing aroma of peanut butter and chocolate mingled in the air, drawing me closer to an unwavering craving for something sweet. Today, I'm excited to share my favorite dessert: Butterfinger Peanut Butter Pie. This pie combines creamy peanut butter, rich cream cheese, and delightful Butterfinger bits, creating a treat that’s simply irresistible. One of the best parts? It requires just 20 minutes of prep, allowing you to whip it up quickly, whether for a family gathering or a quiet night at home. Plus, it’s a guaranteed crowd-pleaser that will have everyone coming back for seconds. Are you ready to indulge your sweet tooth and impress your loved ones with this delightful pie? Let's dive in!
Why is Butterfinger Peanut Butter Pie irresistible?
Decadent, this pie is a chocolate lover's dream with its rich, creamy filling and crunchy candy bar bits. Quick to make, you only need 20 minutes of prep time, perfect for last-minute gatherings or cozy nights in. Versatile, it can easily be adapted using crushed Oreos for an extra chocolatey twist. Crowd-pleaser alert! This dessert is sure to impress guests, making it the perfect choice for any event. No-bake and chilled to perfection, every slice melts in your mouth and leaves you craving more. Don't miss out on exploring similar delights like our Salted Caramel Butter Bars or Christmas Gooey Butter Cookies!
Butterfinger Peanut Butter Pie Ingredients
For the Crust
• Graham cracker crumbs – perfect for a crunchy base; substitute with crushed Oreos for a chocolate twist.
• Unsalted butter – helps bind the crust together, creating a rich flavor.
For the Filling
• Creamy peanut butter – adds that delicious, nutty flavor essential in this Butterfinger Peanut Butter Pie.
• Cream cheese – ensures a smooth and creamy texture that balances the sweetness.
• Powdered sugar – sweetens the filling; you can adjust to taste based on your sweetness preference.
• Vanilla extract – enhances the overall flavor profile with its warm notes.
• Whipped topping – contributes to the light and airy texture; make sure it's thawed for easier mixing.
• Butterfinger candy bars – crush into bits for delightful crunch and chocolatey sweetness, and save some for garnish!
Each layer of this pie blends together beautifully, making every bite an unforgettable indulgence!
Step‑by‑Step Instructions for Butterfinger Peanut Butter Pie
Step 1: Prepare the Crust
In a mixing bowl, combine 2 cups of graham cracker crumbs with ½ cup of melted unsalted butter. Mix until the crumbs are fully coated, resembling wet sand. Press this mixture firmly into the bottom of a 9-inch pie dish, using the back of a measuring cup or your fingers to create an even layer. Set the crust aside to firm up while you prepare the filling.
Step 2: Make the Filling
In a medium-sized bowl, beat together 1 cup of creamy peanut butter, 8 oz of softened cream cheese, 1 cup of powdered sugar, and 1 teaspoon of vanilla extract using an electric mixer. Mix at medium speed for about 2–3 minutes until the mixture is smooth and free of lumps. Take a moment to enjoy the rich aroma of the peanut butter filling as it comes together beautifully.
Step 3: Fold in Whipped Topping
Once the peanut butter mixture is smooth, gently fold in 8 oz of thawed whipped topping using a rubber spatula. Be careful not to deflate the whipped topping; the goal is to keep it light and airy for a creamy texture in your Butterfinger Peanut Butter Pie. This should take around 1–2 minutes of careful folding to integrate completely.
Step 4: Add Butterfinger Pieces
Next, stir in 4 crushed Butterfinger candy bars until they're evenly distributed throughout the filling. The crushed pieces will add delightful crunchy bits and chocolatey flavor to every bite. This step allows you to customize your pie, ensuring every slice has that irresistible Butterfinger touch.
Step 5: Assemble the Pie
Pour the fluffy filling into the prepared crust, spreading it evenly with a spatula. Smooth the top gently to create an inviting finish. Take a moment to ensure the filling sits flush with the edges of the crust. This Butterfinger Peanut Butter Pie is already mouthwatering, but you’ll want to chill it to let the flavors meld.
Step 6: Chill the Pie
Cover the pie with plastic wrap, ensuring it doesn't touch the filling. Refrigerate for at least 4 hours, allowing it to set properly. The wait will be worth it as the pie transforms into a decadent dessert that's cool and creamy. A well-chilled pie helps the flavors develop, making every bite delightful.
Step 7: Garnish and Serve
Before serving, remove the pie from the refrigerator and sprinkle additional crushed Butterfinger bars on top for an eye-catching garnish. This final touch enhances the pie’s presentation and crunch factor. Slice into this decadent Butterfinger Peanut Butter Pie and serve it chilled, letting your loved ones experience the joy of each luscious bite.

Expert Tips for Butterfinger Peanut Butter Pie
-
Crust Perfection: Ensure your graham cracker or Oreo crumbs are finely crushed to prevent a crumbly crust. Press firmly but gently to avoid cracks.
-
Room Temperature Ingredients: Always soften cream cheese and allow peanut butter to reach room temperature before mixing. This ensures a smooth filling without lumps.
-
Gentle Folding: When incorporating whipped topping, use a gentle folding technique to maintain the airy texture. Over-mixing can lead to a denser filling in your Butterfinger Peanut Butter Pie.
-
Chill Time Matters: Patience is key! Allow at least 4 hours for the pie to set properly in the refrigerator. This time helps flavors meld beautifully and firm up the filling.
-
Custom Toppings: Get creative with toppings! Add chocolate drizzle or even a sprinkle of sea salt for an extra layer of flavor that complements the sweetness.
What to Serve with Butterfinger Peanut Butter Pie
Delightful pairings can elevate your dessert table, making each bite of this creamy indulgence even more magical.
-
Fresh Berries: The tartness of strawberries or raspberries creates a beautiful contrast, balancing the sweetness of the pie. A luscious fruit salad adds a touch of freshness that brightens every plate.
-
Chocolate Drizzle: Enhancing the presentation, a warm drizzle of chocolate sauce not only pleases the eye but also elevates the chocolate flavor. It’s a simple yet indulgent touch every chocoholic will adore.
-
Whipped Cream: Adding a light, fluffy dollop on top or beside each slice complements the pie’s creamy texture. It offers a delightful creaminess that every dessert deserves.
-
Ice Cream: A scoop of vanilla or chocolate ice cream pairs beautifully with the pie, providing a refreshing cold contrast. The creaminess of the ice cream melts seamlessly into the pie, creating a dreamy combination.
-
Coffee: A warm cup of freshly brewed coffee enhances the rich flavors of the pie. The slight bitterness complements the sweetness, creating a perfectly balanced experience, making it a delightful finish to any meal.
-
Chocolate-Covered Pretzels: For a salty-sweet crunch, serve some chocolate-covered pretzels on the side. Their unique texture and flavor contrast create a fun and satisfying addition.
-
Creamy Drink: A milkshake or chocolate malt adds a fun twist and can be a deliciously nostalgic pairing with your dessert. Its creaminess and sweetness echo the lusciousness of the pie, making it a hit.
-
Coconut Macarons: These chewy delights add an exotic flair to your dessert table. Their sweet profile pairs nicely with the nutty flavors of the Butterfinger Peanut Butter Pie, creating a gourmet feel.
-
Fruit Sorbet: A refreshing citrus sorbet can cleanse the palate and offer a delightful burst of flavor alongside the pie. Its icy sweetness makes it wonderfully refreshing and a good counterbalance to the richness of the dessert.
Butterfinger Peanut Butter Pie Variations
Feel free to get creative with this Butterfinger Peanut Butter Pie recipe, making it uniquely yours with these delightful variations!
- Dairy-Free: Substitute cream cheese and whipped topping with plant-based alternatives for a dairy-free delight.
- Nut-Free: Use sun butter or soy nut butter in place of peanut butter for a nut-free twist that’s just as creamy.
- Chocolate Overload: Add cocoa powder to the filling for a richer, chocolatey flavor that will make every bite even more indulgent.
- Spicy Kick: Mix in a dash of cayenne pepper for a surprising, spicy kick that beautifully contrasts with the sweetness.
- Crunchy Add-In: Swap out Butterfinger bars for crushed pretzels or toffee bits for a delightful crunch that adds new texture.
- Fruit Twist: Fold in some finely chopped strawberries or bananas for a fruity freshness that elevates each slice beautifully.
- Caramel Swirl: Drizzle caramel sauce into the filling before chilling for a luscious caramel surprise in every bite.
- Mini Pies: Create individual servings by using small tart pans or muffin tins—perfect for parties or portion control!
Try these simple twists to elevate this pie and make it the perfect dessert for every occasion. Don’t forget to explore options like our Browned Butter Chai Spice Bundt Cake for more inspired baking ideas that will surely brighten your gatherings!
How to Store and Freeze Butterfinger Peanut Butter Pie
Fridge: Store leftover Butterfinger Peanut Butter Pie in an airtight container in the fridge for up to 5 days. This way, you can enjoy it throughout the week without losing any of that delicious flavor.
Freezer: If you want to preserve the pie for longer, it can be frozen for up to 2 months. Wrap the pie tightly in plastic wrap and then in aluminum foil to prevent freezer burn.
Thawing: To enjoy frozen Butterfinger Peanut Butter Pie, gently thaw it in the refrigerator overnight before serving. This will keep the texture smooth and creamy for your indulgence.
Reheating: This dessert is best enjoyed chilled, so no reheating is necessary. Simply slice and serve straight from the fridge or after thawing from the freezer!
Make Ahead Options
These Butterfinger Peanut Butter Pie preparations are perfect for busy home cooks looking to save time! You can fully prepare the pie up to 24 hours in advance by making the crust and filling as outlined. Simply press the crust into the pie dish, prepare the filling, and assemble the pie without garnishing the top. Cover tightly with plastic wrap and refrigerate. This ensures the flavors meld beautifully while maintaining that light, airy texture. When it's time to serve, just sprinkle additional crushed Butterfinger bars on top for that delightful finish. With this make-ahead method, you’ll have a delicious dessert ready with minimal last-minute effort!

Butterfinger Peanut Butter Pie Recipe FAQs
How do I choose ripe ingredients for my Butterfinger Peanut Butter Pie?
Absolutely! For the best results, ensure your cream cheese is at room temperature for easy mixing. Check that your peanut butter is creamy and has no hard lumps. If using whipped topping, make sure it’s fully thawed, as this helps achieve that light, airy texture in your pie.
How should I store Butterfinger Peanut Butter Pie?
Very! Leftover pie can be stored in an airtight container in the fridge for up to 5 days. Make sure it's well covered to keep it fresh. If you plan to enjoy it later, wrapping it tightly in plastic wrap followed by aluminum foil will keep it safe from freezer burn in the freezer for up to 2 months.
Can I freeze Butterfinger Peanut Butter Pie?
Absolutely! To freeze your pie, simply wrap it securely in plastic wrap first, and follow up with a layer of aluminum foil. This protects it from freezer burn and keeps it delicious. When you're ready to enjoy it, transfer it to the refrigerator the night before to thaw gently, preserving its creamy texture.
What should I do if my pie hasn't set properly?
If your Butterfinger Peanut Butter Pie hasn't set after 4 hours, don't fret! Place it back in the refrigerator for a few more hours. Make sure it’s well covered with plastic wrap to avoid any air exposure. You can also try adding some more whipped topping and folding it in gently to lighten the mix, then refrigerate again for adequate setting.
Are there any dietary considerations I should keep in mind?
Very! If you’re serving this dessert to guests with dietary restrictions, note that it contains gluten (from the crust) and peanut butter, which can trigger allergies. You can make the crust gluten-free by using gluten-free cookies or graham crackers. For a nut-free option, try using sun butter or another nut-free spread, adjusting the recipe for taste.
How can I enhance the flavor of my Butterfinger Peanut Butter Pie?
I often make it extra special by drizzling some chocolate sauce over the top just before serving or adding a pinch of sea salt for a nice contrast to the sweetness. You can also experiment with different candy toppings, such as Snickers or Reese's, to give your pie a whole new twist!
Decadent Butterfinger Peanut Butter Pie for Sweet Cravings
Ingredients
Equipment
Method
- In a mixing bowl, combine graham cracker crumbs and melted butter. Press into a 9-inch pie dish.
- In another bowl, beat peanut butter, cream cheese, powdered sugar, and vanilla until smooth.
- Fold in whipped topping gently until fully combined.
- Stir in crushed Butterfinger pieces evenly into the filling.
- Pour filling into crust and smooth the top.
- Cover with plastic wrap and refrigerate for at least 4 hours.
- Garnish with extra crushed Butterfinger before serving.


Leave a Reply