
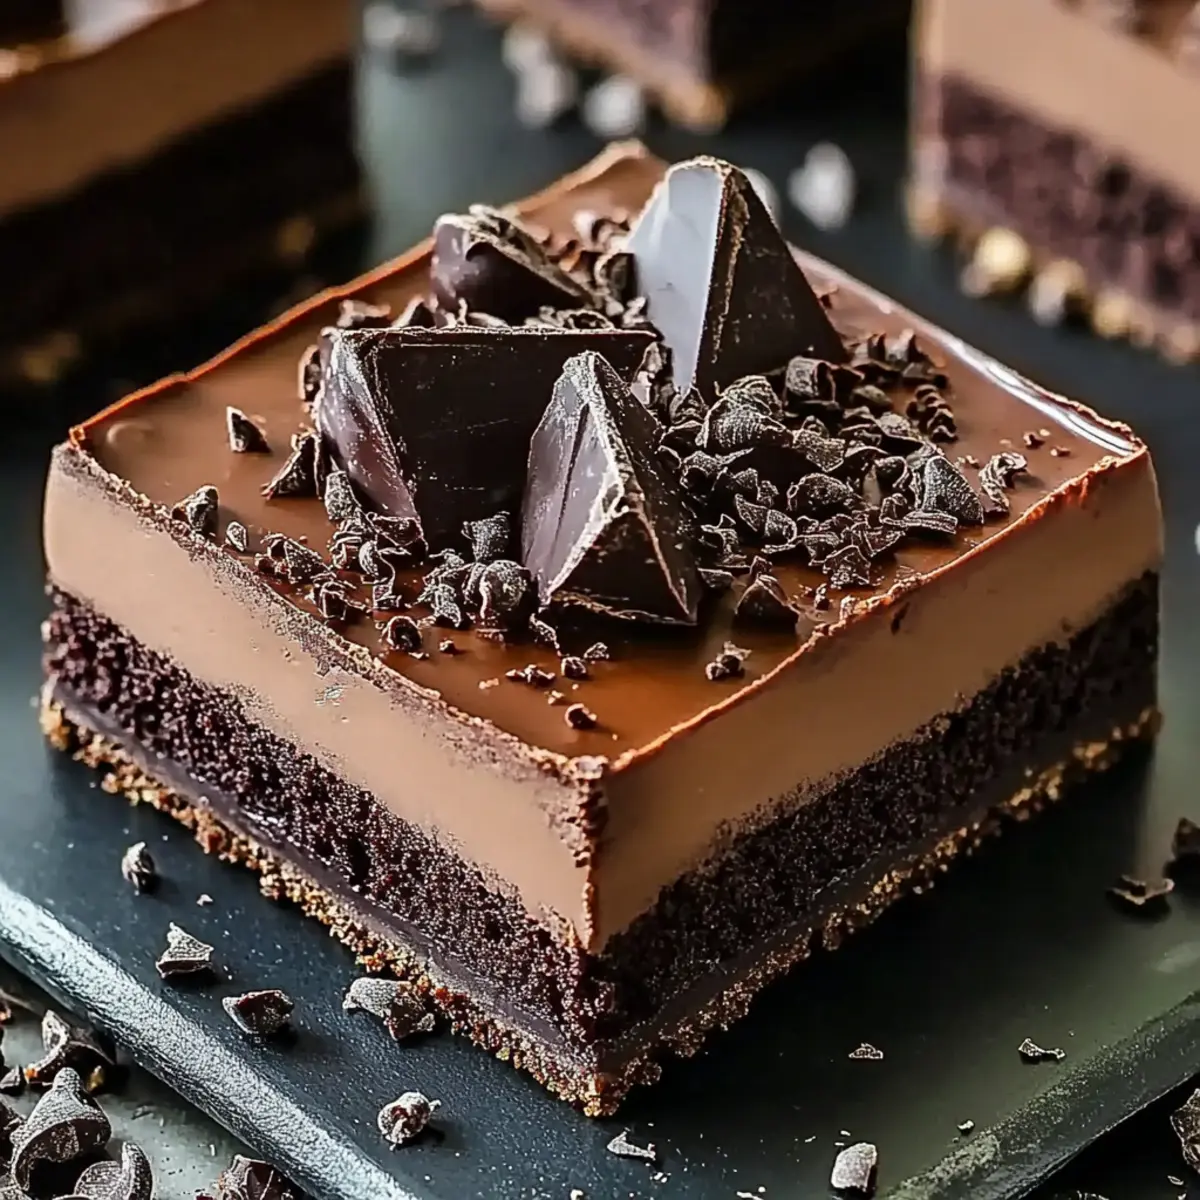
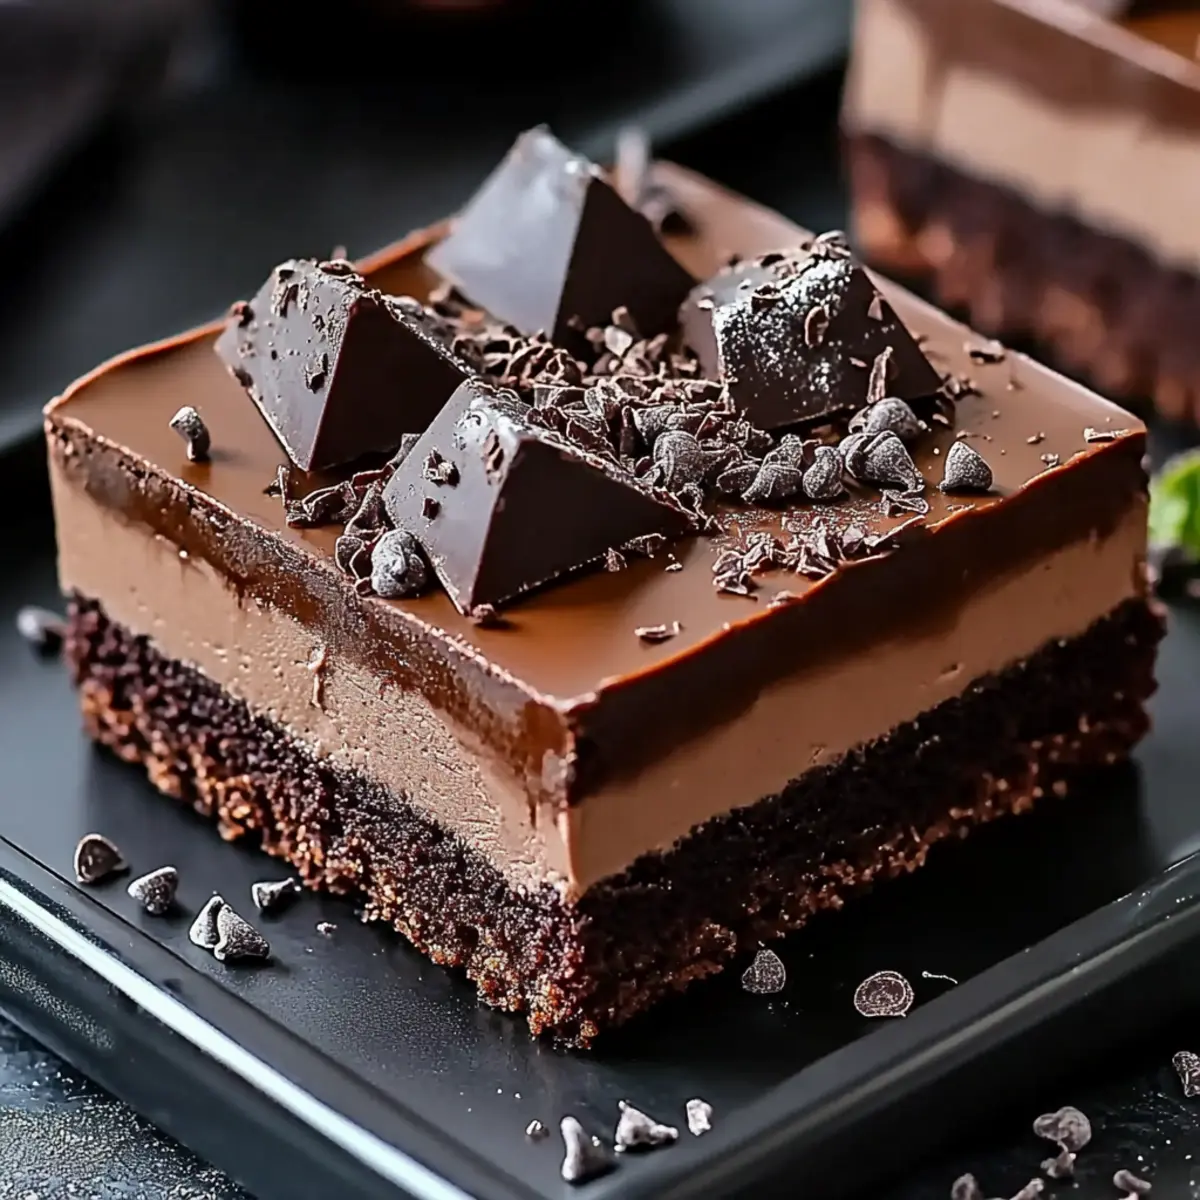
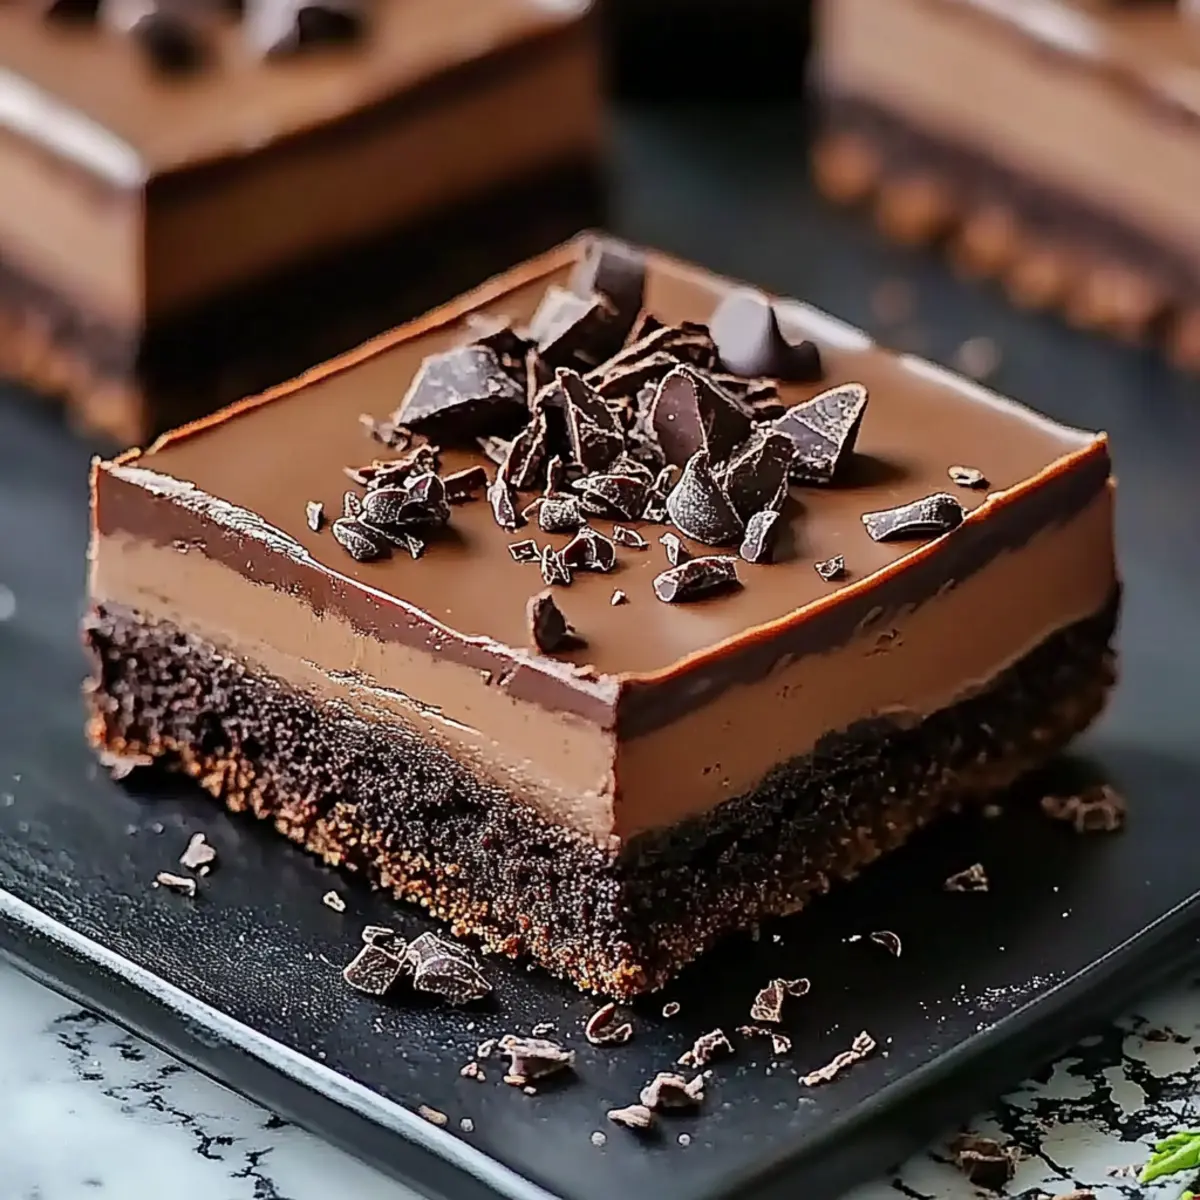
One evening, while rummaging through my pantry for a sweet fix, I discovered the perfect combination of chocolate and cream just waiting to be transformed. That’s how my journey to create these Chocolate Mousse Brownies began—an indulgent twist on a classic favorite. Not only are these brownies a delightful crowd-pleaser, but they also offer a surprisingly simple method to elevate your baking game. The dense, fudgy brownie base is topped with a light, airy mousse that feels like a slice of heaven. It's the ideal treat for those who crave a homemade dessert without spending hours in the kitchen. Ready to impress your friends or simply indulge yourself? Let’s dive into this deliciously simple recipe!
Why are Chocolate Mousse Brownies irresistible?
Decadent Delight: These brownies offer a luxurious combination of rich chocolate and airy mousse, making every bite a heavenly experience.
Simplicity at its Finest: With straightforward ingredients and easy steps, anyone from novice bakers to seasoned chefs can master this recipe.
Perfect for Any Occasion: Whether it’s a casual family gathering or a fancy dinner party, these brownies are sure to wow your guests.
Crowd-Pleasing Appeal: Who doesn't love chocolate? This dessert will satisfy both chocolate lovers and those looking for a unique treat. Plus, if you enjoy baking, you might also want to check out my Chocolate Cherry Brownies for another delightful option!
Chill Time Magic: Allowing the mousse to set gives you time to relax or prepare other dishes, making it a true time-saver in the kitchen.
Indulge in this perfect balance of flavor and texture that will leave everyone asking for seconds!
Chocolate Mousse Brownie Ingredients
• Get ready to create a chocolate lover's dream!
For the Brownie Base
- 1 cup chocolate chips – use semi-sweet for a rich flavor, or dark chocolate for an extra kick.
- 2 cups granulated sugar – this gives the brownies their sweetness and fudgy texture.
- 4 large eggs – act as the binding agent, adding moisture and richness.
- 1 tablespoon vanilla extract – enhances the chocolate flavor, making it more robust.
- 1 cup all-purpose flour – provides structure; don’t overmix once added!
- ½ teaspoon salt – balances sweetness and enhances overall flavor.
- ½ teaspoon baking powder – gives a slight lift to the brownies for a lighter bite.
For the Mousse Topping
- 3 cups heavy cream – this is what creates that dreamy, luscious mousse texture.
- ¼ cup powdered sugar – for a touch of sweetness without adding graininess.
- 1 teaspoon vanilla extract – amplifies the other flavors and adds depth.
- 2 large egg whites – whipped to stiff peaks for a light and airy texture in the mousse.
Embrace the sweet magic of these Chocolate Mousse Brownies as you imagine the blend of flavors coming together!
Step‑by‑Step Instructions for Chocolate Mousse Brownies
Step 1: Preheat the Oven
Begin by preheating your oven to 350°F (175°C). This temperature ensures that your brownies bake perfectly, creating a fudgy center with a slightly crisp top. While the oven warms up, gather your baking dish and grease it lightly to prevent sticking.
Step 2: Melt the Chocolate Chips
In a medium saucepan, combine 1 cup of chocolate chips and place it over low heat. Stir gently until the chocolate melts completely, taking about 5 minutes. Once melted, remove the pan from heat and allow the chocolate to cool slightly before proceeding.
Step 3: Mix the Sugars and Eggs
In a large mixing bowl, use a whisk or electric mixer to beat together 2 cups of granulated sugar, 4 large eggs, and 1 tablespoon of vanilla extract. Blend on medium speed until the mixture is smooth and creamy, which should take about 2-3 minutes, reaching a pale yellow color.
Step 4: Combine Chocolate with Egg Mixture
Add the slightly cooled melted chocolate to the egg mixture. Gently stir with a spatula or wooden spoon until everything is well incorporated, ensuring there are no streaks of chocolate remaining in the mixture.
Step 5: Add Dry Ingredients
Sift in 1 cup of all-purpose flour, ½ teaspoon of salt, and ½ teaspoon of baking powder into the chocolate mixture. Fold the dry ingredients in carefully, mixing until just combined. Avoid overmixing to maintain the brownies’ fudgy texture.
Step 6: Pour into Baking Dish
Transfer the brownie batter into the prepared greased baking dish, spreading it out evenly with a spatula. This is the base for your Chocolate Mousse Brownies, so ensure there are no lumps or areas missing batter, which will help with even baking.
Step 7: Bake the Brownies
Place the baking dish into the preheated oven and bake for 25-30 minutes. Check for doneness by inserting a toothpick in the center; it should come out clean or with a few moist crumbs. Once baked, remove from the oven and let the brownies cool completely in the pan.
Step 8: Whip the Heavy Cream
While the brownies cool, prepare the mousse by whipping 3 cups of heavy cream in a separate mixing bowl. Use an electric mixer at medium speed and add ¼ cup of powdered sugar and 1 teaspoon of vanilla extract. Whip until stiff peaks form, which should take about 4-5 minutes.
Step 9: Whisk the Egg Whites
In another clean bowl, whisk together 2 large egg whites until stiff peaks form. This step should be done separately to ensure the egg whites achieve the right structure, which makes the mousse light and airy.
Step 10: Fold Cream into Egg Whites
Gently fold the whipped cream into the beaten egg whites using a spatula. Do this carefully to preserve the airy texture, mixing just until no streaks remain. This fluffy combination is what makes the mousse layer truly special in your Chocolate Mousse Brownies.
Step 11: Spread Mousse Over Brownies
Once the brownies have cooled completely, spread the mousse mixture evenly on top using a spatula. Make sure to cover the brownie layer completely for even distribution of flavor and texture.
Step 12: Chill to Set
Refrigerate the assembled Chocolate Mousse Brownies for at least 2 hours. This chilling time allows the mousse to set perfectly, enhancing the flavors and creating a luxurious texture.
Step 13: Slice and Serve
After the mousse has firmed up, remove the brownies from the refrigerator. Using a sharp knife, slice them into squares or rectangles for serving. The final treat is now ready to delight friends and family!
Make Ahead Options
These Chocolate Mousse Brownies are a fantastic option for meal prep, allowing you to enjoy a rich dessert without the last-minute rush! You can prepare the brownie base and refrigerate it up to 24 hours ahead of time. Just ensure they are tightly covered to maintain freshness. The mousse can also be made 24 hours in advance and stored in the refrigerator in an airtight container. To finish, simply spread the mousse over the brownie base right before serving, and allow it to set for at least 2 hours for perfect consistency. With these prep tips, you'll have a stunning dessert ready to impress your family or guests with minimal effort!
Tips for the Best Chocolate Mousse Brownies
Use Quality Chocolate: Choose high-quality chocolate chips for the best flavor; it makes all the difference in your Chocolate Mousse Brownies.
Don't Overmix: When adding flour to the batter, mix until just combined to avoid tough brownies. You want that fudgy texture!
Cool Completely: Allow brownies to cool completely before adding the mousse; this prevents the mousse from melting when spread.
Precise Chilling Time: Ensure you refrigerate the brownies for at least 2 hours for the mousse to set properly; patience pays off in flavor and texture!
Knife Tips: For cleaner slices, use a sharp knife dipped in hot water; this helps cut through the mousse without tearing.
Chocolate Mousse Brownies Variations
Feel free to let your creativity shine as you customize these brownies and make them your own!
-
Nutty Crunch: Add ½ cup of chopped nuts like walnuts or pecans for extra texture and flavor. They’ll provide a delightful crunch against the smooth mousse.
-
Minty Fresh: Incorporate peppermint extract in the brownie batter or sprinkle crushed mint candies on top of the mousse. A little coolness balances the chocolate beautifully.
-
Fruity Twist: Layer fresh raspberries or strawberries on the brownie base before adding the mousse. This fruity burst adds both color and a refreshing taste contrast.
-
Dairy-Free: Swap heavy cream with coconut cream and use dairy-free chocolate chips. You'll achieve a rich, creamy mousse while keeping it dairy-free!
-
Spiced Delight: Enhance the brownie batter with a pinch of cinnamon or chili powder for a warm, unexpected kick. It elevates flavors and adds a cozy twist.
-
Gluten-Free: Substitute all-purpose flour with a gluten-free blend or almond flour for a delicious gluten-free version. Just be sure to check your baking powder for gluten.
-
Caramel Swirl: Drizzle caramel sauce on the brownie batter before baking for gooey pockets of sweetness. It will add layers of flavor that elevate your indulgence.
-
Double Chocolate: For true chocolate lovers, mix in additional chocolate chips into the brownie batter. The more, the merrier—especially when it melts beautifully in every bite!
Feel inspired? You might also enjoy whipping up a batch of Cake Batter Chocolate Chip Cookies for another scrumptious treat that delights!
How to Store and Freeze Chocolate Mousse Brownies
Room Temperature: Keep the brownies covered at room temperature for up to 2 days. Make sure they're stored in an airtight container to maintain freshness!
Fridge: For longer-lasting treats, store in the fridge for up to 5 days. Place them in a sealed container to prevent the mousse from absorbing any odors.
Freezer: Freeze the Chocolate Mousse Brownies for up to 3 months. Wrap each piece tightly in plastic wrap, then store in an airtight container. To enjoy, simply thaw in the refrigerator overnight.
Reheating: If you prefer them warm, heat individual pieces in the microwave for about 15-20 seconds. This will gently soften the mousse while keeping the brownie fudgy.
What to Serve with Chocolate Mousse Brownies?
The perfect indulgence doesn't end with just brownies; elevate your dessert experience!
-
Vanilla Ice Cream: A scoop of creamy vanilla ice cream adds a delightful contrast to the rich chocolate, melting beautifully with each bite.
-
Fresh Berries: Plump raspberries or strawberries provide a burst of tartness, balancing the sweetness of the brownies with their juicy freshness.
-
Espresso or Coffee: A strong cup of espresso enhances the chocolate flavors, making each brownie feel more decadent and satisfying.
-
Whipped Cream: A dollop of freshly whipped cream adds a light, airy touch, echoing the mousse's luxurious texture for a soft, sweet finish.
-
Chocolate Sauce: Drizzled over the brownies, a rich chocolate sauce creates a double chocolate delight that is simply irresistible.
-
Mint Tea: Cooling mint tea matches perfectly with the brownie’s richness, offering a refreshing palate cleanser between bites.
Treat your guests and yourself; these pairing ideas will make your Chocolate Mousse Brownies recipe a hit at any gathering!

Chocolate Mousse Brownies Recipe FAQs
How do I know when my chocolate is ripe for melting?
Absolutely! The best chocolate for melting should be smooth and glossy, with no signs of whitish specks or streaks. Choose high-quality chocolate chips or bars that have not passed their expiration date for the best flavor and texture.
What’s the best way to store leftovers?
To keep your Chocolate Mousse Brownies fresh, store them covered at room temperature for up to 2 days. If you prefer them to last longer, pop them in the fridge where they can stay tasty for about 5 days in an airtight container to prevent the mousse from absorbing any odors.
Can I freeze my brownies? How?
Absolutely! You can freeze your Chocolate Mousse Brownies for up to 3 months. First, wrap each piece tightly in plastic wrap to prevent freezer burn, then place them in an airtight container. When you're ready to indulge again, simply thaw them in the refrigerator overnight.
What should I do if my brownies are too dense?
Very! If your brownies turn out too dense, it might be due to overmixing the batter after adding the flour. For the perfect fudgy texture, only mix until you see no flour streaks. Also, ensure you're using the right amount of eggs, as they act as a key binding agent for moisture.
Are there any dietary considerations for pets or allergies?
It's important to note that chocolate is toxic to pets, especially dogs and cats. This means you should keep your Chocolate Mousse Brownies well out of their reach! In terms of allergies, be cautious with eggs and dairy; you can consider substituting with egg replacers and non-dairy cream options if necessary to accommodate dietary needs.
How can I achieve the best mousse texture?
For a heavenly, airy mousse, it’s crucial to whip the heavy cream until stiff peaks form, which usually takes about 4-5 minutes with an electric mixer. Equally important is whisking the egg whites separately until they also reach stiff peaks. When folding the mixtures together, do so gently to retain that lightness. Following these steps will give you the perfect mousse layer over your brownies!
Decadent Chocolate Mousse Brownies for Ultimate Indulgence
Ingredients
Equipment
Method
- Preheat your oven to 350°F (175°C).
- Melt 1 cup of chocolate chips in a medium saucepan over low heat for about 5 minutes.
- In a large mixing bowl, beat together 2 cups of granulated sugar, 4 large eggs, and 1 tablespoon of vanilla extract until smooth.
- Gently stir the melted chocolate into the egg mixture until fully incorporated.
- Sift in 1 cup of all-purpose flour, ½ teaspoon of salt, and ½ teaspoon of baking powder; fold to combine.
- Transfer the batter into a greased baking dish, spreading it evenly.
- Bake for 25-30 minutes, checking for doneness with a toothpick.
- Whip 3 cups of heavy cream in another bowl, adding ¼ cup of powdered sugar and 1 teaspoon of vanilla until stiff peaks form.
- In a separate bowl, whisk 2 large egg whites until stiff peaks form.
- Gently fold the whipped cream into the beaten egg whites.
- Spread the mousse evenly over the cooled brownies.
- Chill the brownies for at least 2 hours to set the mousse.
- Slice into squares or rectangles and serve.


Leave a Reply