
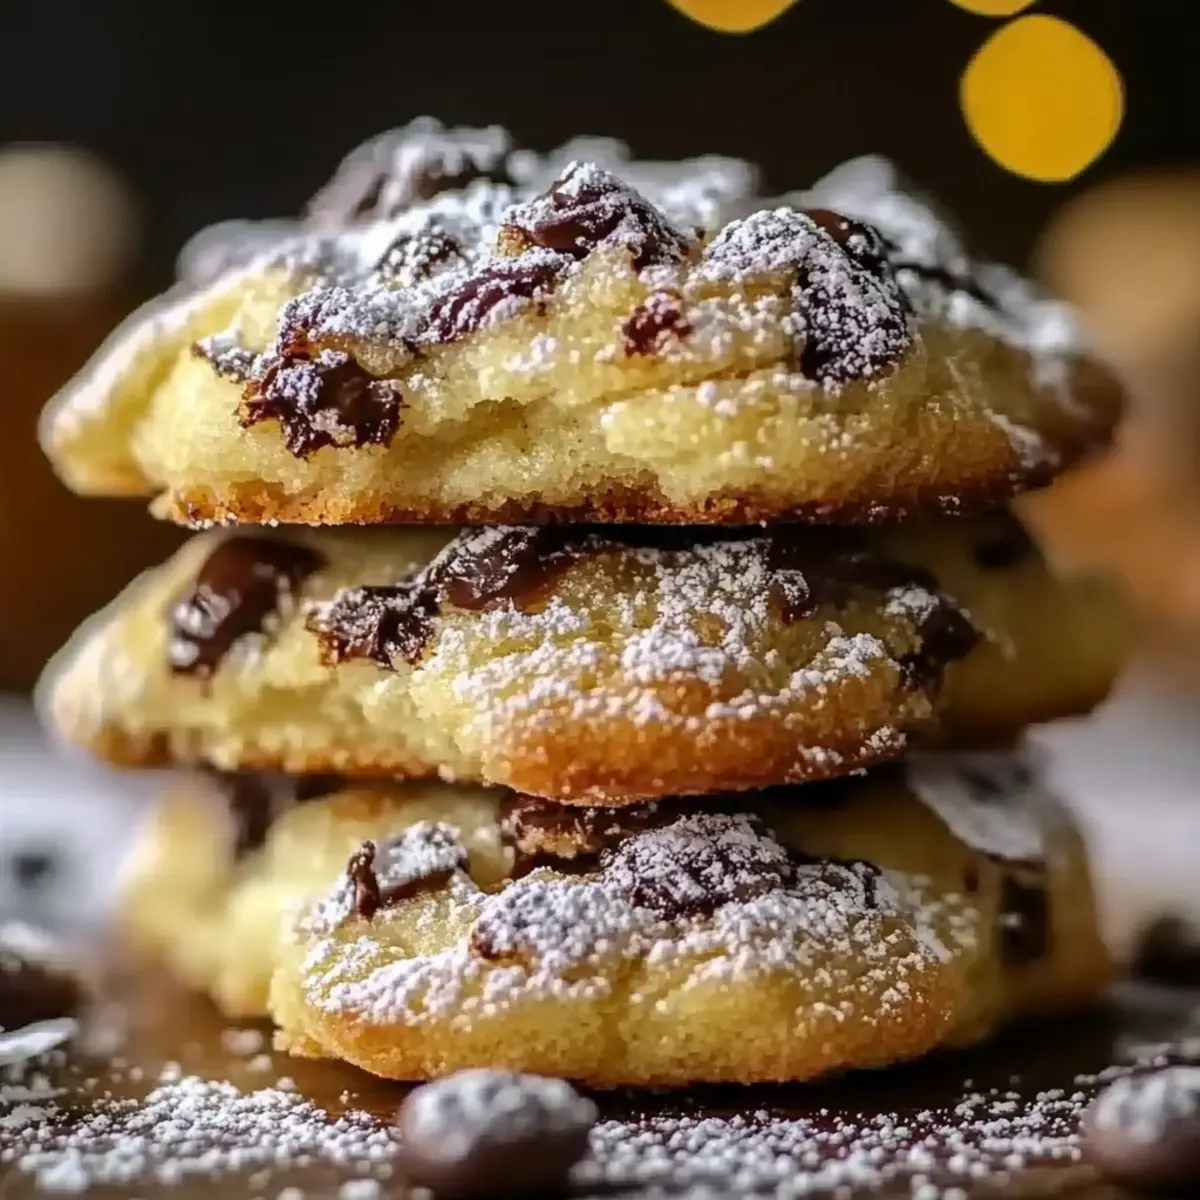
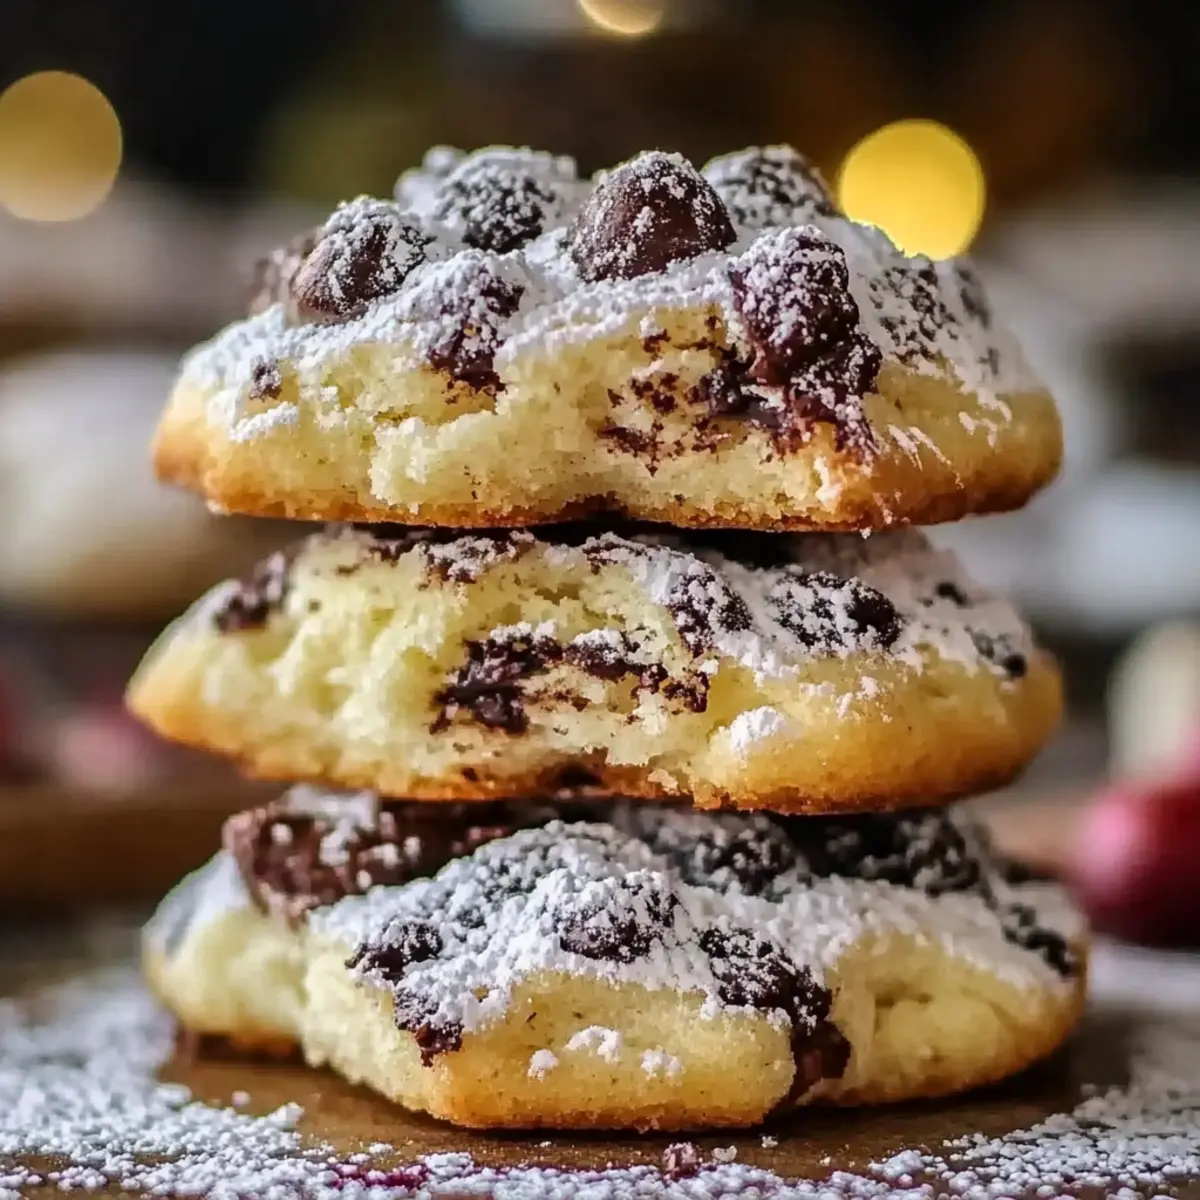
As I sifted through my pantry, searching for inspiration, the sweet aroma of memories flooded my mind—of bustling Italian bakeries and the joy of sharing treats with family. That’s when I decided to recreate one of my all-time favorites: Cannoli Cookies. These delightful bites are not just a clever twist on the classic dessert; they bring together the rich creaminess of ricotta cheese and a hint of citrus zest to create a warm, comforting snack that’s quick to whip up. In less than 40 minutes, you can bake a batch that’s perfect for cozy afternoons or festive gatherings. Plus, they’re freezer-friendly, making them an ideal companion for unexpected guests or late-night cravings. Ready to anchor your next baking adventure with these Cannoli Cookies? Let’s get started!

Why Are Cannoli Cookies So Irresistible?
Deliciously Unique: These Cannoli Cookies combine classic flavors with a modern twist, bringing the iconic Italian dessert right to your kitchen.
Effortless Preparation: In just 15 minutes of prep, you’ll dive into a baking adventure that requires minimal effort but yields maximum flavor.
Citrusy Sweetness: Thanks to the almond extract and citrus zest, every bite is a refreshing burst of brightness that perfectly complements the rich ricotta.
Crowd-Pleaser: With their soft, chewy texture and indulgent chocolate chips, these cookies are sure to become a hit at your next gathering or dessert table.
Versatile Storage: Not only can you enjoy them fresh, but these treats freeze beautifully, ensuring you’re always just a bake away from a sweet treat. For more delightful recipes, check out my post on easy Italian desserts.
Cannoli Cookies Ingredients
For the Cookie Dough
- All-purpose flour – Perfect for structure, use a spoon to lightly scoop and level for accuracy.
- Baking powder – Ensures your cookies rise to a delightful, fluffy texture.
- Baking soda – Balances the acidity of the ricotta, contributing to the cookie's perfect rise.
- Salt – Enhances all the sweet flavors, making them pop pleasingly against the creamy backdrop.
- Unsalted butter – Brings richness; don't skimp on softening it for optimal creaming.
- Granulated sugar – Sweetens your cookies; consider using brown sugar for a deeper flavor.
- Large egg – Binds the ingredients while adding moisture; let it come to room temperature for best results.
- Almond extract – Infuses a lovely nutty aroma that complements the ricotta beautifully.
- Vanilla extract – A classic flavor that pairs excellently with all the other ingredients.
- Ricotta cheese – The star ingredient, adding creaminess and a delightful texture—look for whole milk ricotta for the best taste.
For the Mix-Ins
- Mini chocolate chips – Adds sweetness and chocolatey goodness; feel free to swap with white chocolate for a fun twist.
- Citrus zest – Whether lemon or orange, this adds a fragrant brightness that elevates your Cannoli Cookies.
Embrace the joy of baking these scrumptious Cannoli Cookies and enjoy their unique flavor profile that's reminiscent of the classic Italian treat!
Step‑by‑Step Instructions for Cannoli Cookies
Step 1: Preheat the Oven
Start by preheating your oven to 350°F (175°C). While the oven warms up, prepare a baking sheet by lining it with parchment paper. This will ensure your Cannoli Cookies don't stick and come out perfectly when baked. The parchment will help create a lovely golden bottom on each cookie.
Step 2: Combine Dry Ingredients
In a medium bowl, whisk together 2 cups of all-purpose flour, 1 teaspoon of baking powder, ½ teaspoon of baking soda, and ¼ teaspoon of salt. This mixture is essential for achieving the right texture. Ensure there are no lumps and let it sit while you move on to the wet ingredients, allowing the baking powder to activate.
Step 3: Cream the Butter and Sugar
In a separate large bowl, use a hand mixer or stand mixer to cream together ½ cup of softened unsalted butter and 1 cup of granulated sugar. Mix on medium speed for about 3-5 minutes, or until the mixture becomes light and fluffy. This step is crucial for adding air into your Cannoli Cookies, making them tender and chewy.
Step 4: Incorporate the Wet Ingredients
Add in 1 large egg, 1 teaspoon of almond extract, and 1 teaspoon of vanilla extract to the butter-sugar mix. Beat until fully combined and smooth, which should take about 1-2 minutes. The mixture should appear glossy and uniform, ready to meld with the ricotta.
Step 5: Add the Ricotta
Next, gently fold in 1 cup of ricotta cheese into the wet mixture. Make sure the ricotta is fully incorporated without any visible lumps. This will create the rich, creamy texture that makes your Cannoli Cookies so delightful. Mix until combined, being careful not to overmix.
Step 6: Combine Wet and Dry Mixtures
Gradually add the dry ingredient mixture to the wet ingredients, stirring with a wooden spoon or spatula until just combined. Avoid overmixing, as this can lead to tough cookies. The dough should be thick and a bit sticky, ready for the fun mix-ins!
Step 7: Fold in Chocolate Chips and Zest
Gently fold in ½ cup of mini chocolate chips and the zest of one lemon or orange. This will add a burst of citrusy flavor and sweetness to your Cannoli Cookies. Ensure an even distribution of the chocolate chips and zest throughout the dough for a tasty bite in every cookie.
Step 8: Shape the Cookies
Using a tablespoon or cookie scoop, drop balls of dough onto the prepared baking sheet, spacing them about 2 inches apart. The dough should be a little rough in appearance, forming a rustic look that adds charm to your Cannoli Cookies as they bake and spread.
Step 9: Bake the Cookies
Place the baking sheet in the oven and bake for 12-15 minutes, or until the edges are lightly golden. Keep an eye on them—once they puff up and begin to turn golden, it’s time to take them out for that perfect soft texture.
Step 10: Cool and Serve
After baking, allow the cookies to cool on the baking sheet for about 5 minutes. Then, carefully transfer them to a wire rack to cool completely. This will help them firm up a bit more while retaining their delightful chewy texture, ready to be enjoyed with family and friends.
Storage Tips for Cannoli Cookies
Room Temperature: Keep freshly baked Cannoli Cookies in an airtight container at room temperature for up to 7 days to maintain their delightful texture.
Fridge: For longer freshness, you can store the cookies in the fridge for up to 2 weeks; ensure they are well-wrapped to avoid drying out.
Freezer: If you want to save them for later, these cookies freeze beautifully! Place them in a freezer-safe bag or container, and they’ll stay good for up to 3 months.
Reheating: To enjoy cookies warm, simply pop them in the microwave for about 10-15 seconds after thawing. This will bring back that fresh-baked taste and texture!
Cannoli Cookies Variations & Substitutions
Feel free to let your creativity shine by customizing these delightful Cannoli Cookies with these fun variations!
-
Gluten-Free: Substitute all-purpose flour with a 1:1 gluten-free baking blend for a celiac-friendly treat.
-
Dairy-Free: Use coconut oil or a dairy-free butter alternative in combination with a plant-based ricotta for a delicious vegan option.
-
Flavor Burst: Add a splash of orange or lemon juice to elevate the citrus notes in your Cannoli Cookies.
-
Nutty Delight: Mix in toasted chopped pistachios or crushed almonds for that extra crunch and nutty flavor.
-
Spicy Kick: Introduce a dash of cinnamon or nutmeg into the flour mixture for a warm, spiced flavor profile.
-
Fruity Addition: Toss in some dried cherries or raisins for a unique twist that complements the sweetness of the chocolate.
-
Minty Fresh: Stir in a teaspoon of peppermint extract for a refreshing minty taste that’s perfect for the holiday season.
-
Double Chocolate: Use chocolate dough by swapping ¼ cup of flour for cocoa powder and adding mini chocolate chips for a richer cookie experience.
With these variations, your Cannoli Cookies can be an ever-evolving treat that delights every time you bake! If you're curious about more flavor combinations, take a look at my post on easy Italian desserts for some scrumptious ideas!
What to Serve with Cannoli Cookies
Imagine indulging in something sweet, with textures and flavors that enhance each bite, while complementing your delicious cookies.
- Steaming Coffee: The rich, dark notes of coffee offset the sweet, creamy flavor of Cannoli Cookies perfectly for a delightful pairing.
- Creamy Gelato: A scoop of vanilla or hazelnut gelato adds an extra layer of creamy indulgence that mirrors the ricotta's texture.
- Fresh Berries: Juicy strawberries or raspberries provide a fresh, tart contrast that balances the sweetness, making each bite more exciting.
- Chocolate Drizzle: A simple drizzle of melted chocolate over your cookies elevates them into a gourmet treat, enhancing their flavor profile.
- Citrus Sorbet: The refreshing zing of lemon or orange sorbet cleanses the palate and complements the citrus zest in the cookies beautifully.
- Sparkling Wine: A glass of prosecco brings the perfect bubbly note, opening up your taste buds to the sweet delights of Cannoli Cookies.
- Nutty Biscotti: These crunchy treats make for a perfect sidekick, offering texture and a coffee-friendly companion for a perfect dessert experience.
- Vanilla Ice Cream: The creaminess of vanilla ice cream contrasts with the chewy texture of Cannoli Cookies for a match made in dessert heaven.
- Lemonade Spritzer: A fizzy lemonade spritzer adds a refreshing kick, blending citrus notes that harmonize with every nibble of the cookie.
- Whipped Cream: Light, airy whipped cream can be served alongside or on top, making your cookies feel even more dessert-like and decadent.
Expert Tips for Cannoli Cookies
Perfect Butter Creaming: Ensure your butter is softened to room temperature; this creates a light, fluffy base that results in tender Cannoli Cookies.
Watch the Mixing: Avoid overmixing the dough; mix until ingredients are just combined for the best texture and to prevent tough cookies.
Chill the Dough: If the dough feels too sticky, chill it for about 15 minutes before shaping. This will make it easier to handle.
Golden Edges: Check for light golden edges while baking, as this indicates that your Cannoli Cookies are perfectly fluffy and ready to come out of the oven.
Customize Your Add-ins: Feel free to experiment with different mix-ins, like dried fruit or nuts, for a unique twist on the classic Cannoli Cookies flavor.
Storage Magic: Store cookies in an airtight container to maintain freshness; they'll be good for up to a week at room temperature!
Make Ahead Options
These Cannoli Cookies are perfect for meal prep enthusiasts! You can prepare the dough up to 24 hours in advance by mixing everything through step 7 before refrigerating it in an airtight container. This not only saves time on busy baking days but also enhances the flavors as they meld overnight. If you want to go even further, you can scoop the dough into balls and freeze them for up to 3 months; just place them on a baking sheet until firm, then transfer to a freezer bag. When you're ready to bake, simply bake the frozen dough balls for an extra minute or two. Enjoy these delicious Cannoli Cookies just as fresh, with minimal effort and maximum flavor!
Cannoli Cookies Recipe FAQs
How do I know if my ricotta cheese is fresh enough to use?
Absolutely! When selecting ricotta cheese, look for it to be creamy and slightly wet, without any dark spots all over the surface. Check the expiration date and make sure it has been properly refrigerated. If it has a sour smell or off taste, it’s best to toss it; fresh ricotta will taste sweet and mild.
How should I store my Cannoli Cookies for maximum freshness?
Very! Store your Cannoli Cookies in an airtight container at room temperature for up to 7 days. If you want to keep them even longer, you can refrigerate them for up to 2 weeks. Just ensure they're well-wrapped to maintain that delicious chewy texture.
Can I freeze the dough for Cannoli Cookies?
Absolutely! To freeze the cookie dough, scoop the dough into tablespoon-sized balls and place them on a baking sheet lined with parchment paper. Freeze until firm, then transfer the balls into a freezer-safe bag. You can keep them for up to 3 months. When you’re ready to bake, simply pop them straight into the oven—no need to thaw!
What should I do if my Cannoli Cookies are too dry or crumbly?
If your cookies turn out too dry, it might be due to overmixing or not measuring the flour correctly. Next time, be sure to gently mix the dough until just combined and measure your ingredients with precision. If you find yourself in a pinch, you can try adding a dab of melted butter or an extra tablespoon of ricotta to the dough before baking.
Are there any allergy considerations I should keep in mind when making Cannoli Cookies?
Definitely! Keep in mind that these cookies contain gluten (from the flour) and dairy (from the ricotta and butter), which are common allergens. If preparing for someone with allergies, you can substitute the all-purpose flour with a gluten-free blend and use dairy-free ricotta or an appropriate alternative. Always check labels to ensure they meet dietary needs.
What’s the best way to reheat frozen Cannoli Cookies?
To enjoy your frozen Cannoli Cookies warm, first thaw them in the fridge or at room temperature. Then, place them in the microwave for about 10-15 seconds for a delightful warm treat that tastes just like fresh-baked! This simple step brings them back to life, maintaining their texture and flavor.

Delicious Cannoli Cookies That Bring Italy to Your Kitchen
Ingredients
Equipment
Method
- Preheat your oven to 350°F (175°C) and prepare a baking sheet lined with parchment paper.
- In a medium bowl, whisk together the dry ingredients: flour, baking powder, baking soda, and salt.
- In a large bowl, cream together softened butter and granulated sugar until light and fluffy.
- Add the egg, almond extract, and vanilla extract to the butter-sugar mix and beat until smooth.
- Gently fold in the ricotta cheese until fully incorporated without lumps.
- Add the dry ingredients to the wet ingredients, stirring until just combined.
- Fold in mini chocolate chips and citrus zest for added flavor.
- Drop balls of dough onto the prepared baking sheet, spacing them about 2 inches apart.
- Bake for 12-15 minutes, or until the edges are lightly golden.
- Allow the cookies to cool on the baking sheet for 5 minutes before transferring to a wire rack.


Leave a Reply