
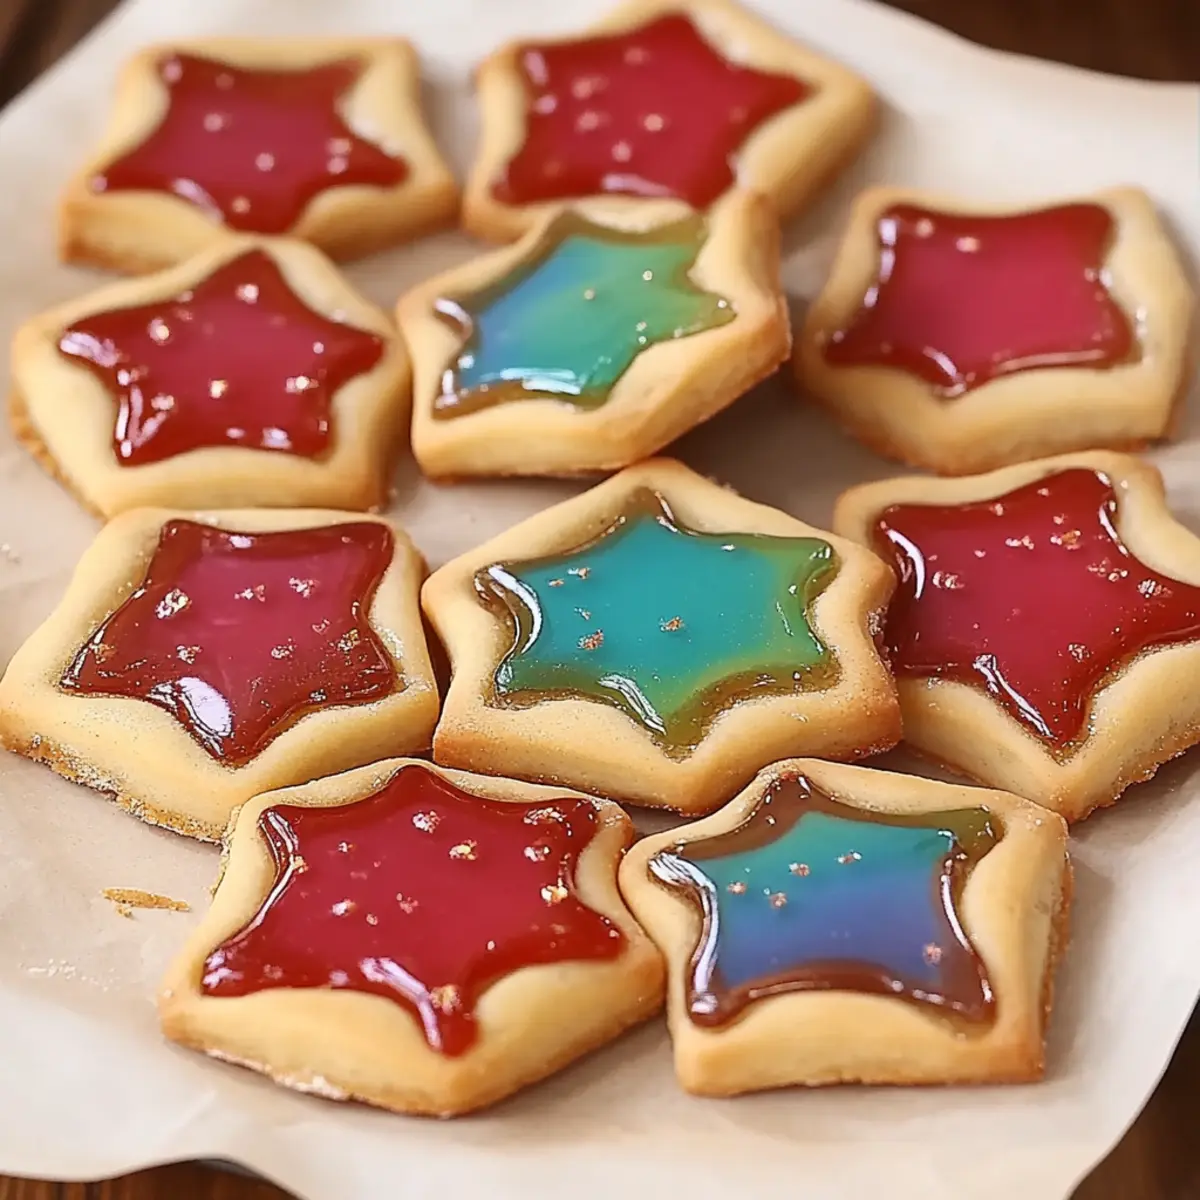
As I stood in my kitchen, a vibrant array of hard candies beckoned from their bowl, promising a delightful transformation. What better way to infuse joy into the everyday than with these stunning Stained Glass Cookies? This recipe is not just a feast for the eyes but also offers the irresistible perks of being quick to prepare and an absolute crowd-pleaser, perfect for any occasion. You’ll love the playful twist of creating cookie windows filled with colorful, melted candy that will dazzle friends and family alike! Whether you're a seasoned baker or just looking to swap out that drive-thru dinner for something homemade, these cookies are sure to spark your creativity and brighten your day. Are you ready to bring some color into your baking? Let’s dive into the recipe!

Why will you love Stained Glass Cookies?
Visual Delight: These Stained Glass Cookies are as beautiful as they are delicious, featuring vibrant, candy-filled centerpieces that are sure to impress.
Simplicity: The recipe is easy to follow, making it a perfect choice for both novice and experienced bakers looking to create something special.
Quick Treat: With just 30 minutes of total time (plus chilling), you’ll have a festive, homemade treat ready in no time!
Versatile Joy: Use any hard candies you have on hand for endless flavor combinations, perfect for any holiday or get-together.
Family Fun: This cookie-making adventure is a wonderful way to spend time with loved ones, getting creative with shapes and colors together.
Try serving these delightful cookies alongside a cup of freshly brewed tea or coffee, or check out our tips on holiday cookies for more delightful ideas!
Stained Glass Cookies Ingredients
Unlock the secrets to these vibrant treats!
For the Cookie Dough
- All-purpose flour – This serves as the base for your cookies, providing structure and texture.
- Baking powder – Helps the cookies rise, ensuring a light and airy bite.
- Salt – A pinch enhances the sweetness and balances the flavors.
- Unsalted butter – Adding rich flavor and tenderness when creamed with sugar.
- Granulated sugar – Sweetens the dough and contributes to the cookie's lovely texture.
- Large egg – Acts as a binder, bringing the ingredients together beautifully.
- Vanilla extract – Adds a warm, classic flavor that complements the sweetness.
- Almond extract (optional) – A twist of almond flavor adds depth, creating a delightful blend.
For the Filling
- Assorted hard candies – Crush these for vibrant ‘glass’ centers that melt into colorful treats.
Step‑by‑Step Instructions for Stained Glass Cookies
Step 1: Prepare the Dry Ingredients
In a medium bowl, whisk together 2 ½ cups of all-purpose flour, 1 teaspoon of baking powder, and ¼ teaspoon of salt. Ensure there are no lumps, as this mixture forms the base for your Stained Glass Cookies. Set this bowl aside while you work on the wet ingredients.
Step 2: Cream the Butter and Sugar
In a separate large mixing bowl, use an electric mixer to cream together 1 cup of softened unsalted butter and 1 cup of granulated sugar. Beat on medium speed for about 3-4 minutes until the mixture is light and fluffy. This step incorporates air, ensuring your cookies will be tender and delicious.
Step 3: Incorporate the Wet Ingredients
Add 1 large egg, 2 teaspoons of vanilla extract, and ½ teaspoon of almond extract (if using) to the creamed mixture. Mix on low speed until fully incorporated, making sure the egg is blended smoothly into the batter. The fragrant combination will enhance the flavor of your Stained Glass Cookies.
Step 4: Combine Dry and Wet Ingredients
Gradually add the dry ingredient mixture to the wet ingredients, beating on low speed until just combined. Be careful not to overmix; the dough should come together nicely and resemble a soft ball. This step is crucial for achieving the perfect cookie texture!
Step 5: Chill the Dough
Divide the dough in half and shape each portion into a disc. Wrap each disc tightly in plastic wrap and refrigerate for at least 1 hour, or until firm. Chilling helps the flavors meld and makes the dough easier to roll out, resulting in more beautiful Stained Glass Cookies.
Step 6: Preheat the Oven
Once the dough is chilled, preheat your oven to 350°F (175°C). Line your baking sheets with parchment paper to prevent sticking. This step ensures that your cookies bake evenly and come out perfectly golden.
Step 7: Roll Out the Dough
On a lightly floured surface, take one disc of chilled dough and roll it out to about ¼ inch thick. Use a rolling pin to achieve an even thickness, which is crucial for the cookies' final appearance. They should feel somewhat firm but flexible, ready for cutting.
Step 8: Cut Out Cookie Shapes
Using your favorite cookie cutters, cut out shapes from the rolled dough. Remember to use a smaller cutter to create a window within each cookie for the ‘glass’ effect. Arrange the cutouts on the prepared baking sheets, leaving space between them for expansion while baking.
Step 9: Fill with Crushed Candy
Crush assorted hard candies into small pieces and carefully fill the centers of each cookie cutout with the colorful bits. Aim to fill them just to the rim, as the candy will melt during baking, creating the beautiful stained glass effect of your cookies.
Step 10: Bake the Cookies
Place the baking sheets in the preheated oven and bake your Stained Glass Cookies for 8-10 minutes, or until the edges are lightly golden. Keep an eye on them to ensure they don't overbake; you want them to look splendid and delicious!
Step 11: Cool the Cookies
Once baked, remove the cookies from the oven and allow them to cool completely on the baking sheets for about 10 minutes. This cooling period lets the candy set up properly, sealing in that stained glass effect while ensuring the cookies are firm enough to transfer.
Step 12: Transfer and Enjoy
Carefully transfer the cooled cookies to a wire rack for further cooling. Once completely cool, they're ready to be served! These Stained Glass Cookies will not only please the eye but also delight the taste buds of everyone who tries them.

Stained Glass Cookies Variations
Feel free to let your creativity shine by customizing these Stained Glass Cookies to suit your tastes!
-
Gluten-Free: Substitute all-purpose flour with a 1-to-1 gluten-free baking blend for a delicious alternative.
-
Dairy-Free: Use vegan butter instead of unsalted butter to make these cookies dairy-free, without compromising on taste.
-
Nutty Twist: Enhance flavor by adding chopped nuts, like almonds or walnuts, to the cookie dough for a delightful crunch.
-
Spice It Up: Incorporate a teaspoon of cinnamon or ginger into the dough for a warming spice perfect for fall or winter.
-
Colorful Swirls: Roll in some food coloring to your dough before chilling to create vibrant, swirled cookies that pop with color.
-
Add Citrus: Zest a lemon or orange into the dough for a refreshing burst of citrus that complements the sweetness beautifully.
-
Heat Things Up: Add a pinch of cayenne or chili powder to the dough for a surprising spicy kick that surprises the taste buds delightfully.
-
Chocolatey Delight: Replace some flour with cocoa powder for a chocolate version, then use colorful candy for that stunning stained-glass effect.
With these variations, you can easily adapt your Stained Glass Cookies to suit everyone’s taste buds! For more inspiration, don’t forget to check out our tips on holiday cookies or explore other wonderful baking adventures you can embark on!
How to Store and Freeze Stained Glass Cookies
Room Temperature: Store your cooled Stained Glass Cookies in an airtight container at room temperature for up to 3 days. This keeps them fresh and flavorful for snacking.
Fridge: If you prefer, you can refrigerate the cookies in an airtight container for up to 1 week. Just be aware that refrigeration may slightly alter their texture.
Freezer: For longer storage, freeze the cookies in a single layer on a baking sheet first, then transfer to an airtight container or freezer bag. They can last up to 3 months in the freezer.
Reheating: To enjoy a fresh taste, reheat baked cookies in a preheated oven at 350°F (175°C) for about 5 minutes. This revitalizes the cookies, making the candy centers extra delightful!
Expert Tips for Stained Glass Cookies
Chill the Dough: Ensure you chill the dough for at least one hour; this helps with rolling and shapes, preventing the cookies from spreading too much in the oven.
Choose Candy Wisely: Use hard candies that melt well, like Jolly Ranchers or Lifesavers, ensuring vibrant colors for your stained glass effect—avoid candies that won’t melt!
Watch the Baking Time: Keep an eye on your cookies as they bake. Remove them when edges are lightly golden; underbaking slightly is better than overbaking to retain a soft texture.
Avoid Sticky Dough: If your dough becomes too sticky while rolling, sprinkle a little flour on your work surface and rolling pin to make it easier to handle.
Creative Shapes: Get playful! Use themed cookie cutters for various occasions—these Stained Glass Cookies can brighten up any holiday or celebration.
What to Serve with Stained Glass Cookies
Imagine an array of delightful dishes creating a magical atmosphere, perfect for sharing these stunning cookies with loved ones.
-
Fresh Fruit Salad: A light, refreshing complement that balances the sweetness of the cookies, brightening your meal with vibrant flavors.
-
Rich Hot Chocolate: The creamy texture and deep cocoa flavors provide a warm, chocolatey contrast that lovingly envelops the taste of the cookies.
-
Vanilla Ice Cream: The smooth, cold creaminess pairs wonderfully with the warm, sweet cookies—add a drizzle of chocolate sauce for extra indulgence!
-
Milk or Dairy Alternatives: A classic companion, a glass of milk or even almond milk enhances the cookies' sweetness, making every bite a nostalgic treat.
-
Nutty Granola Bars: Provide a hearty snack option that offers a satisfying crunch, creating a delightful texture contrast with the soft Stained Glass Cookies.
-
Coffee or Tea: The rich bitterness of coffee or the delicate flavors of tea perfectly cut through the sweet, buttery notes of the cookies, creating a harmonious pairing.
-
Cheese Platter: A selection of creamy cheeses contrasts beautifully with the cookie's sweetness, creating a balanced and interesting flavor experience.
-
Zesty Lemon Bars: Bright and tangy, these sweet treats offer a flavorful twist that beautifully balances the sweetness of the cookies—perfect for afternoon gatherings.
Embrace creativity and find the perfect pairings that spark joy during any occasion!
Make Ahead Options
These Stained Glass Cookies are perfect for meal prep, allowing you to enjoy homemade treats without the last-minute rush! You can prepare the cookie dough and refrigerate it for up to 3 days; simply shape it into discs, wrap in plastic wrap, and keep it chilled until you’re ready to bake. Additionally, you can cut out the cookies and fill them with crushed candies, then refrigerate them for up to 24 hours before baking. To maintain quality, ensure the cookies are stored in an airtight container to prevent them from drying out. When you're ready to serve, just pop them into the oven, and in no time, you’ll have colorful, delightful Stained Glass Cookies that are just as delicious as if baked fresh!
Stained Glass Cookies Recipe FAQs
How do I choose the right hard candies for Stained Glass Cookies?
Absolutely! Opt for hard candies that melt beautifully, like Jolly Ranchers or Lifesavers. These candies offer vibrant colors and won't crystalize after melting, ensuring your cookies have that stunning stained glass look. Avoid candies like chocolate or gummy varieties, as they won't melt properly and can spoil the effect you’re aiming for.
What is the best way to store Stained Glass Cookies?
To keep your cookies fresh and tasty, store them in an airtight container at room temperature for up to 3 days. If you'd like to extend their life, refrigerate them in an airtight container for up to 1 week. Just a heads up, refrigeration might make them slightly softer.
Can I freeze Stained Glass Cookies? What’s the best way?
Certainly! To freeze your cookies, first, lay them in a single layer on a baking sheet. Freeze them for about 1-2 hours until firm, then transfer them to an airtight container or freezer bag. They can last up to 3 months in the freezer. When you’re ready to enjoy them, simply reheat in a preheated oven at 350°F (175°C) for around 5 minutes.
What should I do if my cookies spread too much while baking?
If you notice your Stained Glass Cookies spreading out, it may be due to the dough being too warm or too little flour being added. To troubleshoot, make sure to chill the dough sufficiently (at least 1 hour) and flour your rolling surface well. If they spread regardless, you can reshape them slightly while they’re still warm to achieve that perfect look!
Can I make Stained Glass Cookies allergy-friendly?
Very! To cater to allergies, you can substitute the all-purpose flour with a gluten-free blend. For dairy-free options, use plant-based butter in your recipe. Always check the ingredients of your hard candies to ensure they are free from allergens, like nuts or gluten, as some brands may have cross-contamination.

Delicious Stained Glass Cookies That Spark Joy These Holidays
Ingredients
Equipment
Method
- In a medium bowl, whisk together the flour, baking powder, and salt.

- In a large mixing bowl, cream the butter and sugar together.
- Add the egg, vanilla extract, and almond extract to the creamed mixture and mix until incorporated.
- Gradually add the dry ingredients to the wet ingredients and mix until just combined.
- Divide the dough and chill for at least 1 hour.
- Preheat the oven to 350°F (175°C) and prepare baking sheets.
- Roll out the dough to ¼ inch thick on a floured surface.
- Cut out shapes and make smaller cutouts for the candy filling.
- Fill the centers with crushed candy.
- Bake for 8-10 minutes until edges are golden.
- Cool on sheets for 10 minutes before transferring to a wire rack.
- Enjoy your vibrant Stained Glass Cookies!

Leave a Reply