
Caught in a flurry of autumn leaves, I found myself reminiscing about those delightful childhood Halloweens—the kind filled with laughter, costumed antics, and, of course, treats galore. That's why I’m thrilled to share my recipe for Halloween Rocky Road Slices, a fun spin on the classic dessert that’s perfectly festive and irresistibly tasty. Not only are these slices a breeze to whip up in just 15 minutes, but they also double as an eerie yet delicious treat that delights kids and adults alike. With layers of chocolate, crunchy peanuts, and a sprinkle of whimsical candies, they’re perfect for parties or cozy nights in. Have you ever thought about how a simple dessert can bring back those sweet memories? Let’s dive into the delightful world of Halloween treats!
Why Are These Halloween Rocky Road Slices Irresistible?
Easy to Make: Preparation is a breeze, taking just 15 minutes! Perfect for anyone looking to whip up a festive treat without the hassle.
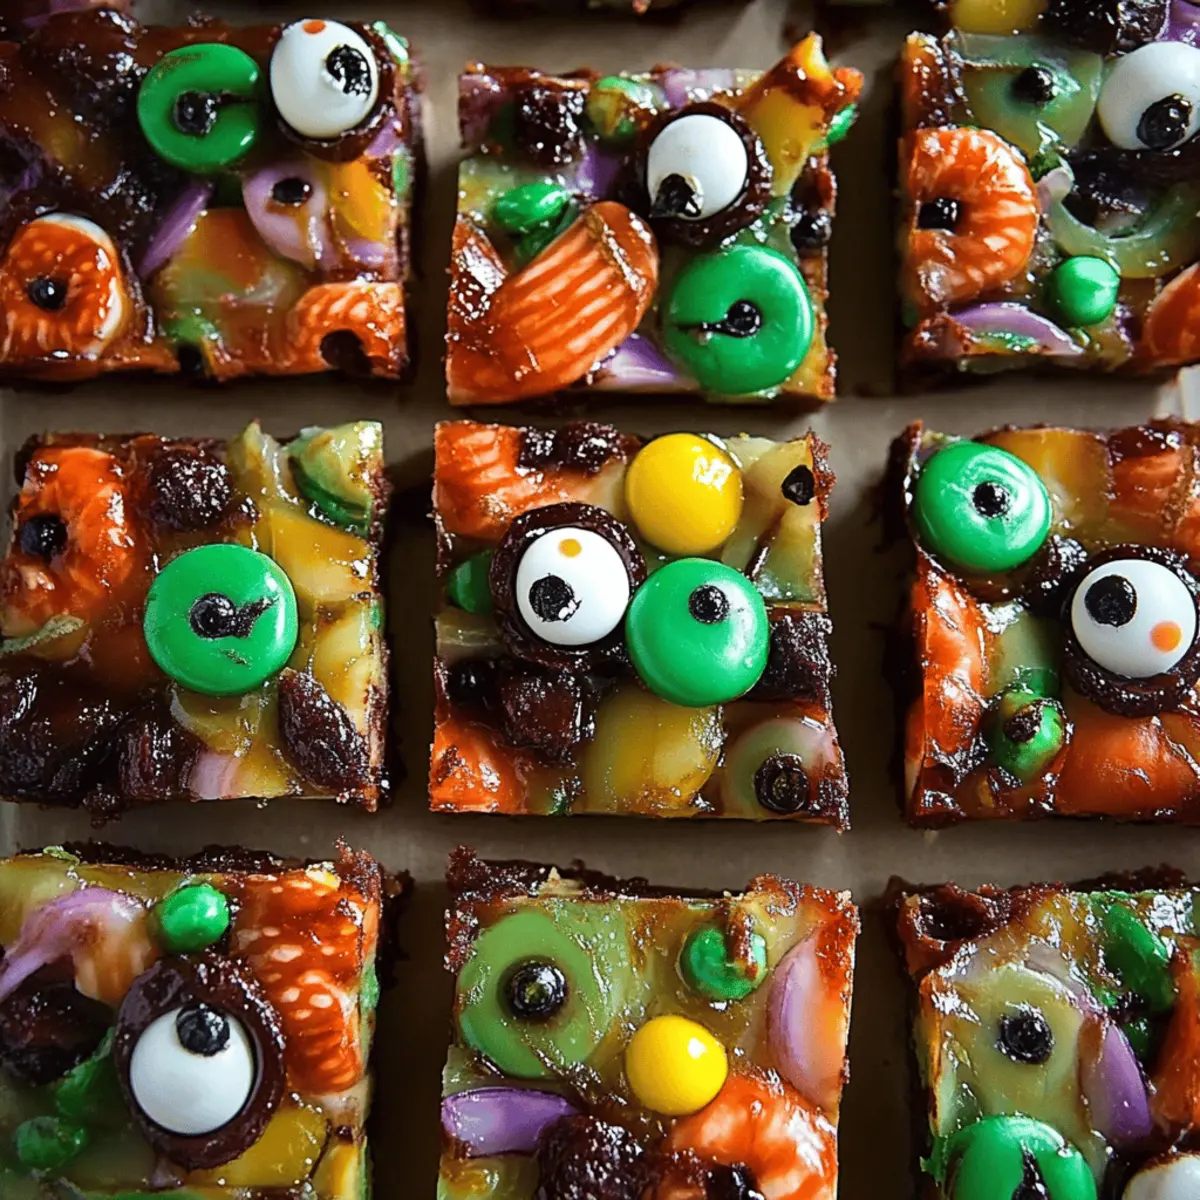
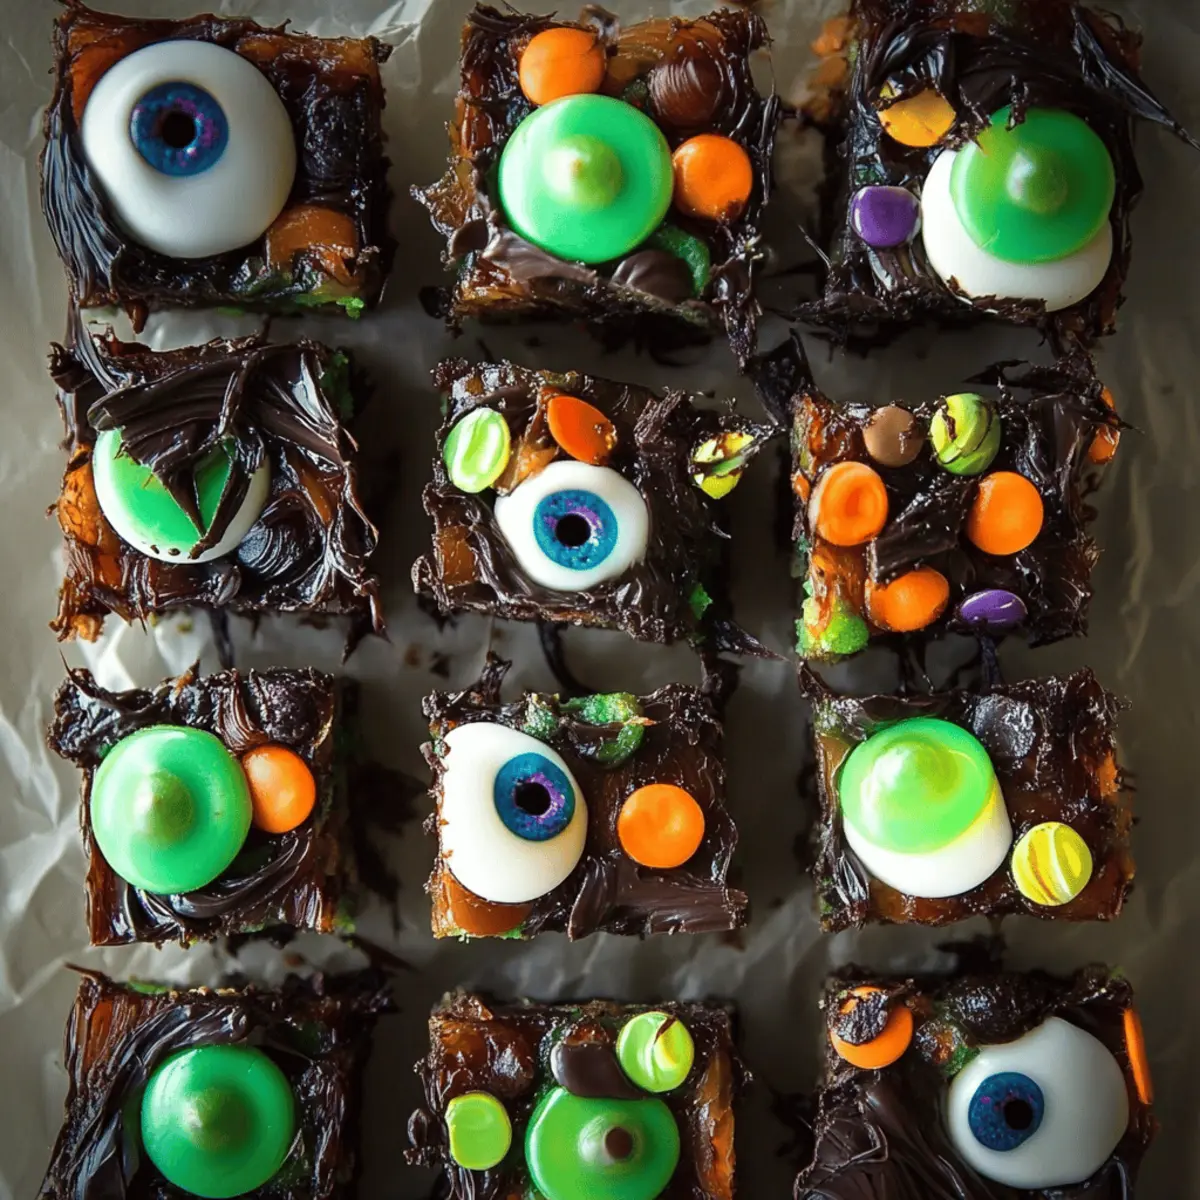
Layer of Fun: Each slice features a delightful mix of chocolate, crunchy peanuts, and gooey marshmallows, making every bite a party in your mouth.
Festive Presentation: The addition of colorful candy melts and Halloween-themed decorations allows for creativity, making these slices a feast for the eyes as well as the tastebuds.
Crowd-Pleasing: Whether for a Halloween party or a cozy family gathering, these slices are sure to be a hit with both kids and adults.
Make Ahead: With a chilling time that can be overnight, you can prepare these ahead of time, saving you stress on the big day!
Using this recipe as a base, you might also want to explore more delightful treats like chocolate peanut butter bars or spooky Halloween cupcakes to keep the festivities going!
Halloween Rocky Road Slices Ingredients
• Get ready to summon your inner chef with these delicious Halloween Rocky Road Slices!
For the Base
- 340 g semi-sweet chocolate chips – melts beautifully to create a rich chocolate foundation.
- 170 g butter – adds creaminess and ensures a smooth consistency.
- Generous pinch of salt – enhances the chocolate flavor and balances sweetness.
For the Crunch
- 150 g roasted peanuts – brings a delightful crunch that contrasts well with the soft ingredients.
- 75 g mini marshmallows – adds a chewy texture and a hint of sweetness.
- 10 mini Kit Kat bars – introduces layers of crunchy wafer and chocolate for added fun.
For the Decoration
- 115 g candy melts (in various colors) – provides a pop of color and whimsy to your slices.
- Gummy worms (regular or sour) – perfect for an eerie Halloween touch, adding playful appeal.
- M&M candy (Ghoul mix) – vibrant candies that bring both flavor and spooky charm.
- Candy eyes (a mix of small and large) – gives each slice a fun and frightful personality.
- Halloween sprinkles – sprinkle some magic to complete the festive look.
- Extra melted semi-sweet chocolate – use this to secure your decorations and make them stick!
Collect all these ingredients and prepare for a delightful adventure in baking!
Step‑by‑Step Instructions for Halloween Rocky Road Slices
Step 1: Prepare the Pan
Begin by lining an 8-inch or 9-inch square pan with parchment paper, ensuring the paper hangs over the edges for easy removal later. If you prefer thicker slices, use the 8-inch pan; for thinner ones, opt for the 9-inch. Set the prepared pan aside while you melt the chocolate base.
Step 2: Melt the Chocolate Base
In a large microwave-safe bowl, combine the butter, semi-sweet chocolate chips, and a generous pinch of salt. Microwave the mixture in 30-second intervals, stirring well between each round until the chocolate is completely melted and smooth. This usually takes about 1.5 to 2 minutes, so keep an eye on it to prevent burning.
Step 3: Melt the Candy Melts
While the chocolate base is cooling slightly, prepare the colorful candy melts. In separate microwave-safe bowls for each color, melt them in 20- to 30-second intervals, stirring occasionally until smooth. This adds a fun and vibrant layer to your Halloween Rocky Road Slices, bringing them to life visually!
Step 4: Prepare the Kit Kat Bars
Next, take the mini Kit Kat bars and cut each one in half. This step adds delightful crunchy pieces to your rocky road mixture that will be a hit with everyone. Set the chopped Kit Kat bars aside until you're ready to mix them into the chocolate base.
Step 5: Combine the Crunch
Once the chocolate base has cooled slightly, add the roasted peanuts and the halved Kit Kat pieces. Stir gently to combine, ensuring all the ingredients are well-coated in the rich chocolate mixture, even if some melts a little from the heat.
Step 6: Add the Marshmallows
To protect their shape, add the mini marshmallows last to the chocolate mixture. Mix them in carefully to keep their fluffy texture intact. The marshmallows will add a gooey element to your Halloween Rocky Road Slices that everyone will love!
Step 7: Pour into the Pan
Scrape the combined rocky road mixture into the prepared pan, spreading it evenly. For a fun touch, add dollops of the melted candy melts on top and swirl them into the mixture. This will create a festive marbled effect and enhance the flavor of your slices.
Step 8: Mark for Cutting
Before you decorate, use a knife to lightly mark where you plan to cut the slices. You can choose to cut them into 5x5 squares for 25 pieces or 4x4 squares for 16 larger slices. This will give you a guide for serving later.
Step 9: Add Gummy Worms
Take the gummy worms and place them on the surface of the rocky road, gently pressing them in. Feel free to position them creatively, allowing your imagination to run wild! This spooky element is perfect for the Halloween theme and will delight kids and adults alike.
Step 10: Decorate with M&Ms and Eyes
Next, sprinkle M&Ms and candy eyes between the gummy worms, placing them carefully without disturbing your marked cut lines. The M&Ms will not only add flavor but also enhance the festive look of your Halloween Rocky Road Slices.
Step 11: Secure the Decorations
If needed, use extra melted semi-sweet chocolate to help secure the decorations in place. Apply small dollops underneath the candies to keep them from shifting. This step is optional, but it adds an extra touch of creativity to your festive treat!
Step 12: Chill to Set
Now, cover the pan with plastic wrap or aluminum foil and refrigerate it for at least 8 hours, preferably overnight. This chilling time allows the chocolate to set completely—it’s crucial for achieving the perfect texture for your Halloween Rocky Road Slices.
Step 13: Cut and Serve
Once well-chilled, remove the rocky road from the pan by lifting the parchment paper. Using a sharp knife, cut along your marked lines, warming the knife in hot water if necessary to ensure clean cuts. Slice through the mixture to reveal the colorful layers and fun decorations.
Step 14: Store and Enjoy
Store your Halloween Rocky Road Slices in an airtight container in the fridge to maintain freshness. Serve them when needed, whether at a party or as a delightful after-school treat, and watch them disappear as everyone enjoys this festive, nostalgic dessert!

Expert Tips for Halloween Rocky Road Slices
Chill Time Matters: Ensure you refrigerate your slices for at least 8 hours. This helps the chocolate set properly and makes cutting easier.
Avoid Overheating: When melting the chocolate and candy melts, microwave in short intervals and stir often. Overheating can cause them to seize and lose their smooth texture.
Layer Creatively: Feel free to get imaginative with your candy decorations! Adjust the amount of gummies and sprinkles based on your personal taste, but help keep the look festive.
Use Parchment Paper: Lining the pan with parchment paper not only makes removal easy but also minimizes mess during serving.
Slice with Care: If your knife sticks while cutting, warm it briefly under hot water. This will help you create clean, beautiful slices of your Halloween Rocky Road Slices without tearing.
How to Store and Freeze Halloween Rocky Road Slices
Fridge: Store your delicious Halloween Rocky Road Slices in an airtight container in the refrigerator, and they'll stay fresh for up to 2 weeks.
Freezer: If you'd like to keep them longer, freeze the slices in a single layer, separating each piece with parchment paper. They can last for up to 3 months in the freezer.
Thawing: When ready to enjoy, simply remove the desired amount from the freezer and let them thaw in the fridge for a few hours before serving.
Reheating: There’s no need to reheat these slices; enjoy them chilled for the ultimate delightful experience!
Make Ahead Options
These Halloween Rocky Road Slices are perfect for busy home cooks looking to save time during the festivities! You can prepare the entire rocky road mixture and refrigerate it for up to 24 hours before serving. To make ahead, simply follow the instructions until the chilling step (Step 12), allowing the mixture to set thoroughly. Remember to cover the pan with plastic wrap to keep it fresh and prevent odors from the fridge from affecting the flavor. When you're ready to serve, simply cut the squares as directed in Step 13, and you'll have a delightful treat that’s just as delicious as if made fresh! This way, you can enjoy more time with loved ones and less time in the kitchen.
Halloween Rocky Road Slices Variations & Substitutions
Feel free to explore creative twists and personalized touches to make these festive treats uniquely yours!
-
Nut-Free: Substitute roasted peanuts with sunflower seeds or pumpkin seeds for a delicious crunch without allergens.
-
Vegan: Swap butter for coconut oil and use dairy-free chocolate chips to create a plant-based delight everyone can enjoy.
-
Spicy Kick: Add a dash of cayenne pepper or chopped jalapeños to the chocolate for an unexpected heat that balances the sweetness.
-
Different Candies: Use crushed Oreos or pretzel pieces instead of Kit Kats for a delightful texture change that everyone will love.
-
Dried Fruits: Mix in dried cranberries or cherries for a chewy contrast that adds a touch of fruity flavor alongside the chocolate.
-
Marshmallow Variations: Switch mini marshmallows for flavored ones, like birthday cake or s'mores, to add a fun twist on flavor!
-
Colorful Themes: Customize with seasonal candy melts or sprinkles to fit more than just Halloween—think Christmas, Easter, or summer!
-
Drizzle Topping: For a gourmet touch, drizzle additional melted chocolate over the cooled slices before cutting to create an elegant finish.
If you're feeling adventurous, why not maintain that festive spirit with more delightful options, like spooky Halloween cupcakes or even a scrumptious homemade chocolate peanut butter bars? Each bite is sure to bring smiles!
What to Serve with Halloween Rocky Road Slices
Indulging in a sweet treat feels even better when paired with the perfect accompaniments to elevate your snack game.
-
Vanilla Ice Cream: The creamy, smooth texture of vanilla ice cream complements the rich chocolatey goodness, creating a delightful contrast.
-
Pumpkin Spice Latte: This seasonal favorite adds warmth and cozy flavors, making it a comforting pairing for your Halloween treats.
-
Caramel Sauce: Drizzling warm caramel over the rocky road slices enhances the sweetness and gives each bite a luscious, gooey touch.
-
Chilled Apple Cider: A refreshing glass of chilled apple cider offers a crisp, fruity counterpoint to the indulgent candy-laden slices.
-
Chocolate Milkshake: Thick and creamy, a chocolate milkshake is the perfect drink to amplify the rich chocolate flavor of your rocky road.
-
Ginger Snap Cookies: The spicy crunch of ginger snaps adds an unexpected zing that complements the sweetness of your Halloween Rocky Road Slices.
-
Marshmallow Fluff Dip: This fluffy dip provides an enticing way to enjoy dippable bites while echoing the soft marshmallows in the dessert.
-
Fruit Platter: Add a selection of fresh fruits like strawberries and apples for a refreshing, juicy contrast to the rich chocolate and candy.
-
Hot Chocolate: For those cozy evenings, a cup of dark hot chocolate topped with whipped cream perfectly matches the theme and flavor of your slices.
Halloween Rocky Road Slices Recipe FAQs
What type of chocolate should I use for the base?
I recommend using semi-sweet chocolate chips for the base of your Halloween Rocky Road Slices. They melt beautifully, providing a rich and creamy texture. For a sweeter option, you can also try milk chocolate chips, but be aware that it may alter the final taste.
How long can I store the Halloween Rocky Road Slices?
Store your Halloween Rocky Road Slices in an airtight container in the refrigerator, and they will stay fresh for up to 2 weeks. If you want to enjoy them later, you can freeze the slices too!
Can I freeze the Halloween Rocky Road Slices?
Absolutely! To freeze, place your slices in a single layer on a baking sheet, separating each piece with parchment paper to prevent sticking. Once frozen, transfer them to an airtight container or freezer bag. They can last for up to 3 months in the freezer.
What should I do if my chocolate seizes while melting?
If your chocolate seizes, it means it has overheated or come into contact with moisture. To fix it, try adding a teaspoon of vegetable oil or shortening to the mixture. Stir thoroughly until smooth again. For best results, melt the chocolate in short intervals and stir in between.
Are these Halloween Rocky Road Slices safe for people with nut allergies?
These slices contain roasted peanuts, so they are not suitable for individuals with nut allergies. However, you can easily substitute the peanuts with a nut-free alternative like sunflower seeds or simply omit them altogether. Just adjust the crunch components to maintain balance in your recipe.

Halloween Rocky Road Slices You'll Love This Spooky Treat
Ingredients
Equipment
Method
- Prepare the Pan: Line an 8-inch or 9-inch square pan with parchment paper.
- Melt the Chocolate Base: Combine butter, semi-sweet chocolate chips, and salt in a bowl. Microwave in intervals until melted.
- Melt the Candy Melts: Prepare candy melts in separate bowls and microwave until smooth.
- Prepare the Kit Kat Bars: Cut mini Kit Kat bars in half.
- Combine the Crunch: Add roasted peanuts and halved Kit Kat to chocolate base.
- Add the Marshmallows: Mix in mini marshmallows carefully.
- Pour into the Pan: Scrape the mixture into the prepared pan and add dollops of melted candy melts.
- Mark for Cutting: Lightly mark where to cut the slices.
- Add Gummy Worms: Position gummy worms on the surface.
- Decorate with M&Ms and Eyes: Sprinkle M&Ms and candy eyes strategically.
- Secure the Decorations: Optional step to use extra chocolate for securing candies.
- Chill to Set: Cover and refrigerate for at least 8 hours, preferably overnight.
- Cut and Serve: Remove from the pan and cut into pieces.
- Store and Enjoy: Store in an airtight container in the fridge.


Leave a Reply