
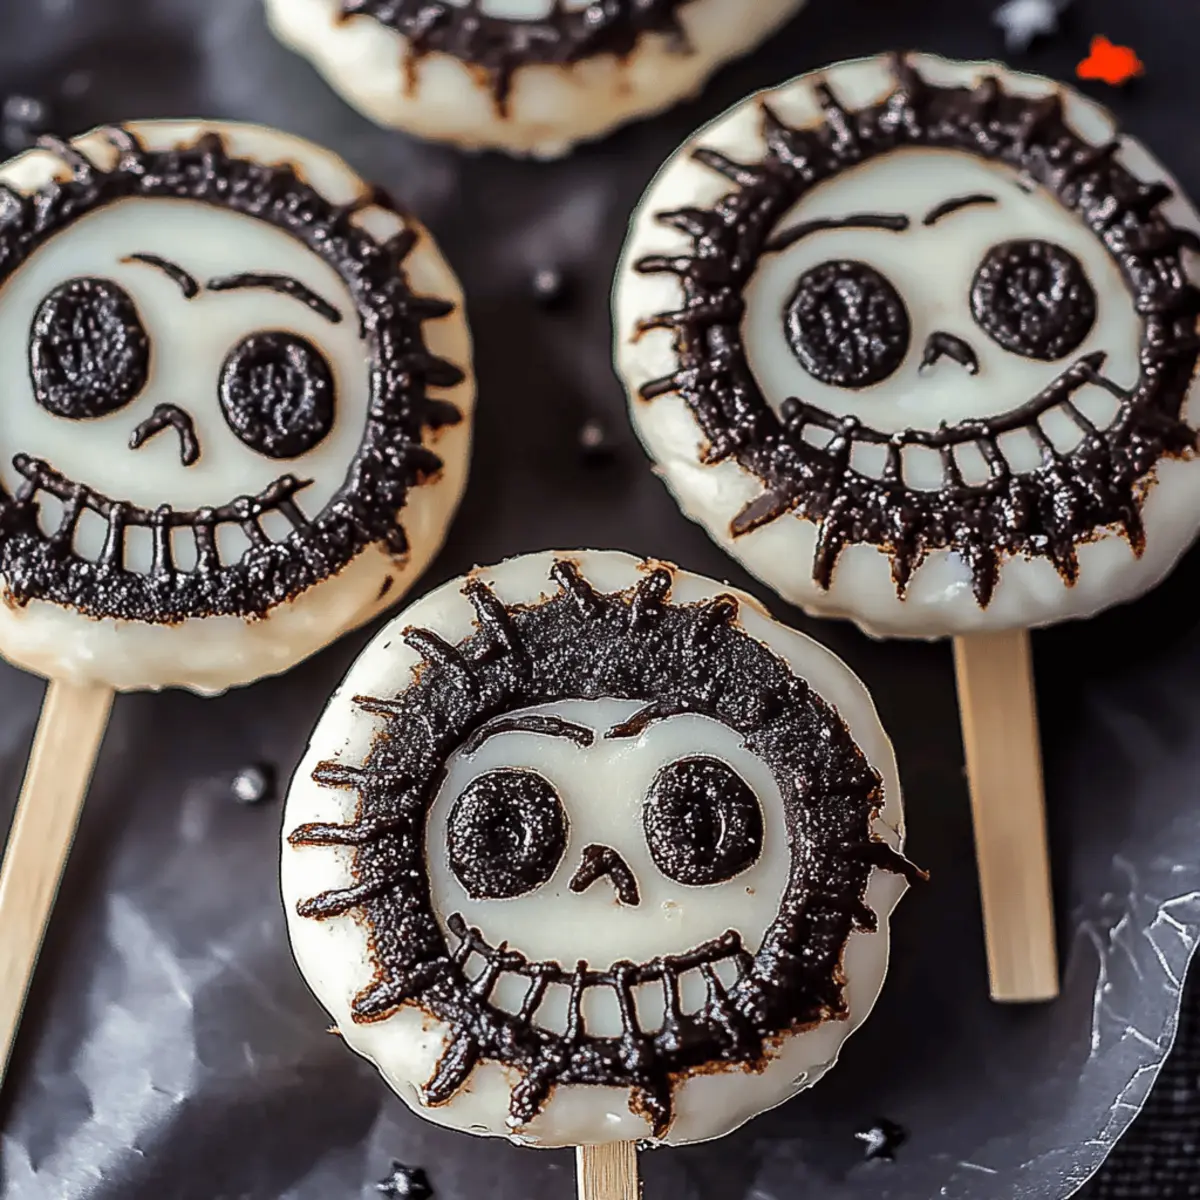
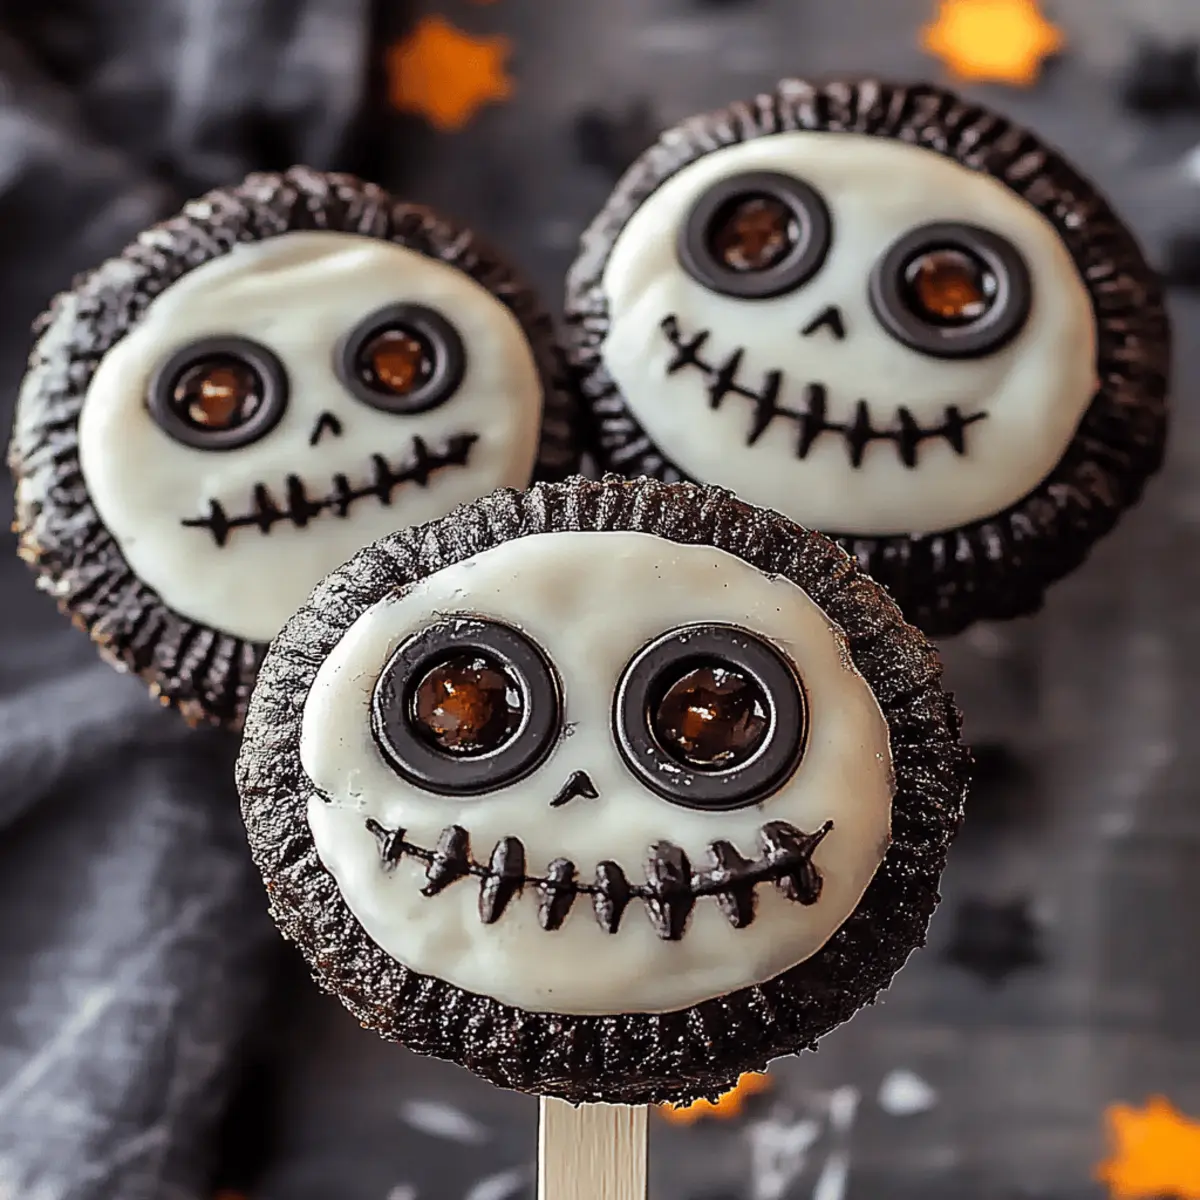
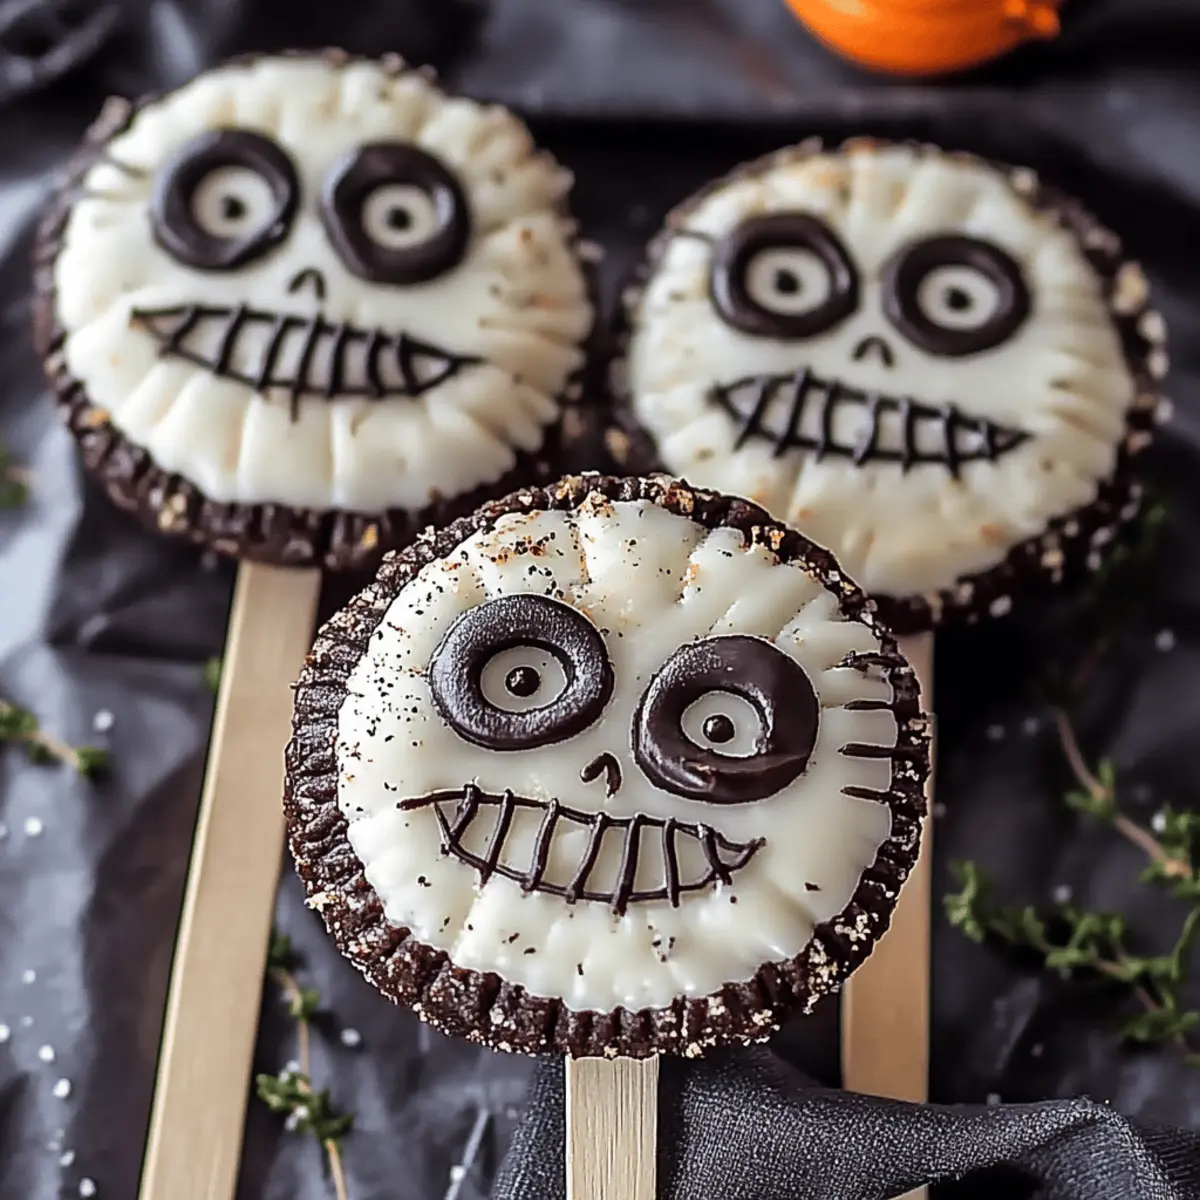
As Halloween approaches, the spirit of festivity fills the air, and what better way to celebrate than with a fun twist on a classic treat? Enter my Jack Skellington Oreo Pops! These delectable bites combine the rich creaminess of Oreo cookies and cream cheese with a playful touch of chocolate, making them a perfect activity to enjoy with family or friends. Not only are they quick to prepare—taking just 30 minutes from start to finish—but these spooky delights also bring a smile to any gathering, charming both kids and adults alike. With a few easy steps, you’ll be creating your own little Halloween masterpieces that are as delightful to make as they are to eat. How will you decorate your Jack Skellington pops?
Why You'll Adore These Oreo Pops
Fun for Halloween: These Jack Skellington Oreo Pops are a delightful treat that transforms classic Oreos into festive delights, perfect for your Halloween parties.
Easy to Make: In just 30 minutes, you can whip up a crowd-pleaser, making them ideal for busy schedules.
Versatile Decoration: Let your creativity shine! Use Halloween-themed sprinkles or charming white chocolate details to customize each pop.
Family Activity: Involve the kids in the decorating fun; it’s a great way to bond while crafting tasty treats.
Irresistible Flavor: The rich combination of Oreo and cream cheese will leave everyone asking for more. Treat your loved ones to something special without elaborate preparation!
Jack Skellington Oreo Pops Ingredients
For the Pops
• Oreo cookies – 1 package (15.35 oz) ensures a luscious chocolate base.
• Cream cheese – 8 oz, softened for a creamy mixture that binds everything beautifully.
For the Coating
• Black chocolate melts – 1 cup, perfect for a spooky finish that captures the Halloween spirit.
• White chocolate melts – 1 cup, to add details making your Jack Skellington pops truly come to life.
Extras
• Popsicle sticks – 10, to give your pops a delightful way to be enjoyed.
• Halloween-themed decorative sprinkles – Use them for creative flair that makes these treats extra festive!
These Jack Skellington Oreo Pops are not only fun to make but also bring a touch of joy to every Halloween gathering!
Step‑by‑Step Instructions for Jack Skellington Oreo Pops
Step 1: Crush the Oreos
Begin by crushing the Oreo cookies into fine crumbs using a food processor or a rolling pin. The goal is to have a consistent crumb texture, which should take about 5 minutes. Once you have your Oreo crumbs ready, transfer them into a mixing bowl to prepare for the next delicious step of crafting your Jack Skellington Oreo Pops.
Step 2: Mix the Ingredients
In the bowl with the crushed Oreo cookies, add the softened cream cheese. Use a spatula or your hands to combine the two ingredients thoroughly until you have a homogeneous mixture, which should take around 3-5 minutes. This rich and creamy blend will be the filling for your pops and will help them hold their shape as you roll them.
Step 3: Shape the Pops
Take about a tablespoon of the Oreo mixture and roll it into a 1-inch ball with your hands. Place each ball on a parchment-lined baking sheet, ensuring they are spaced apart to prevent sticking. Once all the mixture is shaped into balls, pop the baking sheet into the freezer and let them chill for 30 minutes to firm up, making them easier to coat later.
Step 4: Melt the Chocolate
While the Oreo balls are chilling, melt the black chocolate melts according to the package instructions, usually in a microwave or double boiler, until smooth and glossy. Be sure to stir frequently to avoid overheating. Once ready, keep the melted chocolate warm while you prepare to dip your chilled Jack Skellington Oreo Pops.
Step 5: Dip the Pops
After 30 minutes in the freezer, retrieve the Oreo balls and insert a popsicle stick into each one, pushing it about halfway in. Now, dip each pop into the melted black chocolate, ensuring it is evenly coated. Allow any excess chocolate to drip off before placing the pops back onto the parchment-lined sheet, where they will await their playful decorations.
Step 6: Decorate with Sprinkles
Before the chocolate coating sets, get creative by sprinkling your Halloween-themed decorative sprinkles on top of each pop. Alternatively, melt the white chocolate and use it to draw features on your Jack Skellington Oreo Pops’ faces. This adds a festive touch and gives your treats their charming character, making them even more delightful.
Step 7: Set and Serve
Once you've decorated your pops, let them sit on the parchment paper until the chocolate is firm to the touch. This usually takes about 15-20 minutes at room temperature. If you're in a hurry, pop them back into the refrigerator for a quick chill. Once set, your Jack Skellington Oreo Pops are ready to be enjoyed at your Halloween gathering!
Make Ahead Options
Preparing these delightful Jack Skellington Oreo Pops ahead of time is a fantastic way to save valuable moments during the bustling Halloween season! You can roll the Oreo and cream cheese mixture into 1-inch balls and freeze them for up to 3 days. Simply place the prepared balls on a parchment-lined baking sheet and transfer them to an airtight container after freezing, to prevent freezer burn. When you're ready to finish your pops, just dip them into the melted chocolate and add the decorations before serving. This method ensures that the pops remain just as delicious and moist, while giving you time to enjoy the festivities with minimal stress!
What to Serve with Jack Skellington Oreo Pops
Whether you’re hosting a hauntingly fun Halloween gathering or simply satisfying your sweet tooth, these delightful pops call for accompaniments that enhance their playful spirit.
-
Spooky Fruit Platter: A mix of ghostly bananas and pumpkin-shaped oranges offers a fresh balance to the sweet, creamy Oreo pops while keeping the Halloween theme alive.
-
Caramel Apple Slices: The crunchy tartness of fresh apples drizzled with warm caramel pairs beautifully with the sweetness of the pops, adding texture and contrast.
-
Pumpkin Spice Hot Chocolate: Warm up with this cozy drink. The rich, spiced flavors will perfectly complement the chocolatey goodness of your frozen treats.
-
Chocolate-Covered Pretzels: Sweet and salty, these crunchy bites bring another layer of fun and flavor to your dessert table, making every morsel blissfully indulgent.
-
Gather the Kids: Involve little ones in creating a playful Halloween dessert bar. Offer icing, sprinkles, and edible eyes for customization—it’ll be a hit!
-
Halloween-Themed Cupcakes: Pair these pops with vanilla or chocolate cupcakes dressed in spooky decorations. They create an exciting feast that dazzles and delights.
-
Cider or Sparkling Water: A glass of spiced apple cider or fizzy sparkling water provides a refreshing contrast to your dessert, perfect for lighting up the Halloween mood!
Offering these complements not only enhances your spread but also brings a festive touch ideal for any Halloween celebration!
Jack Skellington Oreo Pops Variations
Ready to take your Jack Skellington Oreo Pops to the next level? Let your creativity flow and customize them to suit your tastes!
-
Gluten-Free: Substitute regular Oreo cookies with gluten-free Oreos for a delicious alternative that everyone can enjoy.
-
Nutty Twist: Add a handful of chopped nuts or nut butter to the Oreo and cream cheese mixture for an extra crunch.
-
Dairy-Free: Use vegan cream cheese and dairy-free chocolate melts to make these treats a delightful option for dairy-sensitive friends or family.
-
Spicy Kick: Mix in a pinch of cayenne pepper or chili powder into the Oreo filling for those who love a hint of heat with their sweets!
-
Fruit Infusion: Fold in some dried fruits like cranberries or chopped cherries into the mixture for delightful bursts of flavor.
-
Mini Pops: Roll smaller balls for mini pops that are perfect for parties, making them bite-sized treats that everyone can enjoy in one or two bites.
-
Chocolate Drizzle: Instead of dipping the pops entirely in chocolate, drizzle melted chocolate over the tops for a fun, artistic touch while showing off some of that Oreo mixture.
-
Theme Variations: Try using different colored melts for various themes like Christmas or birthdays—just switch out the decorations to match!
Make these variations your own and watch your treats become the highlight of any celebration! Also, if you’re looking for other easy treats, consider checking out my delightful Halloween Ghost Cupcakes or the ever-popular Cookies and Cream Brownies. These delectable options will ensure your dessert table is filled with joy and creativity.
How to Store and Freeze Jack Skellington Oreo Pops
Fridge: Keep your Jack Skellington Oreo Pops in an airtight container in the fridge for up to 1 week. This will maintain their freshness and creamy texture.
Freezer: For longer storage, freeze the pops in a single layer on a baking sheet, then transfer them to a freezer-safe container. They can last up to 2 months.
Reheating: When you’re ready to enjoy frozen pops, let them thaw in the fridge for a few hours before serving. Avoid refreezing after thawing to preserve their quality.
Decorations: If decorated with sprinkles, store them properly to prevent moisture from ruining the festive touches.
Expert Tips for Jack Skellington Oreo Pops
Right Consistency: Make sure to mix the Oreo crumbs and cream cheese until fully blended. A good mix ensures that the pops hold their shape beautifully without crumbling.
Chill Thoroughly: Don’t skip the initial freezing step! Chilling for 30 minutes makes it much easier to dip in melted chocolate without losing their shape.
Melt Gradually: When melting chocolate, do so gradually to prevent overheating. Frequent stirring helps achieve a smooth, glossy finish that coats evenly.
Decorate Creatively: Use Halloween-themed sprinkles or melt white chocolate for detailing. Remember to sprinkle right after dipping to ensure they stick!
Storage Tips: Store leftover Jack Skellington Oreo Pops in an airtight container in the fridge for up to a week—if they last that long!
Jack Skellington Oreo Pops Recipe FAQs
How do I select the best Oreos for this recipe?
Absolutely! When choosing Oreos, look for packages with the least amount of dust or broken cookies. This ensures a higher quality of crumb and a delightful consistency in your pops.
How should I store Jack Skellington Oreo Pops?
Store your Jack Skellington Oreo Pops in an airtight container in the fridge for up to 1 week. This way, they stay fresh and maintain their soft, creamy texture. If ever you find they last that long!
Can I freeze Jack Skellington Oreo Pops?
Yes, you can! To freeze them, arrange your pops in a single layer on a baking sheet. Place them in the freezer for about 1 hour until firm, then transfer them into a freezer-safe container. They can last in the freezer for up to 3 months! When ready to enjoy, simply let them thaw in the fridge for a few hours.
What should I do if my chocolate coating isn’t smooth?
If your melted chocolate isn't smooth, don’t worry—this is a common issue! Ensure you melt the chocolate slowly and stir frequently to avoid burning. If it has thickened, add a small teaspoon of vegetable oil or shortening to thin it out and regain that lovely glossy finish.
Are these pops safe for kids with allergies?
Always check your ingredient labels! The Jack Skellington Oreo Pops contain dairy from the cream cheese and chocolate melts. For a dairy-free version, you could substitute with a non-dairy cream cheese and chocolate melts made from cocoa butter. Always ensure your ingredients comply with dietary needs and check for any cross-contamination warnings if allergies are a concern.
How do I make sure my pops hold their shape?
To ensure your pops maintain their shape, mix the Oreo crumbs and cream cheese thoroughly until well combined. After shaping them into balls, freezing them for 30 minutes is crucial before dipping them in chocolate. This chilling step helps them firm up, making the coating process much easier and successful!

Delicious Jack Skellington Oreo Pops for Halloween Fun
Ingredients
Equipment
Method
- Crush the Oreo cookies into fine crumbs using a food processor or a rolling pin.
- In a mixing bowl, combine the crushed Oreos with softened cream cheese until well blended.
- Roll the Oreo mixture into 1-inch balls and place on a parchment-lined baking sheet.
- Melt the black chocolate melts according to package instructions until smooth.
- Insert a popsicle stick into each Oreo ball and dip into the melted black chocolate.
- Sprinkle Halloween-themed decorations on top before the chocolate sets.
- Let the pops sit until the chocolate is firm, about 15-20 minutes.


Leave a Reply