
As I was savoring one of those iconic black-and-white cookies, inspiration struck! Why not transform those beloved treats into something even more irresistible? Enter my Oreo Balls, a delightful twist that combines the nostalgic crunch of Oreo cookies with the sweetness of chocolate. These little bites of heaven come together in just 30 minutes, making them perfect for a quick indulgence or a crowd-pleasing dessert at your next gathering. Plus, they’re incredibly versatile; feel free to sprinkle on your favorite toppings for a personal flair! Ready to dive into the easiest and most mouthwatering treat? Let’s roll!

Why Aren't You Making Oreo Balls?
Easy Preparation: You’ll love how simple it is to whip up these Oreo Balls! With just a few ingredients and minimal effort, you’ll have a delicious treat ready in no time.
Decadent Chocolate Coating: The smooth, chocolate coating brings a rich indulgence that perfectly complements the crunchy Oreo filling—what's not to adore?
Versatile Toppings: Feel free to personalize your creations with your favorite toppings! Whether it’s a drizzle of white chocolate or a sprinkle of sea salt, the options are endless.
Crowd-Pleasing Delight: These Oreo Balls are sure to impress guests at any gathering, making them an irresistible addition to parties or casual get-togethers.
Make sure to check out my tips for tasty variations so you can create a flavor explosion with every bite!
Oreo Balls Ingredients
• Ready to create your own sweet treats?
For the Oreo Mixture
- Oreo cookies – 8 ounces; the star of the show, providing that iconic flavor and crunch.
- Melted butter – 3 tablespoons; binds the cookie crumbs together for a luscious texture.
- Milk – 1 teaspoon; adds moisture to achieve the perfect consistency for rolling.
For the Chocolate Coating
- Chocolate – 8 ounces; this delightful coating envelops the Oreo Balls in a rich, decadent layer.
With these simple ingredients, you're just moments away from enjoying homemade Oreo Balls!
Step‑by‑Step Instructions for Oreo Balls
Step 1: Crush the Oreos
Begin by crushing 8 ounces of Oreo cookies into fine crumbs. You can do this using a food processor for a quick blend or by placing the cookies in a sturdy plastic bag and using a rolling pin to crush them evenly. Aim for a sandy texture with no large chunks to ensure a smooth filling for your Oreo Balls.
Step 2: Mix the Ingredients
In a medium bowl, combine the crushed Oreos with 3 tablespoons of melted butter and 1 teaspoon of milk. Stir thoroughly until the mixture holds together nicely and has a cohesive, slightly moist texture, resembling damp sand. This will be the delicious filling for your Oreo Balls, bringing together that irresistible cookie flavor.
Step 3: Form the Balls
Using your hands, take portions of the Oreo mixture and roll them into small balls, about 1 inch in diameter. Place each ball on a baking sheet lined with parchment paper, ensuring they are spaced apart. This allows the balls to maintain their shape and makes dipping easier later on. Once done, you’ll have a dozen or so delightful treats ready for the next step.
Step 4: Freeze for Firmness
Transfer the baking sheet with the formed balls to the freezer and let them chill for approximately 10 minutes. This step is crucial, as it firms up the Oreo mixture, making it easier to coat each ball in luscious chocolate later. Keep an eye on them; they should be firm but not completely frozen, ensuring a smooth chocolate dip.
Step 5: Melt the Chocolate
While the Oreo Balls chill, melt 8 ounces of chocolate using a microwave or a double boiler. If using a microwave, heat the chocolate in 30-second intervals, stirring in between until smooth and fully melted. A good visual cue here is a glossy, fluid texture that ensures a perfect coating for your Oreo Balls.
Step 6: Coat the Balls
Once the chocolate is melted, dip each Oreo ball into the chocolate, using a fork to fully coat them. Allow any excess chocolate to drip off before placing the balls back on the parchment-lined baking sheet. The chocolate should create a beautiful, glistening layer around each Oreo Ball, making them extra tempting.
Step 7: Add Final Touches
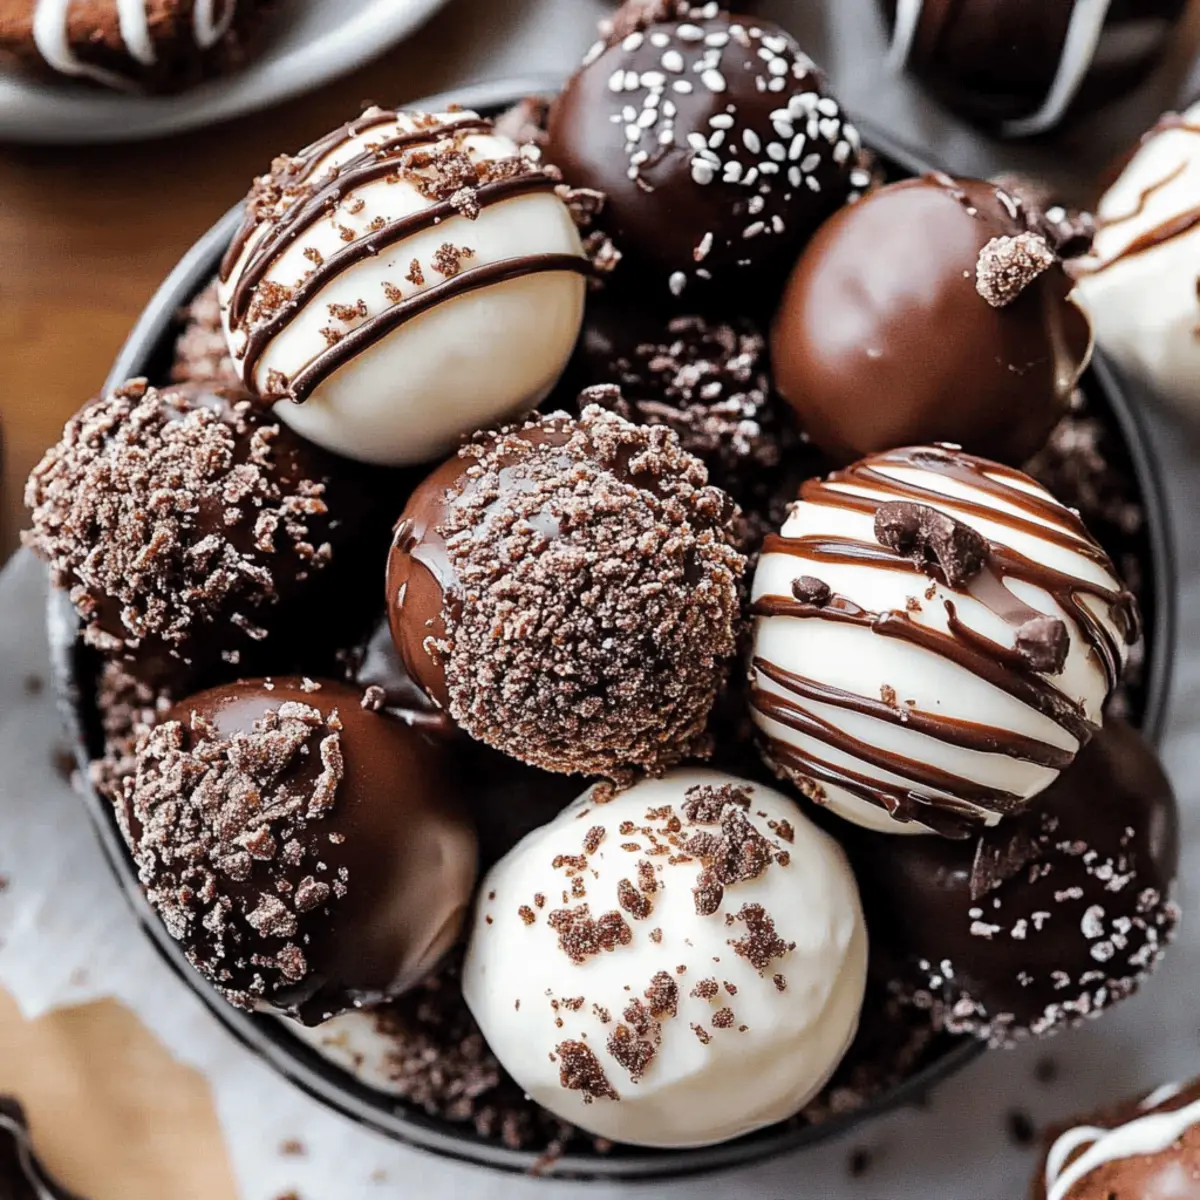
For an optional flair, you can sprinkle toppings on the chocolate-coated Oreo Balls while the chocolate is still wet. Consider using sea salt flakes for some savory contrast, crushed Oreos for a double treat, or a drizzle of white chocolate for a decorative touch. Let your creativity shine in this step!
Step 8: Refrigerate to Set
Finally, place the baking sheet with the coated Oreo Balls in the refrigerator for about 15 minutes or until the chocolate has fully set. Ensure the chocolate is firm to the touch before enjoying your homemade Oreo Balls. Once set, these sweet bites are ready to delight your taste buds!

Make Ahead Options
These Oreo Balls are an absolute lifesaver for busy home cooks looking to simplify meal prep! You can easily prepare the Oreo mixture and form the balls up to 24 hours in advance. Simply crush the Oreo cookies, mix them with melted butter and milk, roll them into balls, and store them in an airtight container in the refrigerator. To maintain their quality, ensure they are well covered to prevent drying out. When it's time to indulge, just pull them out, freeze for 10 minutes, dip in melted chocolate, and refrigerate until set. This way, you’ll have a delightful treat ready to go whenever the craving strikes!
How to Store and Freeze Oreo Balls
Fridge: Keep your Oreo Balls in an airtight container in the fridge for up to 1 week. This helps maintain their freshness and prevents them from absorbing odors.
Freezer: For longer storage, place the Oreo Balls in a single layer on a baking sheet to freeze. Once firm, transfer them to a freezer-safe bag or container for up to 3 months.
Thawing: To enjoy, simply thaw the Oreo Balls in the fridge for several hours or overnight before serving. Avoid thawing at room temperature to maintain their texture.
Reheating: There's no need to reheat these delicious treats, as they're best enjoyed chilled! Just pop them out of the fridge and savor the chocolatey goodness.
What to Serve with Oreo Balls
Indulging in these creamy, chocolatey bites opens a world of delightful pairings that will elevate any gathering.
-
Fresh Berries: The tartness of strawberries or raspberries contrasts beautifully with the sweet Oreo Balls, creating a vibrant color contrast and fresh flavor.
-
Coffee or Espresso: A rich cup of coffee or a shot of espresso enhances the chocolate flavor, making for a luxurious after-dinner treat.
-
Vanilla Ice Cream: Creamy vanilla ice cream complements the cookie crunch, adding a refreshing touch that balances the richness of the Oreo Balls.
-
Nutty Drizzle: A light drizzle of hazelnut or almond syrup adds a nutty flavor and an extra layer of indulgence, making each bite a bit more luxurious.
-
Milkshake: Blend vanilla or chocolate ice cream with milk for a thick, luscious shake that pairs perfectly with these decadent treats, enhancing the sweet experience.
-
Chocolate Sauce: Serve a bowl of warm chocolate sauce for dipping. It reinforces their chocolatey goodness while providing a delightful texture contrast with a warm touch.
Each of these pairings offers a unique taste sensation, turning your Oreo Balls into a memorable dessert experience. Enjoy!
Expert Tips for Oreo Balls
• Use Fresh Oreos: Ensure your Oreo cookies are fresh for the best flavor and texture in your Oreo Balls. Stale cookies can lead to a soggy filling.
• Chill Before Coating: Freezing the formed balls for 10 minutes helps them maintain their shape during dipping. Don’t skip this step!
• Smooth Chocolate Coating: Stir the chocolate frequently while melting to prevent burning. Achieve a glossy finish that perfectly coats your Oreo Balls.
• Experiment with Toppings: Don’t hesitate to personalize your Oreo Balls! Try crushed nuts, candy sprinkles, or even a sprinkle of sea salt for a delicious twist.
• Perfect Portioning: Roll your balls to approximately 1 inch in diameter for a consistent size, ensuring they are easy to eat and share.
Oreo Balls Variations & Substitutions
Let your creativity shine by customizing your Oreo Balls to suit your taste buds or dietary needs!
- Nut-Free: Substitute crushed graham crackers for Oreos to create a delicious yet nut-allergy-friendly base. They’ll offer a similar crunch!
- Dairy-Free: Use dairy-free chocolate and vegan butter for an entirely plant-based edition. Enjoy all the flavor without the dairy!
- Extra Crunch: Mix in chopped nuts or toasted coconut flakes to give your Oreo Balls a delightful texture contrast that elevates each bite.
- Spicy Kick: Add a pinch of cayenne pepper or chili powder to the melted chocolate for a surprising heat that contrasts beautifully with the sweet fillings.
- Flavored Chocolates: Experiment with melting white chocolate, dark chocolate, or even flavored chocolates like mint or orange to elevate your Oreo Balls.
- Chocolate Drizzle: After coating your balls, drizzle with contrasting chocolate for an artistic touch that makes these treats as beautiful as they are delicious.
- Seasonal Spices: Consider adding a sprinkle of cinnamon or nutmeg to the mixture for a seasonal flair during the holidays, creating a warm, inviting taste.
- Coating Alternatives: Instead of chocolate, roll your Oreo Balls in powdered sugar, desiccated coconut, or crushed cookies for a fun and unique twist on presentation.
These variations are sure to make your Oreo Balls even more irresistible! And while you're at it, don’t forget to check out my tips for higher-quality chocolate or how to add a flavor explosion to your other favorite recipes!
Oreo Balls Recipe FAQs
How do I choose the right Oreo cookies for this recipe?
Absolutely! For the best results, I recommend using the classic Oreo cookies as they provide the iconic flavor and texture that make these Oreo Balls irresistible. If you want to experiment, feel free to use other flavors, such as golden Oreos or mint Oreos, for a unique twist!
How should I store my Oreo Balls after making them?
After enjoying some tasty Oreo Balls, keep the remaining treats in an airtight container in the fridge. They'll stay fresh for up to 1 week, ensuring you can snack on them slowly. If you have any leftovers, this method helps preserve their delightful flavor and texture.
Can I freeze Oreo Balls, and how?
Very! To freeze your Oreo Balls, place them in a single layer on a baking sheet and freeze until firm, about 1 hour. Once they’re hard, transfer them to a freezer-safe bag or container and store them for up to 3 months. To enjoy later, simply thaw them in the fridge overnight. Avoid thawing at room temperature as it can affect their texture.
What if my chocolate doesn’t coat properly?
No worries! If you find that your chocolate isn’t coating properly, it could be too thick or cooled too much. Ensure that your chocolate is fully melted and glossy. If it starts to thicken, you can reheat it gently in the microwave with intervals of 10 seconds, stirring in between until it returns to a smooth consistency. This will help achieve that perfect glaze on your Oreo Balls!
Are Oreo Balls suitable for people with certain allergies?
Be mindful! They contain Oreos, which have wheat and dairy. If you have gluten intolerance or a dairy allergy, consider using gluten-free cookies and dairy-free chocolate as substitutes. This way, everyone can enjoy these sweet treats. Always check ingredient labels for any hidden allergens, particularly if you're accommodating guests or family members with sensitivities.
What’s the best way to serve Oreo Balls at a party?
I often make these for gatherings! Place your Oreo Balls on a decorative platter and drizzle them with melted chocolate or caramel for a stunning presentation. For added flair, sprinkle toppings like crushed nuts, or colored sprinkles, or even arrange them in cute cupcake liners for an appealing dessert table display.

Deliciously Easy Oreo Balls You Can’t Resist
Ingredients
Equipment
Method
- Crush the Oreos into fine crumbs using a food processor or a rolling pin.
- In a medium bowl, combine the crushed Oreos with melted butter and milk. Stir until the mixture holds together.
- Roll portions of the Oreo mixture into small balls, about 1 inch in diameter.
- Freeze the balls for approximately 10 minutes to firm them up.
- Melt the chocolate in the microwave or double boiler until smooth.
- Dip each Oreo ball into the melted chocolate and allow excess chocolate to drip off.
- Sprinkle toppings on the chocolate-coated Oreo Balls while the chocolate is still wet.
- Refrigerate the coated Oreo Balls for about 15 minutes or until the chocolate has fully set.


Leave a Reply