
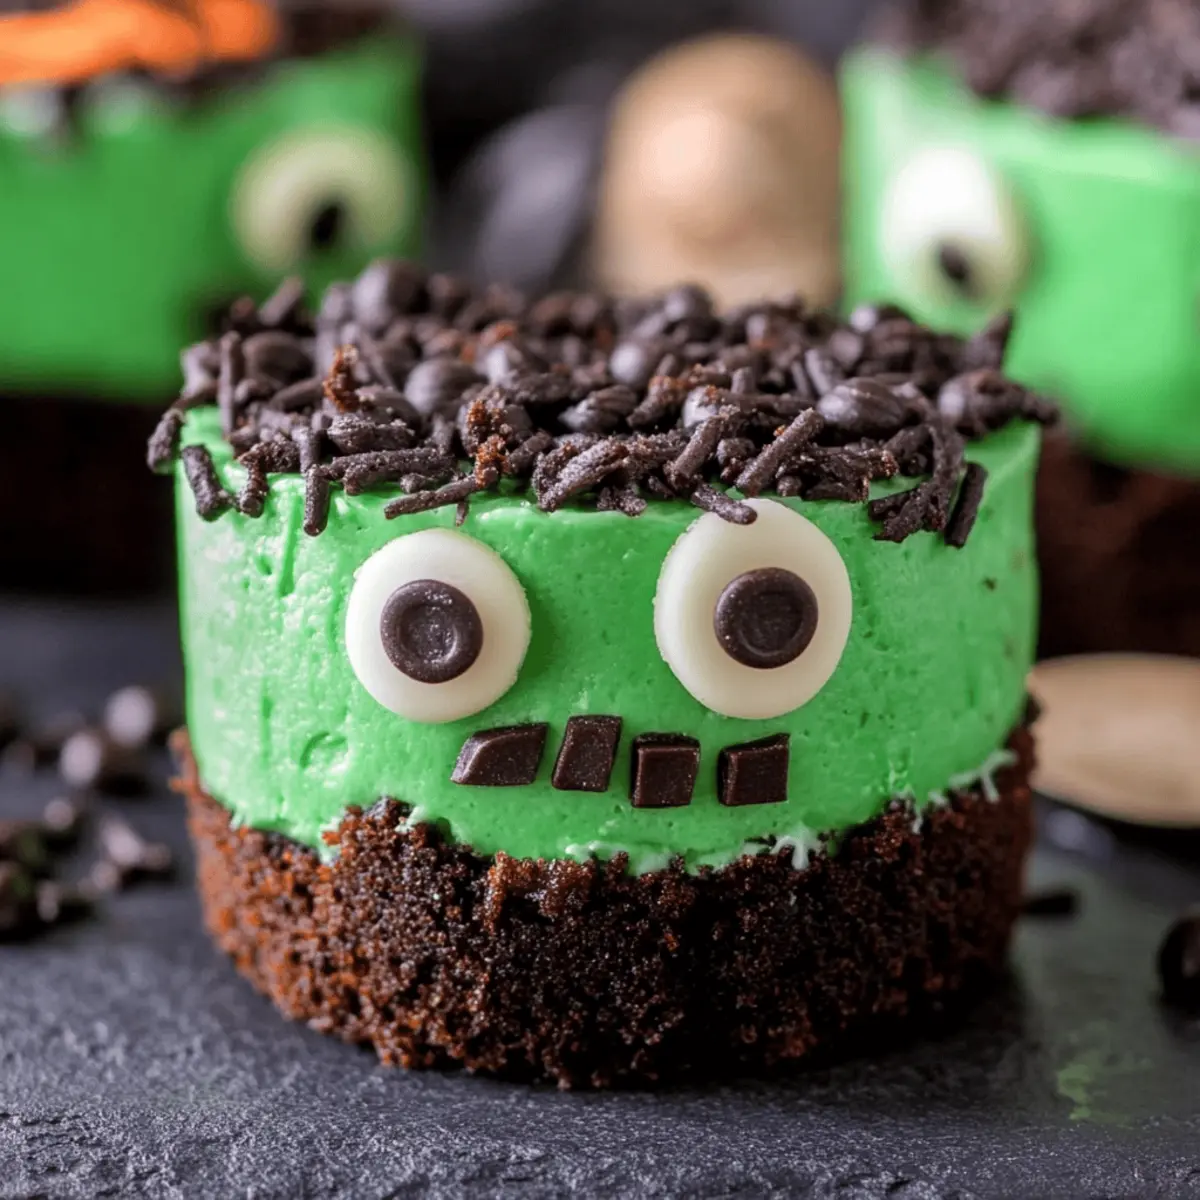
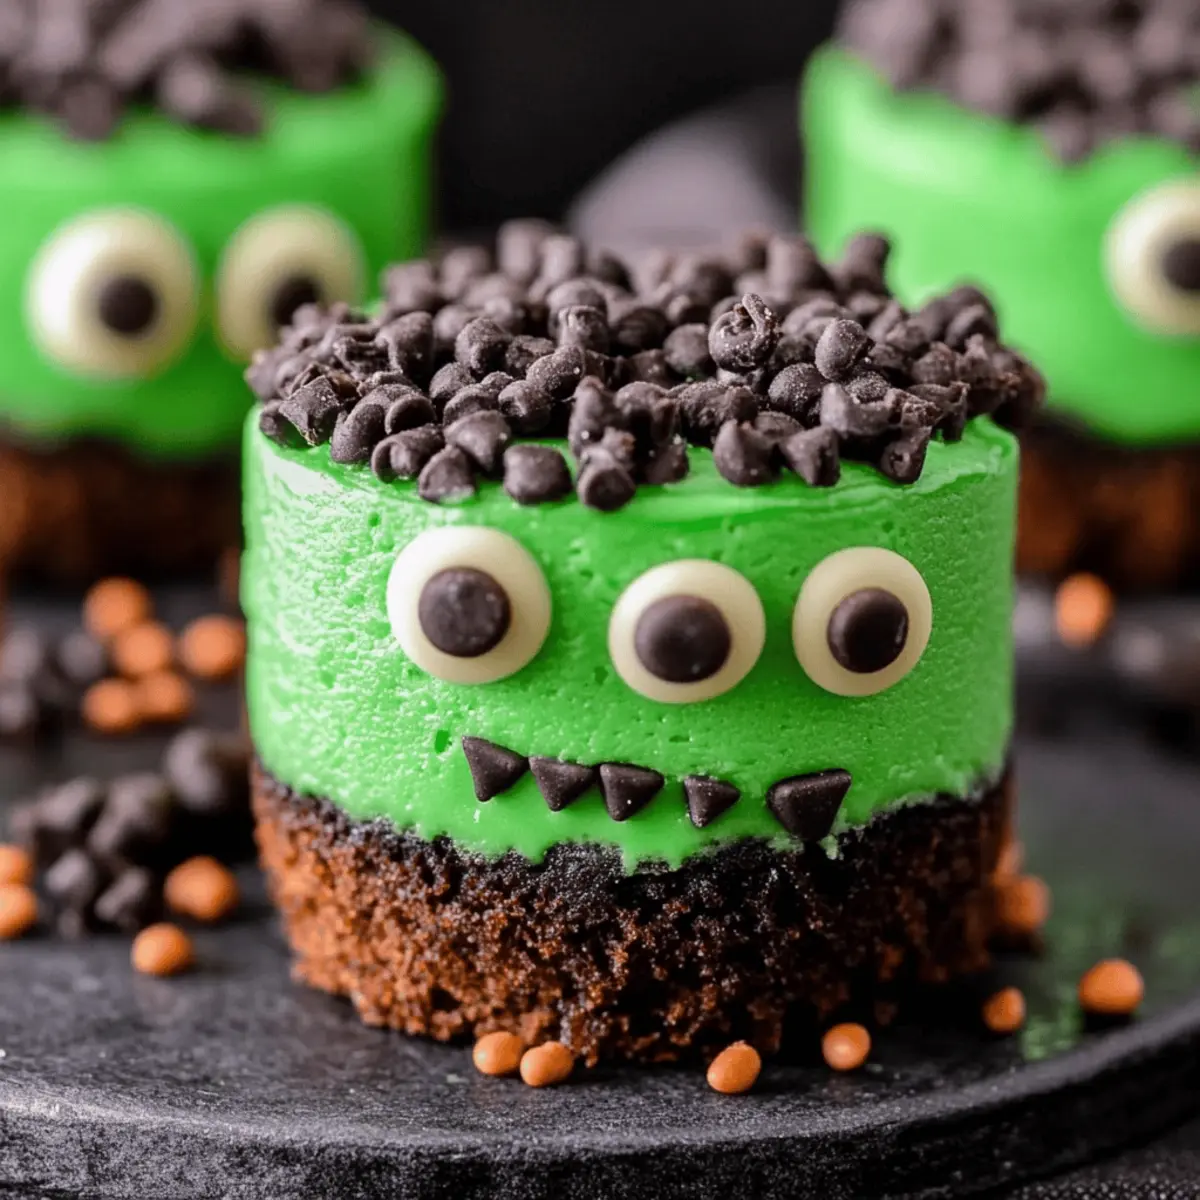
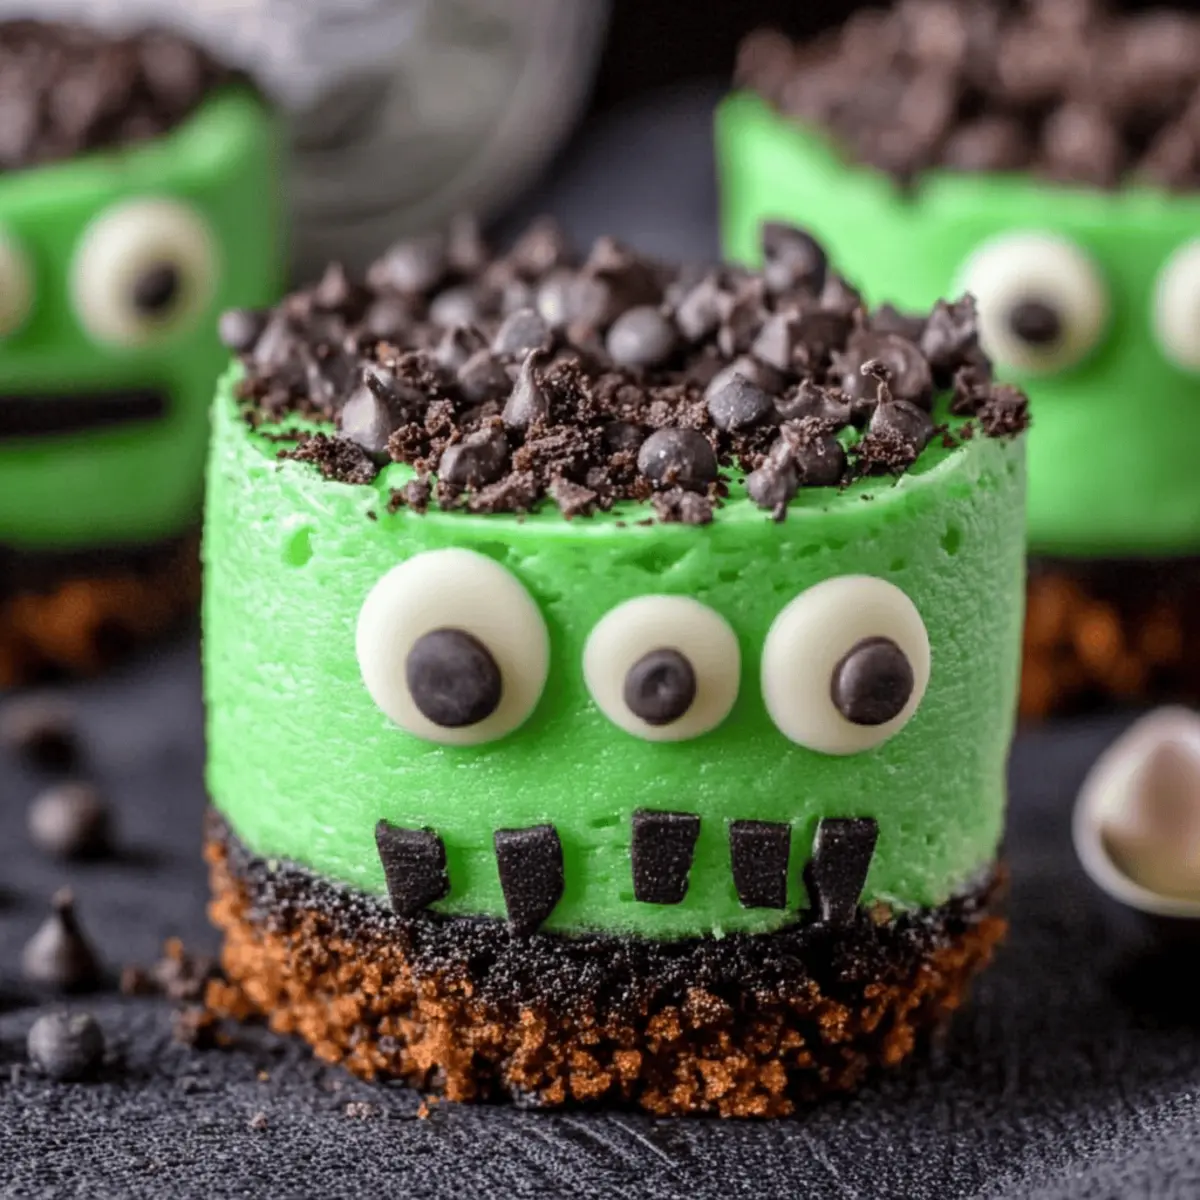
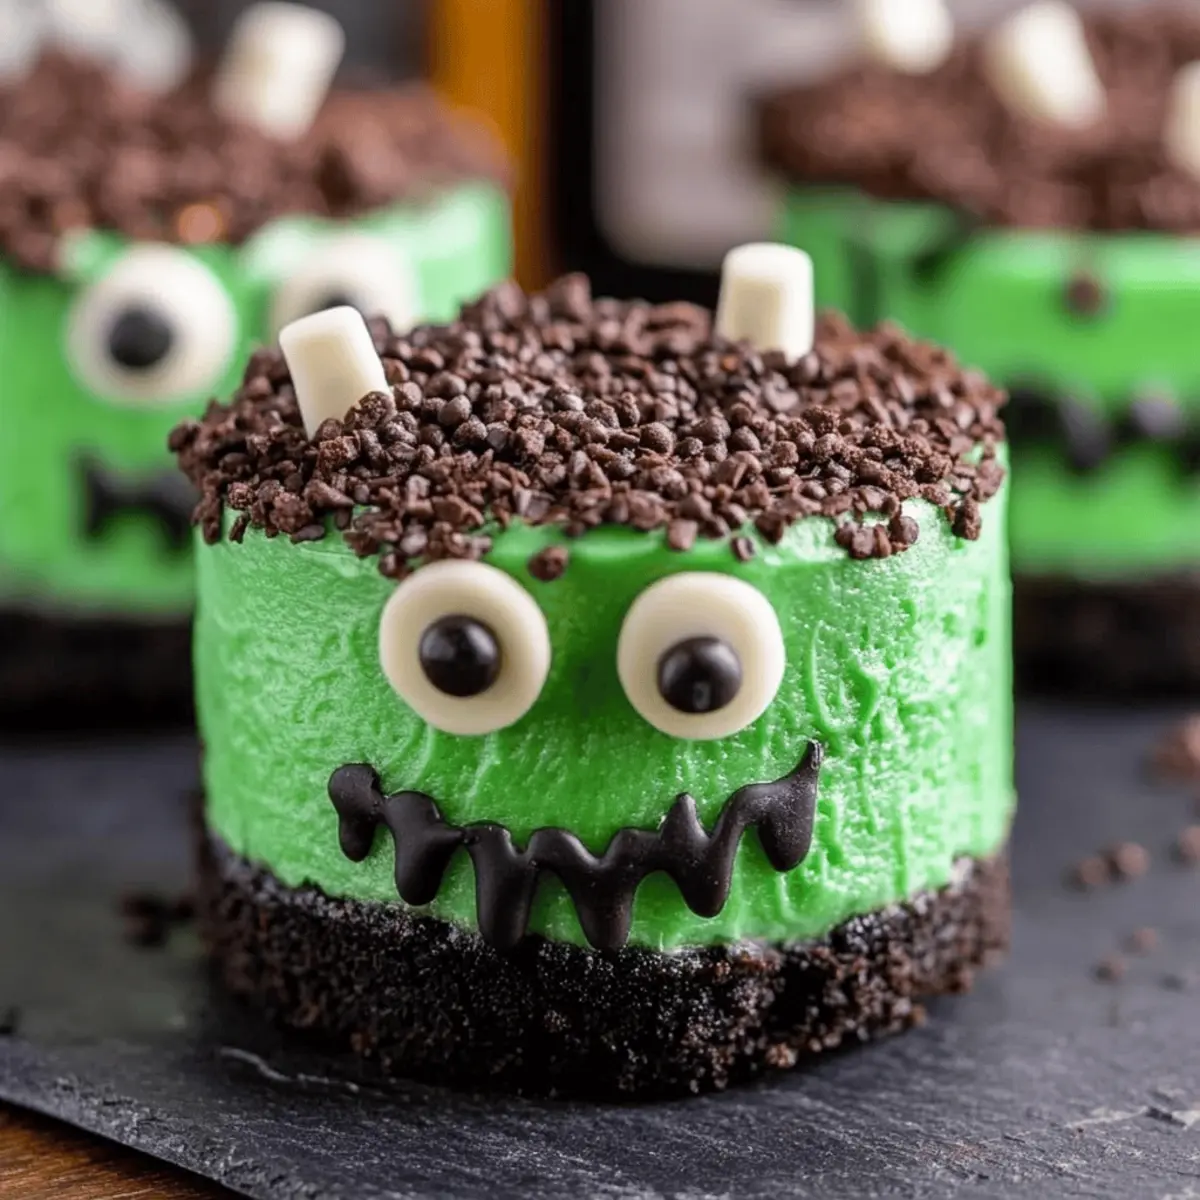
The moment you open the oven door, a delightful wave of sweetness fills the air, making it impossible to resist the charm of these Frankenstein Mini Cheesecakes. These whimsical treats are not just adorable; they are a hit at any gathering. With a quick prep time of just 15 minutes and a simple baking process, they allow you to whip up a special dessert even on your busiest days. And who wouldn’t want to see the smiles on friends' and family members’ faces when they spot these fun, green bites adorned with chocolate eyes? They’re not only easy to make but also offer a delightful twist to classic cheesecake that will leave everyone wanting more. Are you ready to dive into creating this spook-tacular delight?
Why Are These Cheesecakes So Fun?
Delightful Creativity: These Frankenstein Mini Cheesecakes are perfect for unleashing your inner artist, making them an ideal project for family gatherings or Halloween parties.
Quick and Easy: With only 15 minutes of prep time, you can bake a batch of these treats without disrupting your busy schedule.
Ghoulish Presentation: The vibrant green color and adorable decorations with edible eyes make these desserts a show-stopper that everyone will love!
Versatile Treats: They pair wonderfully with other festive desserts, like Crisp Mini Cheesecakes or Apple Mini Cheesecakes, ensuring your dessert table looks spooktacular!
Crowd-Pleasing Flavor: The combination of creamy cheesecake and crunchy Oreo crust makes each bite irresistibly delicious, delighting both kids and adults alike!
Fun Activity: Get the kids involved in the decorating process — they’ll love helping to “bring these monsters to life”!
Frankenstein Mini Cheesecakes Ingredients
For the Cheesecake Filling
- Cream cheese – 16 ounces, softened for a smooth and creamy texture.
- Sugar – 1 cup, to add that sweet touch we all love in desserts.
- Eggs – 3 large, essential for binding and achieving that fluffy consistency.
- Flour – 2 tablespoons, which helps stabilize the cheesecake for a perfect set.
- Vanilla – 1 ½ teaspoons, providing a delightful aromatic flavor that complements the cheesecake.
- Green food coloring – 20 drops (this may vary), to create a fun, spooky green hue that brings these Frankenstein Mini Cheesecakes to life.
For the Crust
- OREO cookies – 24, crushed (approximately 2 cups), forming a deliciously crunchy base.
- Butter – 2 tablespoons, melted to help bind the cookie crumbs together.
For the Decorations
- Edible eyes – 32 pieces, to give each mini cheesecake a playful and spooky expression.
- Chocolate chips – 1 cup, melted for a decadent drizzle and added flair.
- Chocolate sprinkles – 1 cup, to cover the top for a festive touch.
- Chocolate chips – 32 pieces, to act as bolts for our friendly monster.
Get ready to engage with your creations, bringing your kitchen to life with these whimsical Frankenstein Mini Cheesecakes!
Step‑by‑Step Instructions for Frankenstein Mini Cheesecakes
Step 1: Preheat the Oven
Begin your adventure by preheating your oven to 350°F (175°C). This ensures that when your Frankensteins are ready to bake, the heat is just right for that perfect cheesecake consistency. A well-preheated oven is key to achieving that smooth finish, so don’t skip this step!
Step 2: Prepare the Crust
In a mixing bowl, combine the crushed OREO cookies with the melted butter until well-coated. This should create a damp mixture that holds together when pressed. Using your fingers or a tamper, form 1-inch balls of this crumbly delight and firmly press them into the bottom of a mini cheesecake pan. Aim for an even layer, ensuring a solid foundation for your Frankenstein Mini Cheesecakes.
Step 3: Make the Cheesecake Filling
In a large mixing bowl, beat together the softened cream cheese, sugar, eggs, and vanilla until you achieve a smooth and creamy mixture. This will take about 2–3 minutes of blending, so be patient! Look for a texture that’s evenly mixed and free from lumps; this will make your cheesecake filling irresistibly delightful.
Step 4: Incorporate the Flour
Gradually add the flour to your creamy mixture while continuing to mix until fully combined. This step is crucial as flour helps to stabilize your cheesecakes, giving them the perfect structure. Take a moment to ensure there are no visible streaks of flour remaining, allowing each bite to be as creamy and delightful as possible.
Step 5: Mix in the Color
Now, it’s time to add the fun! Gradually mix in the green food coloring, 2–3 drops at a time, until you reach your desired spooky shade. Look for a vibrant green that mirrors the essence of Frankenstein himself. Stir until the color is evenly distributed throughout the batter, which will give your cheesecakes a whimsical appearance.
Step 6: Pour the Filling
Carefully pour the cheesecake mixture over the prepared cookie crusts in each mini cheesecake tin, filling them almost to the top. This should produce a lovely blend of green over the black cookie base. Take care to smooth the tops with a spatula, ensuring a neat and tidy presentation before moving on to the next step.
Step 7: Bake the Mini Cheesecakes
Place the pan in the preheated oven and bake for 15 minutes. As they bake, you'll know they’re done when the edges look set and the centers have a slight jiggle. This gentle movement is key for achieving that perfect cheesecake texture. Once baked, carefully remove them from the oven and allow them to cool completely in the pan.
Step 8: Prepare for Decorating
While the cheesecakes cool, melt the chocolate chips in the microwave in 30-second intervals, stirring until smooth. This melted chocolate will serve as both a delicious topping and an adhesive for your decorations. Make sure it’s not too hot when you’re ready to dip; it should be warm and pourable, making your decorating process easy and fun.
Step 9: Decorate the Cheesecakes
Gently remove the cooled cheesecakes from their mini pan. Dip the top of each cheesecake into the melted chocolate, allowing any excess to drip off. Immediately dip them into a bowl of chocolate sprinkles to create a festive coating. Each cheesecake should now resemble a playful monster, ready for the finishing touches!
Step 10: Add the Finishing Touches
Using a piping bag or a simple plastic bag with a corner snipped off, pipe melted chocolate onto the tops of the cheesecakes to form a mouth and any additional designs you desire. Let your creativity shine as you bring out their personalities, ensuring that each Frankenstein Mini Cheesecake is unique.
Step 11: Attach the Edible Eyes
For the final spooky step, place a small dot of melted chocolate on the back of each edible eye and the tip of each chocolate chip, acting as neck bolts. Gently press them into the cheesecake tops for an instantly adorable and whimsical look. Don’t rush this part—each smiley face you create adds to the charm of your mini cheesecakes!
Expert Tips for Frankenstein Mini Cheesecakes
Watch the Temperature: Make sure your cream cheese is truly softened to room temperature. This helps achieve that smooth, creamy filling without lumps.
Color Gradually: When adding green food coloring, start with a few drops and mix thoroughly before adding more. You can always darken; it's harder to lighten!
Don't Overbake: Keep an eye on your cheesecakes while they bake—15 minutes is usually perfect, but check for that slight jiggle in the center!
Mix Well: After adding flour, mix thoroughly but gently to incorporate air without over-mixing, which can lead to a dense texture.
Chill Before Decorating: Ensure your cheesecakes are completely cool before removing them from the pan and decorating; this helps keep their shape intact!
Get Creative: Feel free to customize the decorations—add candy or other festive touches to make your Frankenstein Mini Cheesecakes uniquely yours!
Frankenstein Mini Cheesecakes Variations
Feel free to get creative with these fun twists and substitutions to make your Frankenstein Mini Cheesecakes uniquely yours!
- Dairy-Free: Substitute cream cheese with a dairy-free alternative, ensuring a rich and creamy texture without the dairy! Coconut or almond cream cheese works beautifully.
- Gluten-Free: Use gluten-free cookies for the crust. Crushed gluten-free chocolate cookies will give you the same delightful crunch without the gluten.
- Flavorful Additions: Add a teaspoon of mint or almond extract to the cheesecake filling for a delightful flavor surprise that complements the sweet chocolate!
- Nutty Crust: Swap OREO cookies for finely chopped nuts mixed with date paste for a wholesome, crunchy base. The natural sweetness from the dates adds an interesting twist!
- Spicy Kick: Get adventurous by adding a pinch of cayenne or cinnamon to the cheesecake mix for a surprising warm note that will tantalize the taste buds!
- Fruit Topping: Top the cheesecakes with your favorite fruit preserves before adding the chocolate drizzle. A layer of raspberry or strawberry preserves adds a lovely fruity contrast!
- Mini Monster Pies: Use a mini pie crust instead of crumbling OREO for a more traditional pie experience with a whimsical Frankenstein twist, adding that extra crunch!
- Gourmet Drizzle: Swap plain chocolate for flavored chocolate melts, like orange or caramel, to enhance your cheesecake’s look and flavor. This becomes a festive treat that will amaze your guests!
The possibilities are endless, so let your imagination guide you and transform these cheesecakes into a memorable treat! For more delicious inspirations, check out the amazing Mini Oreo Cheesecakes or whip up some charming Mini Ghost Pizzas for a killer dessert spread!
Storage Tips for Frankenstein Mini Cheesecakes
Room Temperature: Keep mini cheesecakes at room temperature for up to 2 hours to prevent them from becoming too soft. After that, store them in the fridge.
Fridge: Store leftovers in an airtight container in the fridge for up to 3 days. This will help maintain their creamy texture while keeping the decorations intact.
Freezer: For longer storage, freeze the cheesecakes in a single layer on a baking sheet until solid, then transfer to a freezer-safe container for up to 2 months.
Reheating: To enjoy after freezing, thaw overnight in the fridge. For the best texture, avoid microwaving, as it can alter the cheesecake's consistency. Enjoy your Frankenstein Mini Cheesecakes refreshed!
Make Ahead Options
These Frankenstein Mini Cheesecakes are ideal for busy home cooks who want to save time without sacrificing flavor! You can prepare the crust and cheesecake filling up to 24 hours in advance. To ensure freshness, refrigerate the crust and filling separately. When you’re ready to bake, simply pour the cheesecake mixture over the crust and follow the baking instructions. After they cool, go ahead and decorate your cheesecakes; they can be stored in the refrigerator for an additional 3 days! Just make sure to keep them covered to maintain their delightful taste and texture. With these tips, you'll enjoy impressive, stress-free desserts at your next gathering!
What to Serve with Frankenstein Mini Cheesecakes?
Indulging in these whimsical treats is just the beginning; let’s transform dessert time into a festive feast!
-
Fresh Berry Medley: A vibrant mix of strawberries, blueberries, and raspberries provides a refreshing contrast to the rich cheesecakes, balancing sweetness with acidity. The juicy burst of berries enhances each bite of cheesecake deliciously.
-
Whipped Cream Delight: Light and airy whipped cream serves as a perfect companion, adding a smooth finish to the indulgence. You can flavor it with vanilla or even a hint of peppermint for fun!
-
Chocolate Fondue: Pair these mini cheesecakes with a chocolate fondue station for an interactive dessert experience. The melted chocolate creates a decadent dipping option that appeals to all ages!
-
Ice Cream Scoops: Classic vanilla or mint chocolate chip ice cream is a delightful contrast to the cheesecake's creamy texture. The cold and sweet combination will have everyone reaching for seconds!
-
Spooky Punch: Create a Halloween-themed punch with ginger ale, lime sherbet, and gummy worms. This fizzy and fun drink ties into the festive spirit while refreshing your taste buds!
-
Pumpkin Spice Cookies: Soft, spiced pumpkin cookies complement the flavors of the cheesecakes beautifully. Their warm, spiced notes provide a cozy touch to your Halloween gathering.
-
Chocolate-Covered Strawberries: These sweet treats pair well with the cheesecake, balancing the fun monster theme and providing a slightly healthier option. Their red color adds to the Halloween vibe while being utterly delicious!
-
Coffee or Hot Chocolate: A warm beverage brings a comforting finish to your spooky dessert. The rich taste of coffee or a creamy hot chocolate blends perfectly, allowing flavors to meld beautifully.
Frankenstein Mini Cheesecakes Recipe FAQs
How do I choose ripe ingredients for this recipe?
Absolutely! When selecting your cream cheese, look for a block that’s fresh and soft, with no dark spots or discoloration. For eggs, make sure they are fresh; a quick way to test them is by placing them in water—if they sink, they are good! Use your favorite brand of Oreo cookies for that delightful crust; quality matters here too!
How should I store leftover mini cheesecakes?
Very! After enjoying your Frankenstein Mini Cheesecakes, store any leftovers in an airtight container in the fridge for up to 3 days. Keeping them chilled helps maintain their creamy texture and keep the decorations intact. If they start to soften, it’s best to consume them sooner rather than later!
Can I freeze the mini cheesecakes for later?
Absolutely! To freeze your Frankenstein Mini Cheesecakes, place them in a single layer on a baking sheet until solid. This usually takes about 2-3 hours. Once firm, transfer them to a freezer-safe container or wrap them tightly in plastic wrap. They can be stored for up to 2 months. When you're ready to enjoy them, thaw overnight in the fridge for the best texture!
What should I do if my cheesecake doesn’t set properly?
If your cheesecake hasn’t set after baking, it might not have been baked long enough. Keep an eye on them while baking—look for a slight jiggle in the center when the time is up. If they’re still too soft, you can bake for an additional 5 minutes. Always allow them to cool completely; they'll firm up slightly in the fridge!
Are these mini cheesecakes safe for pets?
Very! While the ingredients in Frankenstein Mini Cheesecakes are safe for humans, they should not be given to pets. Chocolate, for example, is toxic to dogs and cats. Ensure your furry friends stick to their treats while you enjoy these delightful creations.
Do I have options for dietary restrictions?
Absolutely! If you're looking for a gluten-free version, simply use gluten-free Oreos for the crust. For a lower sugar option, you can replace regular sugar with a sugar substitute like erythritol. However, make sure to check the conversion ratios, as they can differ from sugar!
Spooktacular Frankenstein Mini Cheesecakes for Halloween Fun
Ingredients
Equipment
Method
- Preheat the oven to 350°F (175°C).
- In a mixing bowl, combine the crushed OREO cookies with melted butter and form 1-inch balls, pressing into the bottom of a mini cheesecake pan.
- In a large mixing bowl, beat together softened cream cheese, sugar, eggs, and vanilla until smooth.
- Gradually add flour to the mixture, ensuring it is fully combined.
- Add green food coloring gradually, mixing until the desired shade is reached.
- Pour the cheesecake mixture over the crusts in the mini cheesecake tins.
- Bake for 15 minutes until the edges are set and centers have a slight jiggle.
- Remove from oven and allow to cool completely in the pan.
- Melt chocolate chips in the microwave in 30-second intervals until smooth.
- Dip the top of each cheesecake into the melted chocolate and then into chocolate sprinkles.
- Pipe melted chocolate onto the tops of the cheesecakes to form mouths and designs.
- Attach edible eyes and chocolate chips as bolts using melted chocolate.


Leave a Reply