
As the leaves turn and the air grows crisp, my kitchen becomes a hub of creativity and festive joy. What better way to embrace the spooky season than with delightful Halloween Cakesicles? These fun treats not only use up leftover red velvet cupcakes, but they also feature a rich cream cheese frosting that elevates them to another level of deliciousness. In just about 45 minutes, you can whip up these crowd-pleasers, perfect for both parties and family gatherings. Plus, they’re a fantastic way to ignite the spirit of Halloween while keeping things homemade—because let’s face it, nothing beats the taste of a freshly made treat! Ready to dive into a world of sweet creativity? Let’s get started!
Why are Halloween Cakesicles so special?
Creativity at its finest: Halloween Cakesicles offer an inventive twist on traditional treats, making them visually stunning for any festive table.
Quick and Easy: With only 15 minutes of prep time, you’ll have these spooky delights ready in no time, giving you more hours for Halloween fun!
Delicious Blessing: The rich flavor of red velvet combined with cream cheese frosting is simply irresistible, ensuring they’ll be a hit with everyone.
Perfect for Leftovers: This recipe is a clever way to repurpose leftover cupcakes, minimizing waste while maximizing flavor.
Fun for All Ages: Whether you’re baking with kids or surprising friends, these cakesicles are sure to delight and entertain.
Elevate your seasonal treats with these scrumptious cakesicles that everyone will rave about!
Halloween Cakesicles Ingredients
• Craft these spooky treats with ease!
For the Cake Mixture
- Leftover red velvet cupcakes – These crumbled delights give the cakesicles their rich and festive flavor.
- Cream cheese frosting – This creamy goodness binds the cupcakes together and adds a deliciously sweet twist.
For the Coating
- Coating chocolate or candy melts – Choose your favorite for a smooth and elegant outer layer that seals in all the deliciousness.
- Food coloring – Use oil-based or powdered for vibrant Halloween hues to make your cakesicles even more festive.
With these Halloween Cakesicles ingredients, you're well on your way to creating delightful treats that are perfect for any spooky celebration!
Step‑by‑Step Instructions for Halloween Cakesicles
Step 1: Mix the Cake Base
In a large mixing bowl, combine 2 cups of crumbled leftover red velvet cupcakes with 1 cup of cream cheese frosting. Use a spatula to blend them together until they're completely mixed and the texture is smooth and moist, ensuring no dry cake bits remain. This mixture should come together beautifully, creating a rich, velvety dough perfect for shaping.
Step 2: Shape the Cakesicles
Grab your cakesicle molds and begin packing the cake mixture into each cavity. Press firmly but gently to ensure the mixture holds its shape without leaving air pockets. You want each cakesicle to be packed tightly, providing structure when frozen. Once filled, smooth the tops with a spatula, then set the molds aside for the next step.
Step 3: Freeze to Firm Up
Place the filled cakesicle molds in the freezer and let them chill for at least 30 minutes. This will solidify the cake mixture, ensuring that your Halloween Cakesicles maintain their shape during the coating process. Keep an eye on them, and you'll know they're ready when they feel firm to the touch.
Step 4: Melt the Coating
While the cakesicles are firming up, melt 12 ounces of coating chocolate or candy melts according to the package instructions. Use a microwave-safe bowl and heat in 30-second intervals, stirring in between until it's fully melted and smooth. The melted chocolate should have a glossy appearance, ready for dipping your Halloween Cakesicles.
Step 5: Coat the Cakesicles
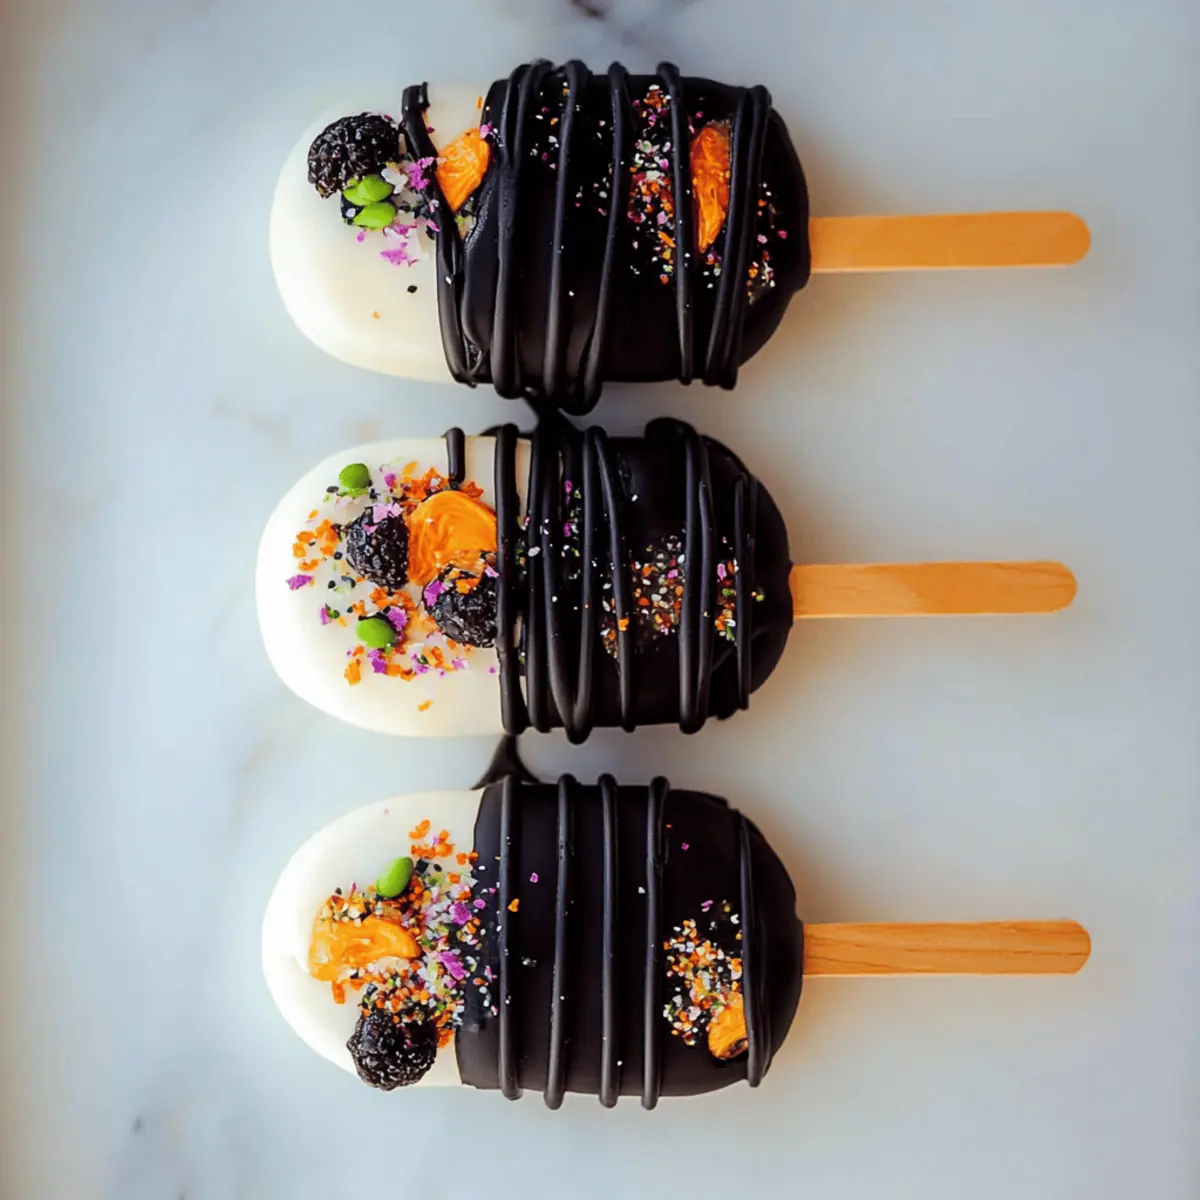
Carefully remove the cakesicles from the molds once they are frozen solid. Dip each cakesicle into the melted chocolate, ensuring they are evenly coated. Allow any excess chocolate to drip off before placing them on a parchment-lined baking sheet. This will ensure a clean finish and a perfect layer of chocolate on your spooky treats.
Step 6: Set and Decorate
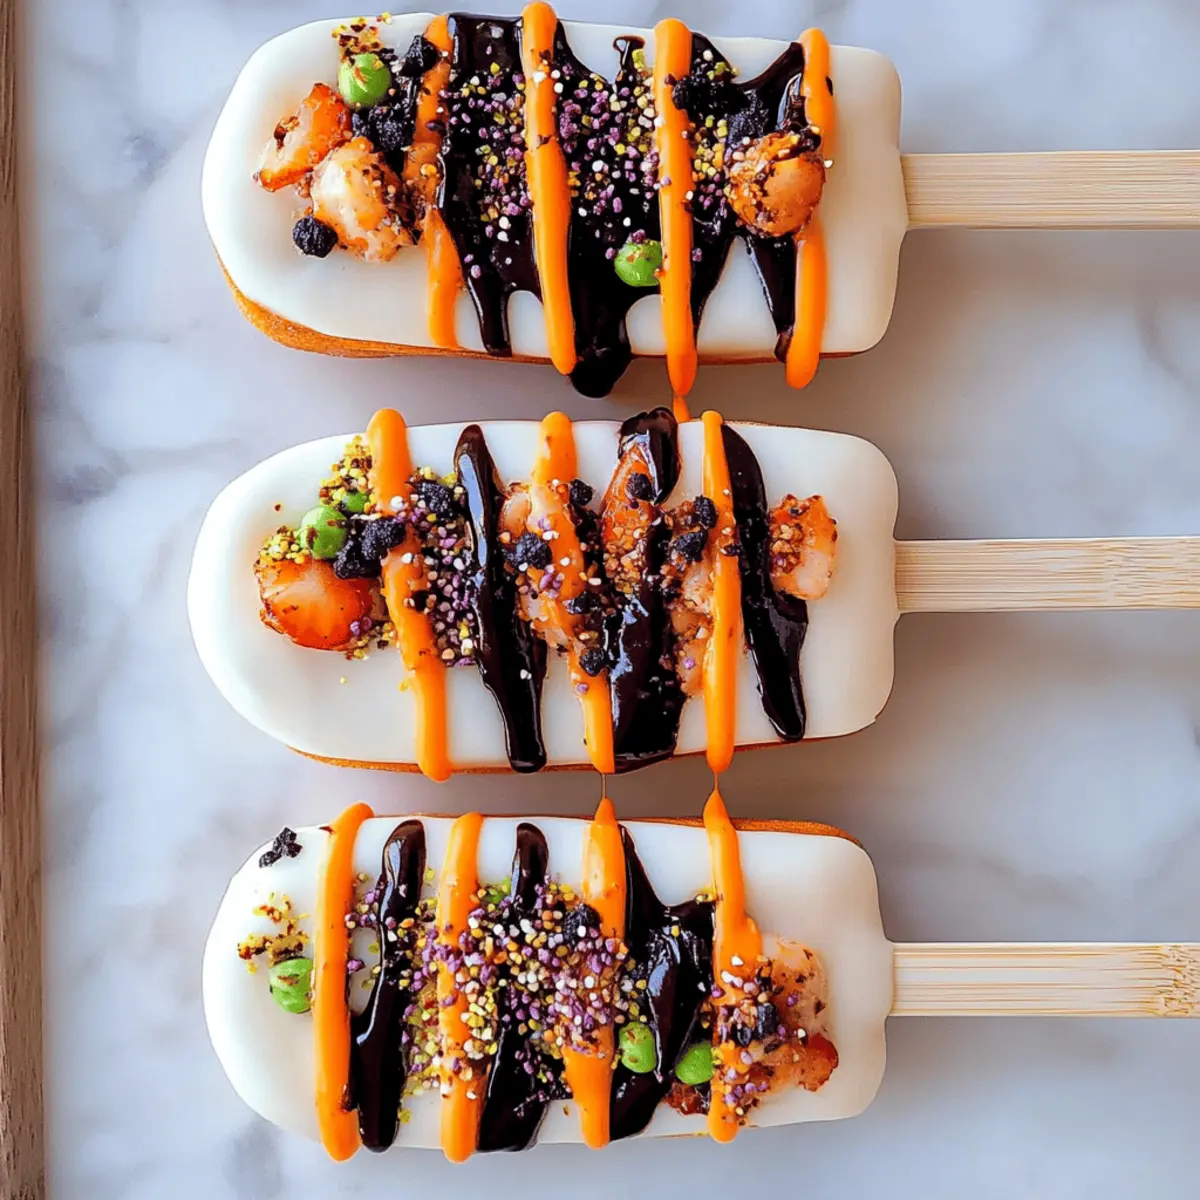
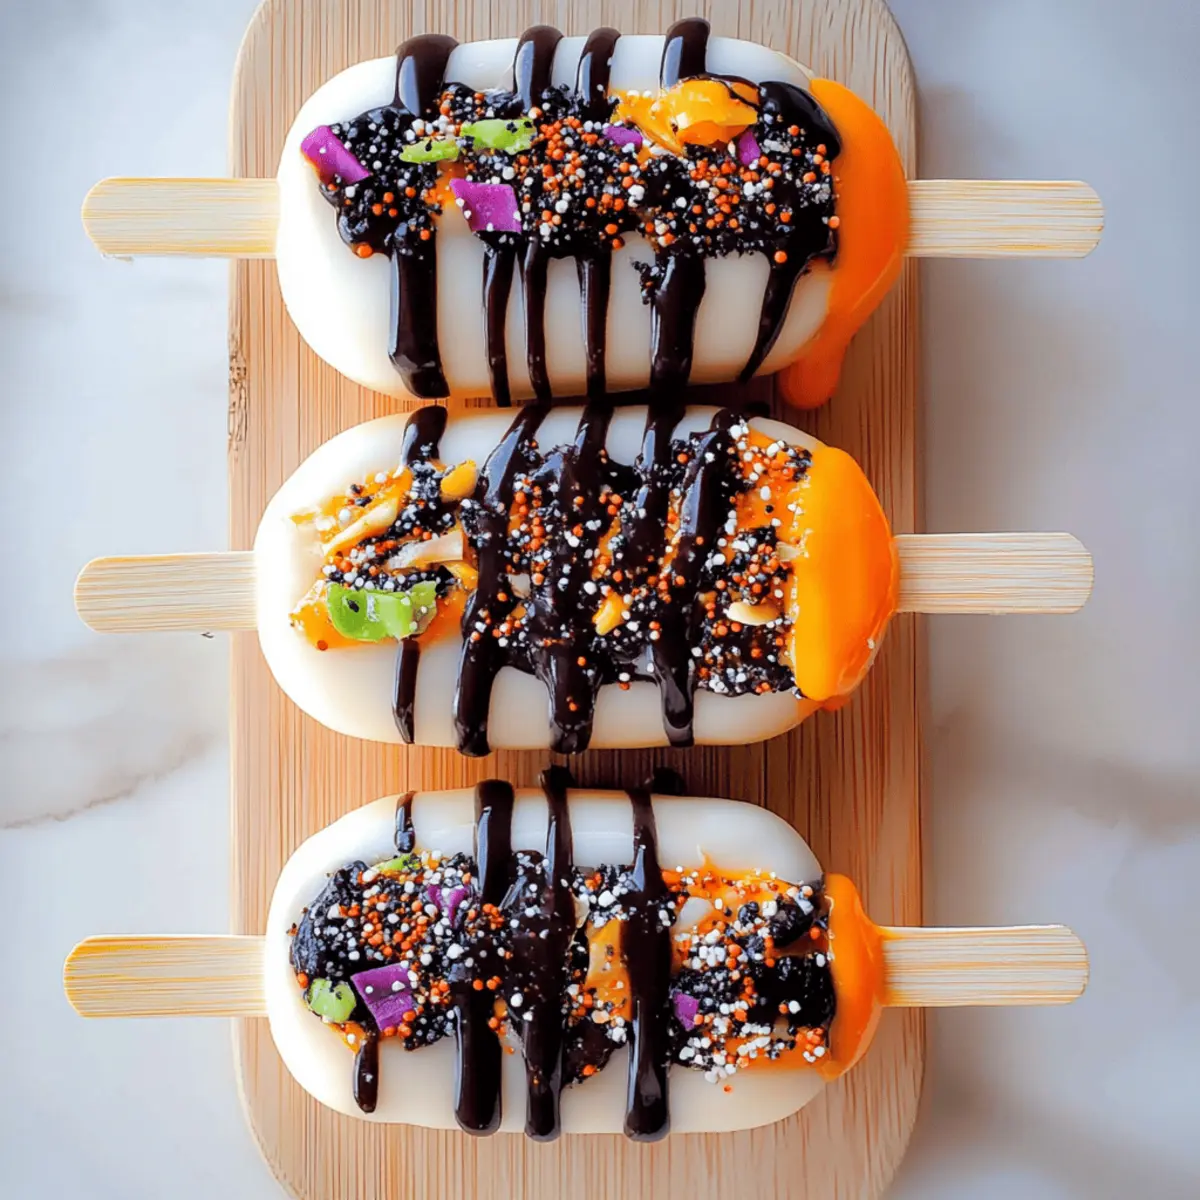
Upon coating, let your Halloween Cakesicles sit on the baking sheet until the chocolate has set firmly. This can take about 15-20 minutes at room temperature. For an extra festive touch, drizzle additional melted chocolate over the top and sprinkle your favorite toppings to add color and flair. Let your creativity shine during this decorating process!

Make Ahead Options
These Halloween Cakesicles are a lifesaver for busy home cooks looking to streamline their festive preparations! You can easily prepare the cake mixture (crumbled red velvet cupcakes combined with cream cheese frosting) up to 24 hours in advance. Simply mix the ingredients, pack them into the molds, and freeze them. Once frozen, transfer the cakesicles to an airtight container and keep them in the freezer for up to 3 days. When you’re ready to serve, just melt the coating chocolate and dip each cakesicle as instructed, maintaining their deliciousness and festive charm. This way, you’ll have show-stopping treats ready to go with minimal last-minute effort!
What to Serve with Halloween Cakesicles
As you prepare to indulge in these delightful treats, let’s create a full Halloween-inspired feast that tantalizes the taste buds.
-
Mummy Dogs: These adorable crescent-wrapped hot dogs make for a savory treat that pairs well with sweet cakesicles, bringing a playful balance to your spread.
-
Pumpkin Soup: A warming bowl of creamy pumpkin soup adds a touch of seasonal flavor that complements the sweetness of the cakesicles beautifully.
-
Spiced Apple Cider: The warmth and spices of apple cider create a cozy drink alongside your cakesicles, making every bite and sip feel festive.
-
Chocolate-Dipped Pretzels: Salty and sweet, these easy-to-make treats are a fun contrast to the rich flavors of Halloween Cakesicles, perfect for snacking.
-
Ghostly Marshmallow Pops: These spooky delights echo the theme while offering a fluffy, sweet sensation, creating an appealing dessert platter.
-
Candy Corn Cupcakes: Boost the festive vibe with these fun cupcakes; their playful presentation ties perfectly into the Halloween theme and pairs spectacularly with cakesicles.
-
Caramel Apples: A classic fall treat, the crunch of the apple and the richness of the caramel are a delightful way to enhance your Halloween celebration.
Craft your spooky spread with these delicious additions, and you’ll have a hauntingly delightful gathering that no one will forget!
Halloween Cakesicles Variations & Substitutions
Feel free to unleash your creativity and make these cakesicles uniquely yours with these fun twists!
-
Vegan:
Substitute leftover cupcakes with vegan red velvet cupcakes and use a dairy-free cream cheese alternative. They'll be just as delicious! -
Gluten-Free:
Use gluten-free red velvet cupcakes to delight those with dietary restrictions, ensuring everyone can enjoy the festivities. -
Choco-Mint:
Add a few drops of peppermint extract to the cream cheese frosting for a refreshing twist that pairs perfectly with chocolate. -
Nutty Flavor:
Incorporate crushed walnuts or pecans into the cake mixture for added crunch and a delightful nutty essence. -
Spice It Up:
Mix in a pinch of cinnamon or nutmeg to the batter for a warm, autumnal spice that enhances the red velvet flavor. -
Decorative Sprinkles:
After coating in chocolate, sprinkle festive Halloween decorations like candy eyes or colored sprinkles for a spooky touch. -
Caramel Drizzle:
Drizzle melted caramel sauce over the coated cakesicles for a sweet and decadent finishing touch, elevating the flavor experience.
These variations allow you to personalize your Halloween Cakesicles, turning them into scrumptious treats that reflect your taste! For more sweet inspiration, check out my Pumpkin Spice Cupcakes or try making some Chocolate-Dipped Strawberries for an exquisite pairing at your Halloween party!
How to Store and Freeze Halloween Cakesicles
Fridge: Keep your Halloween Cakesicles in an airtight container in the fridge for up to 3 days to maintain freshness and flavor.
Freezer: For longer storage, wrap each cakesicle individually in plastic wrap and place them in a freezer-safe container. They can last for up to 2 months, ensuring your spooky treats are always ready to delight!
Reheating: While these treats are best enjoyed chilled or at room temperature, you can let them sit out for about 10 minutes before serving to enhance their texture and taste.
Defrosting: To thaw, simply transfer your frozen Halloween Cakesicles to the fridge for a few hours or overnight before enjoying.
Expert Tips for Halloween Cakesicles
Use the Right Consistency: Ensure the cake mixture is moist but not too sticky. If it doesn't hold its shape, add a little more frosting.
Freeze Thoroughly: Don’t skip the freezing step! Properly firm cakesicles help maintain their shape when dipped in chocolate.
Melting Chocolate: Heat chocolate gently and avoid overheating, which can create a gritty texture—smooth is what we want for your Halloween Cakesicles!
Practice Dipping: Dip quickly but gently; you want a thick layer of chocolate. A second dip can help create a prettier finish.
Decorative Toppings: Get creative with toppings! Sprinkles, nuts or even edible glitter can make your cakesicles stand out for the Halloween festivities.
With these tips, you’ll avoid common mistakes and create delicious Halloween Cakesicles that are sure to impress!
Halloween Cakesicles Recipe FAQs
How do I choose the right red velvet cupcakes?
When selecting red velvet cupcakes for your Halloween Cakesicles, ensure they are fresh and not overly dry. Look for cupcakes that are moist with a rich color—avoid any with dark spots or signs of spoilage. If you're using leftover cupcakes, it's best to use them within a day or two for optimal flavor.
What’s the best way to store leftover Halloween Cakesicles?
To keep your Halloween Cakesicles fresh, store them in an airtight container in the refrigerator. They will stay delicious for up to 3 days. If you want to keep them longer, consider wrapping each cakesicle individually in plastic wrap and placing them in a freezer-safe container. This way, they can last for up to 2 months in the freezer.
Can I freeze Halloween Cakesicles?
Absolutely! To freeze your Halloween Cakesicles, first, wrap each one in plastic wrap. Then, place them in a freezer-safe container or a zip-top bag to prevent freezer burn. They can be kept in the freezer for about 2 months. When you’re ready to enjoy, simply let them thaw in the fridge for a few hours or leave them at room temperature for around 10 minutes.
What if my chocolate coating is too thick?
If you find that your chocolate coating is too thick, which can happen sometimes, you can add a small amount of vegetable oil or shortening to the melted chocolate. Start with just a teaspoon, adding a little more as needed until you reach a smooth, pourable consistency. This will help ensure a nice, even coat on your Halloween Cakesicles.
Are Halloween Cakesicles suitable for those with allergies?
When it comes to allergies, it’s always best to check your specific ingredients. The classic ingredients in Halloween Cakesicles typically include gluten (in the cupcakes), dairy (in cream cheese frosting), and potentially nuts if you add certain toppings. If someone has dietary concerns, consider making gluten-free cupcakes and using dairy-free alternatives to the frosting and coating for a safe treat.
How long do Halloween Cakesicles take to set after coating?
After you've dipped your cakesicles in the melted chocolate, it typically takes about 15-20 minutes at room temperature for them to set completely. To speed up the process, you can place them in the fridge for about 10 minutes, but be sure to watch that they don't get too cold, which can affect the texture.
Spooky Sweet Halloween Cakesicles for Your Festive Treats
Ingredients
Equipment
Method
- In a large mixing bowl, combine the crumbled red velvet cupcakes with cream cheese frosting, mixing until smooth.
- Pack the cake mixture into cakesicle molds tightly, smoothing the tops with a spatula.
- Place the filled molds in the freezer for at least 30 minutes to firm up.
- Melt the coating chocolate in a microwave-safe bowl, stirring until smooth.
- Carefully dip each cakesicle into the melted chocolate, letting excess drip off.
- Let the coated cakesicles sit on a baking sheet until the chocolate sets, then decorate as desired.


Leave a Reply